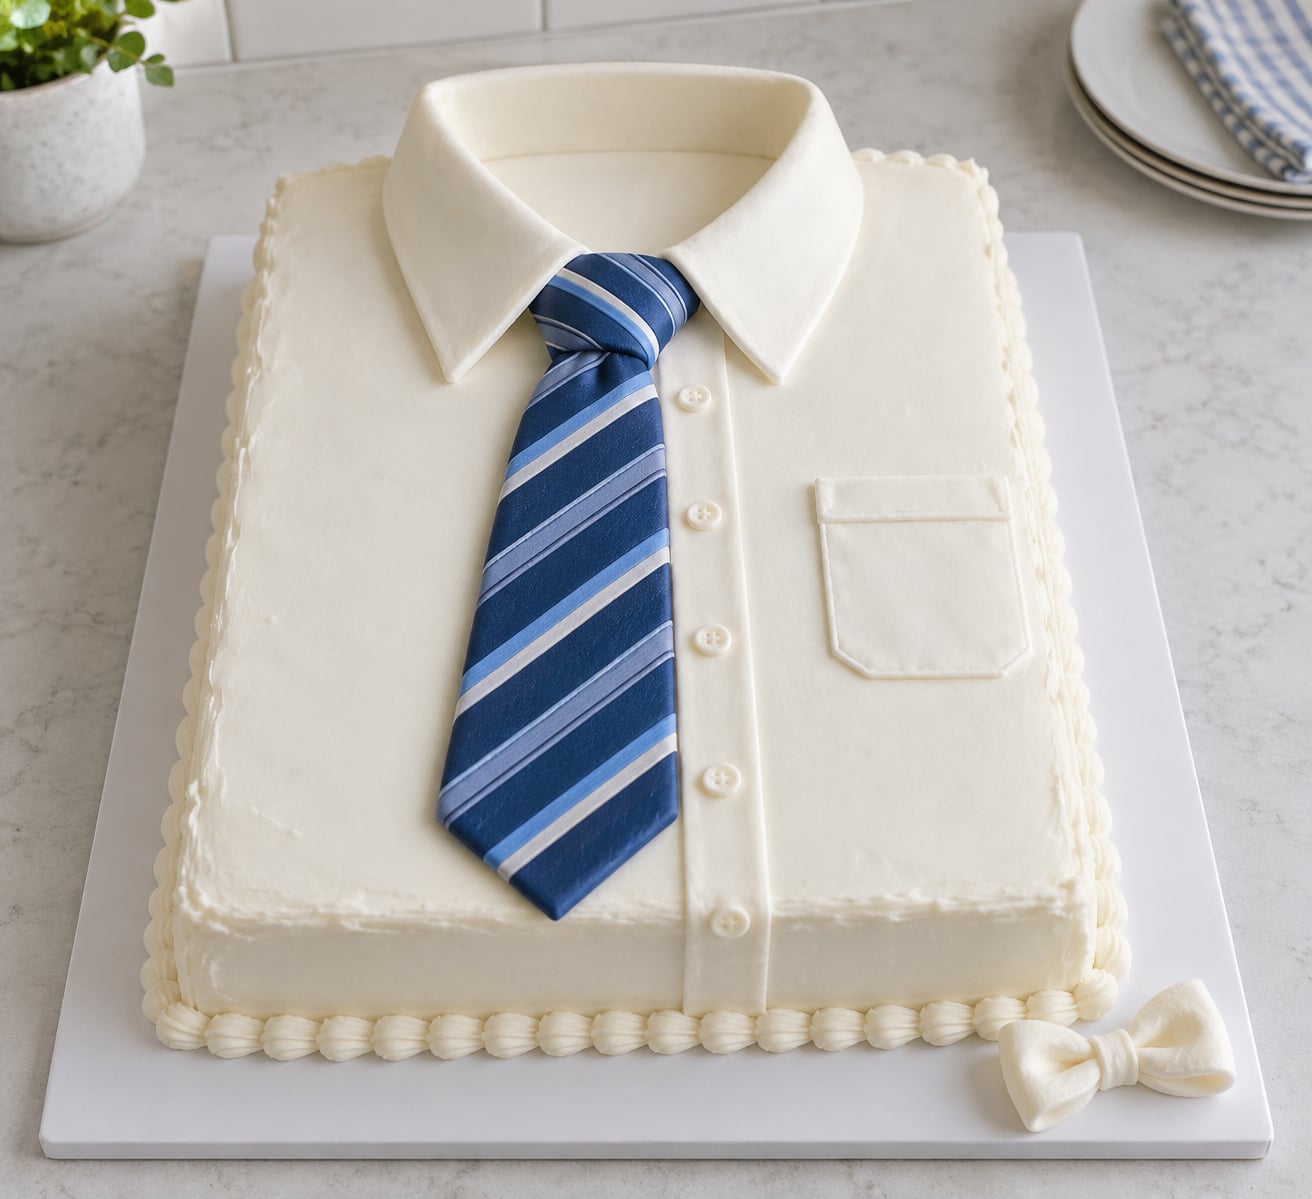
A Father’s Day tie cake is a plain rectangular sheet cake covered in one sheet of white fondant, with a coloured necktie, a folded collar and a small breast pocket stuck on top. No carving, no tiered stacking and no professional kit. Give yourself an afternoon for the baking and about an hour for the decorating, and it works from a shop-bought sponge just as well as one you bake yourself.
Most of the fear around this design comes from fondant, and honestly some of that fear is deserved. It tears, it sticks to everything, and it cracks when you roll it too thin. But the fix is boring and repeatable: roll to a quarter inch, glue with boiled water, and let each piece dry before it touches the cake. Follow those three rules and the shirt and tie cake reads as a shirt every time.
This is still one of the most useful Father’s Day cake ideas for dad going around, and the same design carries over to a birthday, a retirement or a graduation without a single change to the method. Where the steps below mention quantities, I’ve given metric and US cups or ounces so you don’t have to convert anything mid-pour.
Table of Contents
- What You Need
- Cake
- Buttercream for the crumb coat
- Fondant for the shirt and details
- Tools
- Substitutions
- Step-by-Step: How to Make a Father Day Cake with a Tie Design
- Bake and Level the Cake
- How to Make the Tie Shape From One Roll of Fondant
- Apply the Crumb Coat and Fill the Tie
- Color and Pipe the Tie Details
- Add Finishing Touches and Serve
- The no-fondant version for kids and nervous first-timers
- How far ahead you can make each part
- Common Mistakes
- Frequently Asked Questions
- What is the easiest cake shape for a Father’s Day tie design?
- Can I make the tie design on a rectangular cake?
- How do I keep the tie stripes from smearing?
- Can I use cupcakes instead of a shaped cake?
- How should I store a decorated Father’s Day cake?
- Can I use fondant or modeling chocolate for the tie details?
- Conclusion
What You Need
A shop-bought cake is genuinely fine here, and I’d rather you spend your time on the decorating than on a sponge. The list below covers both routes.
Cake
- One 9×13 inch (23x33cm) rectangular sponge, homemade or shop-bought, or three 8 inch (20cm) round cakes joined into a rectangle
- A 10×14 inch (25x35cm) cake board, which should be a couple of inches larger than the cake on every side
Buttercream for the crumb coat
- About 500g (1 and a quarter cups) of buttercream, firm enough to hold a knife line but not rock hard
- One recipe of standard buttercream, or half a tub of shop-bought frosting if you want to skip the mixing
Fondant for the shirt and details
- 1.2kg to 1.4kg (about 2 and a half to 3 boxes, 2lb 8oz to 3lb) of white ready-to-roll fondant for the cake itself
- 250g to 300g (8oz to 10oz) of a second colour for the tie, the knot and the pocket
- An accent colour in gel form for stripes, dots or buttons, or about 20g (3/4oz) of black fondant for shirt buttons
If you’d rather not buy three boxes, buy one large box and the single-colour buttons and dots as edible decoration instead. It looks busier, not worse.
Tools
- A rolling pin and a small sharp knife or a paring knife
- A pastry brush and a cup of boiled water cooled to room temperature, which is your edible glue
- A toothpick for stitching detail on the pocket
- A small round piping tip or a clean chopstick for dots, buttons and lettering
- A ruler or tape measure, plus a pen, to mark the tie before you cut
A cake smoother is lovely but not essential. A clean, warmed palette knife held flat against the sides does the same job, and cornflour dusted on the work surface keeps the fondant from welding itself to your counter.
Substitutions
Ready-to-roll icing works identically to fondant. Modelling paste or flower paste is stiffer and holds a sharper edge for the knot and collar points, so it’s the better choice if you want a crisp silhouette. Rolled wafer paper is the nut-free option for anyone avoiding gluten in a celebration, and it behaves like fondant in every way except that it dries rather than sets by fat.
For a house where somebody has a nut allergy, check every ingredient label before you start, including the sprinkles and the chips you might use for buttons. Many standard sprinkles carry a nut warning.
Step-by-Step: How to Make a Father Day Cake with a Tie Design
Bake and Level the Cake
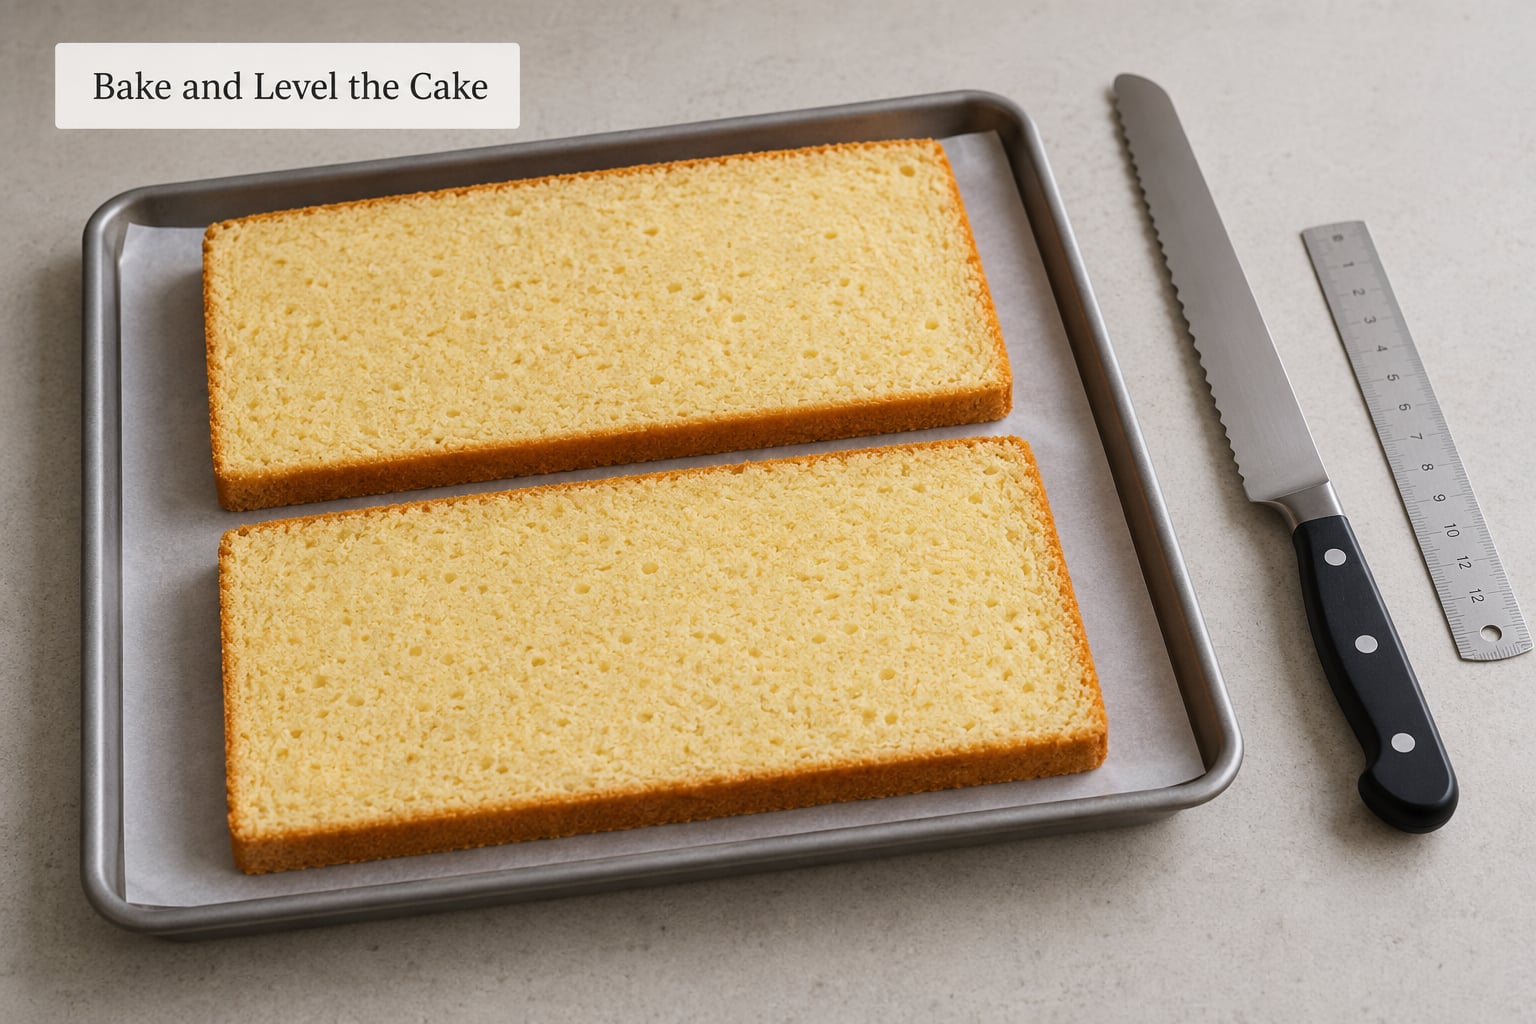
Bake one 9×13 inch (23x33cm) sponge at 180C (350F) for 35 to 40 minutes, until a skewer comes out with just a crumb or two. If you are using a box mix, follow the tin instructions rather than mine, because boxes vary by a good ten minutes.
Cool it completely on a wire rack before you touch it. A warm cake sweats buttercream into a puddle and the fondant will slide off the top the next day.
Trim the domed top off with a serrated knife held at a low angle, working from the back edge toward you and taking off thin slices. You want a surface that a straightedge ruler laid across it will not rock on. If it rocks, take another slice.
Turn the cake out onto your board. It worked for me the first time and it will for you, and the flat side up is the side the fondant goes on.
How to Make the Tie Shape From One Roll of Fondant
Make the tie, the knot and the collar before the cake is covered, because they want time to dry and they are much easier to cut flat on a board than wrapped around a cake.
Knead the coloured fondant until pliable, then roll it to a quarter inch (6mm) thickness. Roll until you can just see your hand’s shadow through it. Thinner than that and it cracks at the folds; much thicker and it looks like a paving slab.
Place a real tie on the fondant, or trace one on paper first. Cutting around a real tie is the single best trick in this whole method, and it costs nothing. A man’s dress tie has a wide top, a knot, and a blade that tapers to a point.
Mark the centre line with a ruler and pen before any cutting. Cut the knot first as a small trapezoid roughly 5cm (2in) across, then the wide blade of the tie below it, then the pointed tail. Cut the knot last of the three if you want the blade to tuck under it neatly.
Make the tie long enough to run all the way to the front edge of the cake and touch the board. A tie that stops short leaves the raw front edge of the sponge showing, which is the detail that gives the whole illusion away.
For the collar, roll one more piece of white fondant about 10mm (a bit thicker than the tie) and cut a strip that spans 60 to 70 percent of the cake’s top width. Too small a collar is the single most common botched element on this cake, and it looks worse than no collar at all. Mark it against the cake with a ruler before you lift the knife.
Lay the collar pieces as a V under the knot so they look like the shirt is folded open. Cut a separate small strip, fold it over the top of the V, and pinch the fold with your fingers to sharpen it.
Apply the Crumb Coat and Fill the Tie
Do you ice a cake before applying fondant? Yes, always. You spread a thin layer of buttercream over the whole cake first, and that layer, called a crumb coat, seals in crumbs so nothing shows through the fondant.
Smooth the buttercream over the top and down all four sides with a palette knife, then scrape it level so the edges are square rather than rounded. Chill the cake for 20 minutes, or 15 in the freezer, until the buttercream is firm to the touch.
Roll the white fondant to a rectangle about 5cm (2in) bigger than the cake on every side. Lift one edge with a clean nonstick sheet or a rolling pin and lay the fondant gently over the top, working toward the far side rather than dropping it.
Smooth the fondant with your palms, then down the sides with a smoother or a flat palette knife held vertical. Trim the overhang at the base with a sharp knife while the cake is still cold.
Press the cake gently from the bottom up onto the fondant so any air pockets leave from the sides, then turn the whole thing over. Almost every crack and tear on this cake comes from trapped air being pushed the wrong way.
Color and Pipe the Tie Details
Thin a spoonful of buttercream with a drop of water, paint the tie’s back surface lightly, and lay it on the cake from the bottom edge upward. Smooth it down with the flat of your hand so it follows the fondant instead of hovering over it.
Glue the collar pieces in place the same way, then add the knot on top so it overlaps the collar join and hides it.
For diagonal stripes, roll a thin strip of a second colour about 1cm (3/8in) wide, lay it over the wet or tacky tie, and press the edges down with your finger. Every third stripe, not every one, or the tie reads as a barber pole.
For polka dots, use a small round piping tip or a clean chopstick and press gently, so the dots sit flat like real spots on a tie. Buttons come from a rolled black fondant ball with a real button pressed into it before it sets.
To add the breast pocket, cut a shape roughly 8cm (3in) wide, curve the top edge down with your fingers, and glue it on one side of the tie. Run a toothpick through the folded edge in a straight line to make stitching.
Add Finishing Touches and Serve
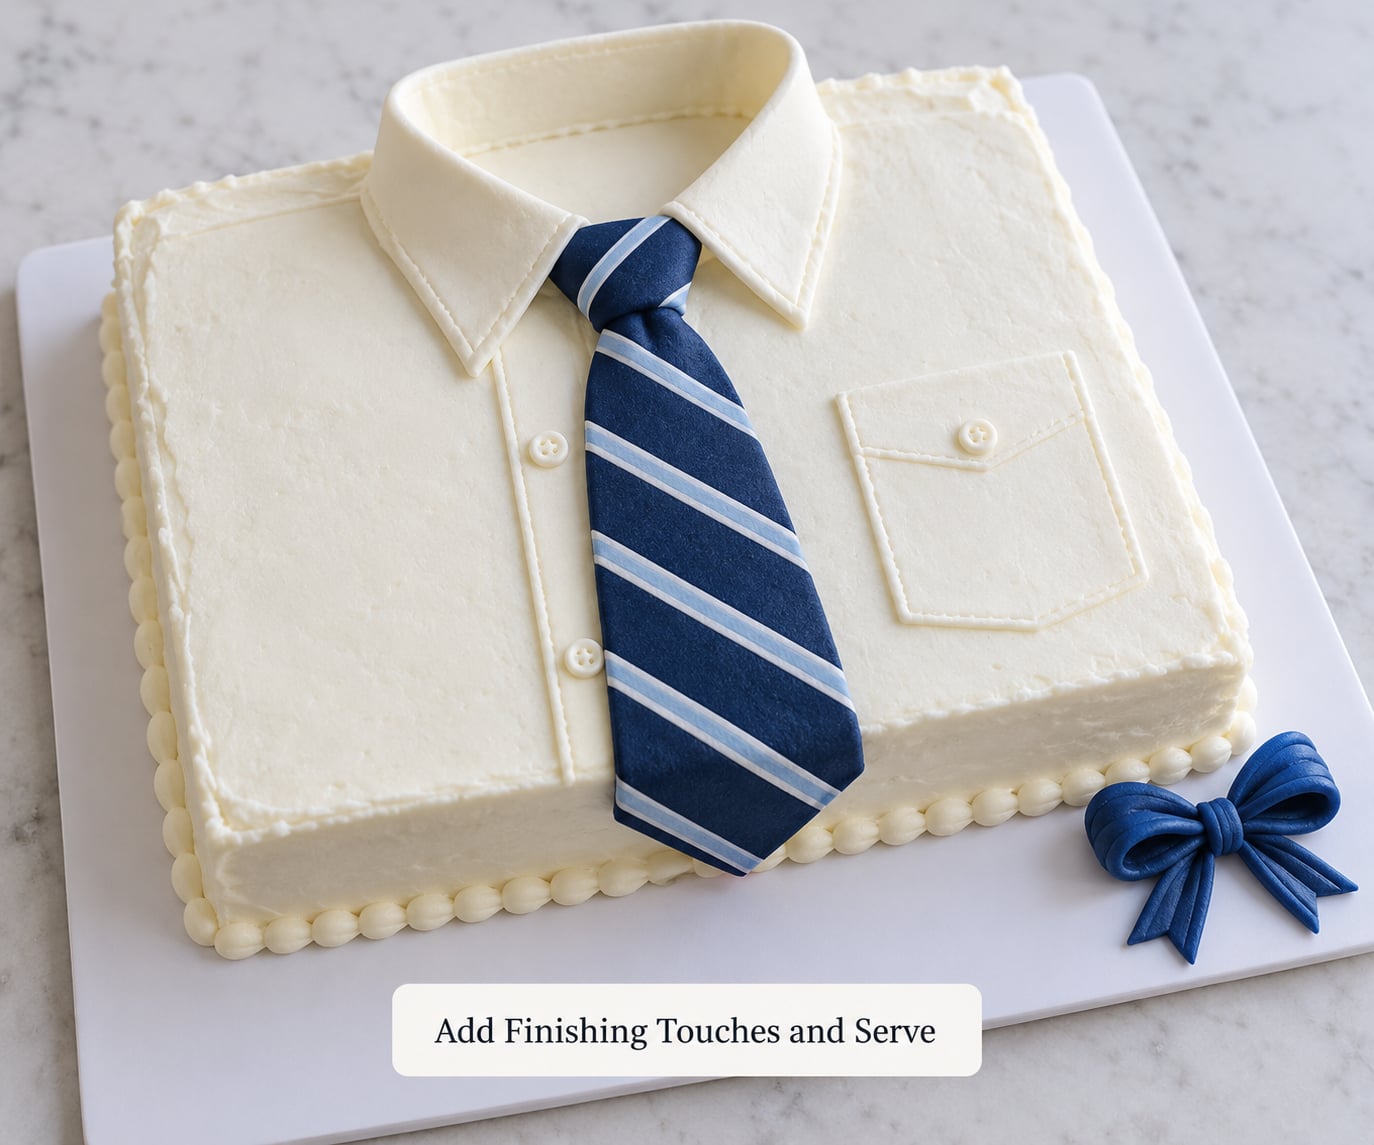
Let every fondant piece dry to a firm touch before you handle the cake for moving or transport. Two hours on a board at room temperature is usually enough for small pieces, longer in a humid kitchen.
Letter the board rather than the cake if you want personalised lettering. Pipe the name and age on the uncovered fondant border, or press them from Tappit style letter cutters into a thin fondant strip and glue it down. Letters piped straight onto a wet fondant tie will slide; letters on a set board will not.
Add edible shimmer or lustre dust sparingly with a dry brush, and keep to one accent so the shirt stays a shirt.
Chill the finished cake for 15 minutes before the first cut. It firms the buttercream at the board line and the cake slices far more cleanly.
The no-fondant version for kids and nervous first-timers
This route takes about 30 minutes and needs no baking at all, and it is honestly the one I would make for a children’s party.
- Take a plain rectangular sponge or shortbread cake and frost it white, using a straight back-and-forth stroke to leave visible lines like a shirt’s texture.
- Pipe a tie knot at the top centre with white cookie icing, then build the tie downward one row at a time, adding a piece to each side on every third row until it is as wide as you want.
- Taper the bottom by taking away two pieces at a time until you reach a single piece, and pipe a rounded point.
- Lay the tie in stripes of two or three colours, then add a piped V collar above it and a piped pocket on one side.
The arithmetic is simple enough that a child can place the pieces, which is the real appeal. Candy pieces, sprinkles or a couple of chocolate buttons stand in for anything that needs to be edible-but-hard.
How far ahead you can make each part
Plan backwards from brunch time rather than forwards from today, because the elements have very different deadlines.
- Up to a week ahead: the tie, knot, collar and pocket. These dry best on a flat board at room temperature, away from steam, and only need to stay under a box or upturned bowl so they do not pick up dust.
- Two days ahead: the board, if you are covering it in fondant, and any piped lettering on a separate strip.
- The day before: bake the sponge, level it, and crumb coat it. Wrap the cake in cling film and refrigerate.
- The morning of: roll and drape the fondant, attach the dried details, and chill for 15 minutes before serving.
A fondant-covered cake keeps 3 to 5 days in a cool room covered by a cake dome. If your buttercream is the American-style kind with milk in it, refrigerate it and take it out about an hour before serving. Always go by the label on your own frosting, since recipes vary.
Common Mistakes
Almost every complaint I have seen about shirt and tie cakes is one of six problems, and all six have a fix. Read this before you start rather than while you are mid-panic with torn fondant in your hands.
The fondant cracked while I rolled it. You rolled it thinner than a quarter inch or your work surface was too cold. Knead a little more cornflour into the area, press the seam closed with your thumb, and keep rolling. Dust the surface with cornflour rather than flour, which is the version of this mistake most beginners make first.
It tore when I draped it over the cake. Either the cake was not cold enough or you dropped it instead of laying it. Chill the crumb-coated cake properly, lift the fondant on a clean nonstick sheet, and start at the back edge. If you have already torn it, patch from underneath with a piece of the same colour and no one will ever find it.
The fondant stuck to the board, the counter or itself. Work on a lightly dusted surface, and knead each piece separately. Do not knead fondant on a surface dusted with water, because that is what welds it to itself.
The collar came out too small or lopsided. Measure the cake, then measure the strip, then mark it before cutting. If it already looks narrow when held over the cake, cut a new one. Re-cutting takes 30 seconds; disguising a narrow collar takes much longer.
The layers slid or the cake sagged on the board. You did not fill or support it. Cake board dowels or even a few extra straws pushed through the sponge stop any movement, and a firm, level buttercream layer that is not too soft stops the sag. Fillings like jam and curd are fine as long as the buttercream around them is solid.
The stripes smeared or the colour bled. You applied gel colour directly onto the tie, or you piped on a wet surface. Tint the accent fondant before you roll it, or pipe with stiff buttercream onto a dry piece. Let each stripe set for a few minutes before you add the next, and keep gel colour out of your main buttercream unless you want a tinted crumb coat.
What will fondant not stick to? It will not reliably stick to a greasy or buttery surface, a wet one, or a cold one. Glue with boiled and cooled water or clear alcohol, both of which evaporate and leave a bond. Fondant also struggles to adhere to a cake that is at room temperature and moving, which is another argument for chilling before assembly.
The letters slid off the cake. Pipe lettering onto the fondant border or the board where it is flat and dry, not onto the tie or the collar, which are curved and narrow. If you pipe straight onto fondant, hold the tip still and let the buttercream push itself out slowly rather than forcing it.
What is the most important rule when using fondant? Measure before you cut, and let each piece dry before you attach it. Almost every other mistake in this list comes from rushing one of those two steps.
Frequently Asked Questions
What is the easiest cake shape for a Father’s Day tie design?
A rectangle is by far the easiest, and a 9×13 inch (23x33cm) sheet cake is the standard size. It reads as a torso with no shaping work at all. A round cake works too, though it looks more like a shirt on a head than a shirt. Three joined round cakes make an excellent rectangle if that is all you have.
Can I make the tie design on a rectangular cake?
That is exactly what the design is for. Cover the rectangle in white fondant, then attach the tie down the centre, the collar in a V at the top edge, and the pocket beside the tie. No carving and no stacking, which is why this is the version most beginners finish on their first attempt.
How do I keep the tie stripes from smearing?
Work on a firm, dry surface and let each stripe sit for a few minutes before laying the next one over it. Roll accent stripes from tinted fondant rather than painting colour onto the tie, and keep gel food colour out of the buttercream you are piping with. Warm hands and a humid kitchen are the usual culprits.
Can I use cupcakes instead of a shaped cake?
Yes, and it is a lovely way to serve the same idea at a party. Pipe a shirt collar in buttercream on top of each cupcake, then add a small fondant or chocolate tie with its knot. Make the ties a few days ahead and store them airtight on a tray, then add them just before the cupcakes go out.
How should I store a decorated Father’s Day cake?
Fondant-covered cakes keep 3 to 5 days in a cool room under a cake dome or large upturned bowl. If your buttercream contains milk or cream, refrigerate the cake and bring it out about an hour before serving. Transport it flat on a nonstick sheet, never in a car boot, and never stack anything on top.
Can I use fondant or modeling chocolate for the tie details?
Both work well. Modelling chocolate sets harder and gives the tie knot and collar points a sharper edge than fondant ever will, and it holds its shape in a warm room. It is heavier, so glue it on with cooled boiled water or clear alcohol. For a nut-free table, rolled wafer paper behaves like fondant and dries completely overnight.
Conclusion
The first thing to do is not the cake. Roll your second colour to a quarter inch, cut the tie and the collar with a ruler in your hand, and leave both on a board to dry for a couple of days. Dry pieces are far easier to place than soft ones, and that single head start removes most of the frustration people report with this design.
Then, on the day, crumb coat the chilled sponge, drape the white fondant from the back edge forward, and press it on from the bottom up so no air is trapped. Attach the dried tie, chill the cake for 15 minutes before the first slice, and do the lettering on the board rather than on the tie. That is the whole job, and the result reads as a proper dress shirt from across the table.