
How to make Easter egg cookies with royal icing is mostly two jobs done in the right order: bake a sugar cookie dough you can roll and cut cleanly, then decorate it with an icing that dries hard enough to handle and stack. The whole project takes about two days of actual work, and the second day is mostly waiting for icing to dry.
The fiddly part for beginners is not piping skill. It is judging how thin the icing should be, which is why this guide gives you a consistency test with numbers instead of words like “thick enough.”
Table of Contents
- What You Need
- Sugar cookie dough
- Royal icing
- Tools
- How to Make Easter Egg Cookies with Royal Icing: Step-by-Step
- How to Make Easter Egg Cookies with Royal Icing: Make the Cookies
- Outline the Egg Shapes
- Flood With Easter Colors
- Add Patterns and Finishing Details
- Dry, Store, and Serve the Cookies
- Common Mistakes
- Frequently Asked Questions
- Can I use a sugar cookie recipe for Easter egg cookies with royal icing?
- How do I keep royal icing from cracking on egg-shaped cookies?
- What consistency should royal icing be for outlining cookies?
- How long should Easter egg cookies dry before storing them?
- Can I freeze cookies decorated with royal icing?
- Conclusion
What You Need
You need a dependable sugar cookie dough, royal icing made with powdered sugar and meringue powder, gel food colouring, and about five tools. Everything below makes roughly 20 egg-shaped cookies plus extra dough for mistakes, which you will have.
Sugar cookie dough
- 1 cup (225g) unsalted butter, softened
- 3/4 cup (150g) granulated sugar
- 1 large egg plus 1 egg yolk
- 1 teaspoon vanilla extract
- 1 teaspoon baking powder
- 1/2 teaspoon fine salt
- 3 cups (360g) all-purpose flour, plus more for rolling
Royal icing
- 4 cups (480g) confectioners’ sugar, sifted
- 3 tablespoons meringue powder
- 1 tablespoon light corn syrup, optional, for extra gloss
- 2 tablespoons lukewarm water, plus more for thinning
- 1/2 teaspoon vanilla extract, optional
- Gel food colouring in pastel shades
Meringue powder is the dried equivalent of egg white, so this icing sets without any raw egg. If you prefer fresh egg whites, use 2 large whites instead of the meringue powder, whip them to soft peaks, and fold the sugar in. Raw egg icing carries a raw egg allergen, which matters if you are baking for people who avoid it. Use pasteurised egg whites or the meringue powder version instead.
Tools
- A 2 to 3 inch egg-shaped cookie cutter, or an oval cutter and a small ball cutter you can assemble the shape from
- A #1 or #2 round piping tip for outlines and fine detail
- A #4 or #5 round piping tip for flooding
- Two small disposable piping bags, plus a coupler if you have one
- A small bowl of water and a clean damp cloth for tip hygiene
- A toothpick or a scriber tool for popping bubbles and guiding lines
- Parchment paper, a wire cooling rack, and a baking sheet
- Cling film or a damp towel to cover the icing bowl
No piping bags at all? A zip-top freezer bag with one corner snipped off works for outlines. It is fiddlier and gives you less control, but it will get you through a batch of eggs.
If you are short on time, buy plain baked sugar cookies shaped like eggs and skip the dough. You lose the homemade crumb, but every decorating step below stays exactly the same.
How to Make Easter Egg Cookies with Royal Icing: Step-by-Step
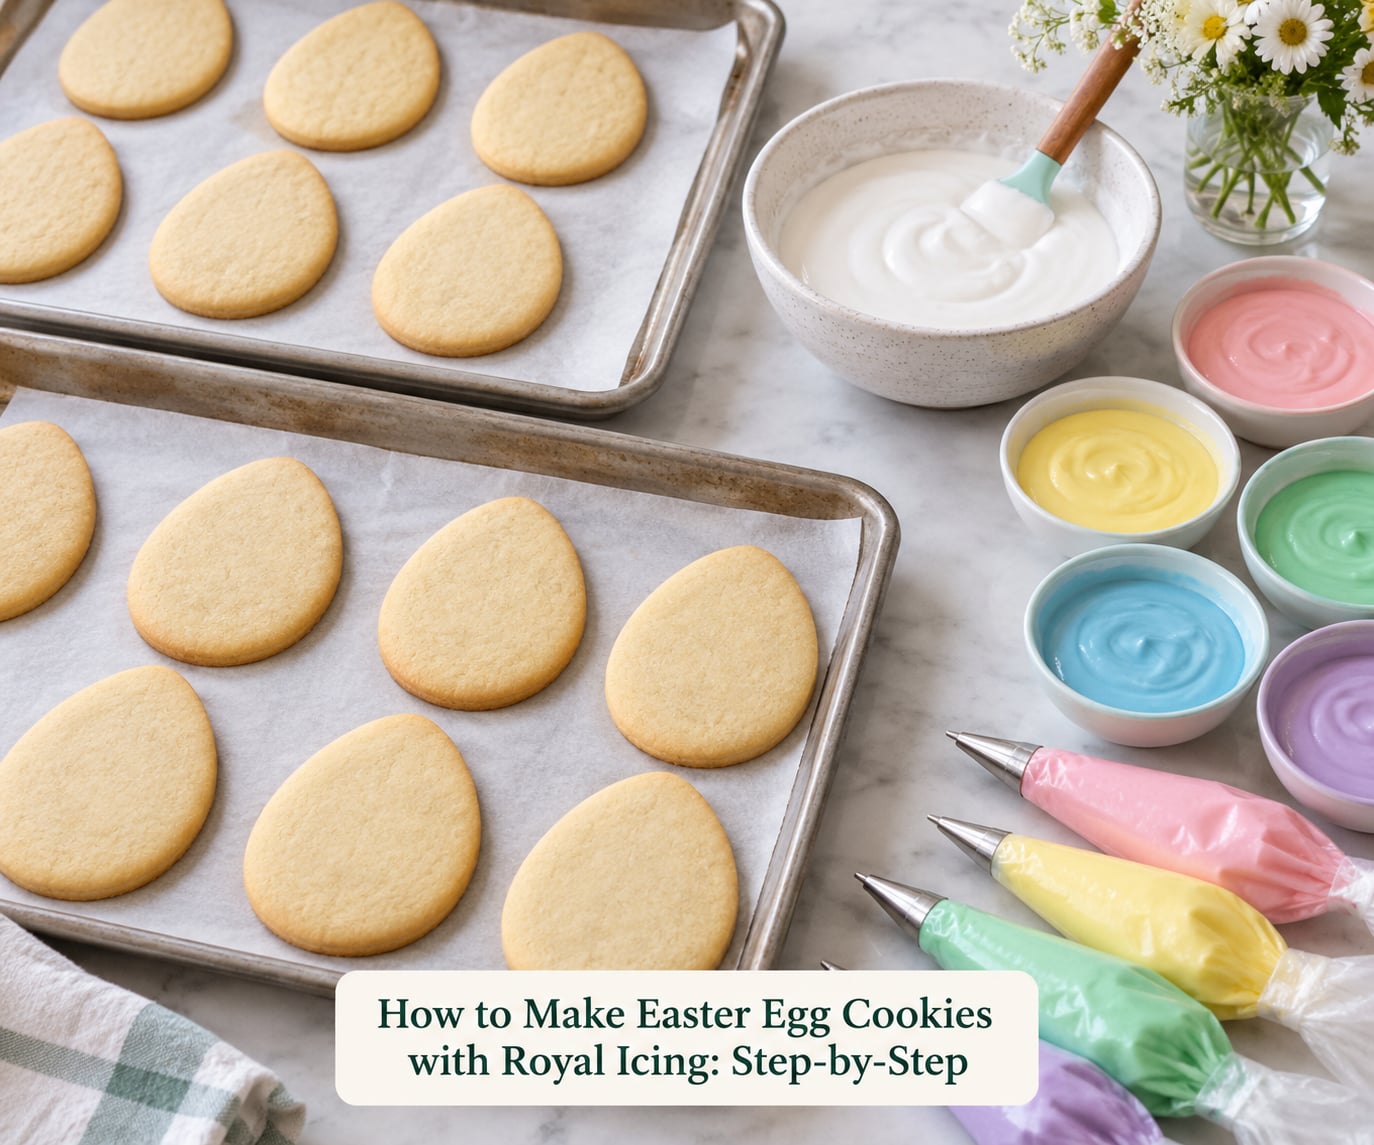
This is the order that works: make and chill the dough, bake and cool the cookies completely, make the icing, outline, flood, dry, then add detail. Each stage depends on the one before it, and the two mistakes that ruin the batch both come from skipping ahead.
How to Make Easter Egg Cookies with Royal Icing: Make the Cookies
Cream the butter and sugar until the mixture is pale and slightly fluffy, about two minutes. Scrape down the bowl, add the egg, yolk and vanilla, and mix again until everything looks uniform and no streaks of butter remain.
Mix in the flour, baking powder and salt at low speed until a soft dough forms. Overmixing here is the reason dough spreads on the pan later, so stop as soon as the flour disappears.
Flatten the dough into a disc, wrap it, and chill for at least one hour. Cold dough holds its shape when you roll and cut it; warm dough stretches, the cutter sticks, and your eggs come out lopsided. After chilling, let the disc sit at room temperature for 15 to 20 minutes so it rolls without cracking.
Roll to 1/4 inch thick between two sheets of parchment. Thinner than that and the cookies turn brittle once baked; much thicker and they stay doughy in the middle.
Cut your eggs, press the scraps back together, and re-roll until you use up the dough. Bake at 350F for 10 to 12 minutes, until the edges look faintly golden and the bottoms feel dry when you lift one. The centre should still look very slightly pale.
Cool on the baking sheet for five minutes, then move the cookies to a wire rack. Wait until they are room temperature all the way through, usually another 30 to 45 minutes. Warm cookies melt the icing on contact, and that is the start of the bleeding and cracking chain.
Outline the Egg Shapes
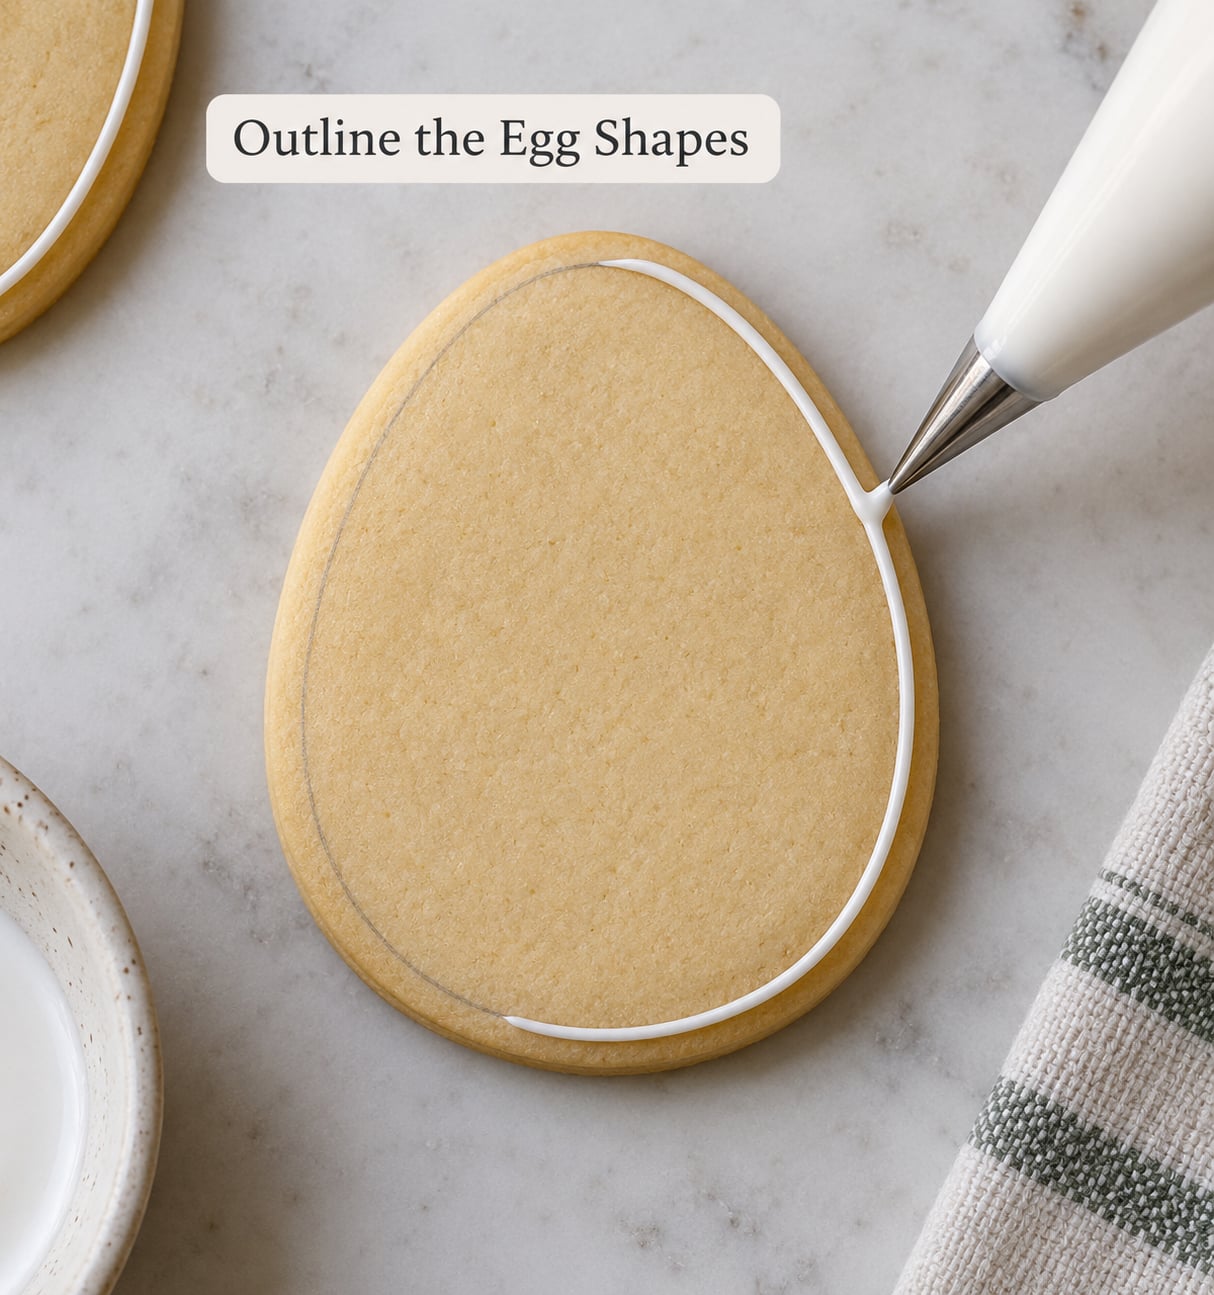
Outlining means piping a thin raised border that holds the flood icing in place. Mix the icing base first, then thin it with warm water a teaspoon at a time until it passes the consistency test.
Load a #1 or #2 round tip into a small bag. Rest the tip on the cookie, squeeze steadily, and trace the outline in one continuous movement without lifting the bag. Start at the widest point of the egg and work around, keeping the line the same width the whole way.
If you lift your bag mid-line, the icing forms a visible nub. If you find a gap after moving on, touch that gap with a toothpick and add a tiny blob of icing to bridge it. Fix gaps and uneven spots now, while the icing is still wet. Once it dries, gaps are permanent.
The consistency test is the whole trick. Drag a line across the surface of the icing with the tip and count how long the tail stays raised before it flattens out.
| Consistency | How it behaves | Use it for |
|---|---|---|
| 10 second | Tail flattens quickly and spreads | Flooding |
| 15 second | Tail holds briefly with a soft ridge | Filling, dots, stripes |
| 20 second | Tail keeps a defined ridge | Outlining, thin details, writing |
This is the rule most people mean when they talk about the 15 second rule: a consistent 15 second test that you repeat every time you thin icing. If your outline icing needs 20 seconds to hold its ridge, it will not slump into the cookie. If it only manages 10, it will sink into the outline and disappear.
Cover any icing you are not using with cling film or a damp towel, touching the film directly onto the surface. A crust forms in minutes otherwise.
Flood With Easter Colors
Flooding is filling a section with thinned coloured icing so it self-levels into a flat, glossy pool. Mix the colour into the icing with gel colouring rather than liquid drops. Liquid colouring is mostly water, and a few drops can knock five seconds off your consistency without warning.
Add water a half teaspoon at a time until the line you drag with the #5 tip flattens in about 10 seconds. Think loose honey, not glaze. The flood needs to spread to the edges of your outline on its own and then stop.
Load a #4 or #5 tip, squeeze icing into one section of the egg, and let the flood carry it to the outline. Then tap the piping tip gently against the edge of the bag, or bounce the bag lightly on your wrist, to knock out larger bubbles. Use a toothpick for the small ones.
Immediately after filling, the icing looks glossy and slightly domed. Give it a few seconds and it settles into a flat, even surface that stops moving at the outline. If it is still creeping past the border, your icing was too thin. Sift in a spoonful of confectioners’ sugar and try again on the next cookie.
Flood the colours one at a time and let each section fill most of the way before you move to the next. Leave colour to colour a wide egg. Let them meet at the edge without overlapping, which is where bleeding starts.
The surface is dry enough to handle when a light fingertip touch leaves no dent and no colour comes away on your finger. That takes roughly two hours at room temperature, longer in a humid kitchen.
Add Patterns and Finishing Details
Fine detail only goes on after the flood layer is fully dry to the touch. Piping onto wet flood drags it and pulls up colour from the base, and there is no fixing that.
- Stripes: thin the coloured icing back to 15 seconds, load a #1 or #2 tip, and pipe straight bands across the dry flood. Hold the bag vertical and keep the pressure even.
- Dots: pipe a small circle in the air first, then touch down, squeeze one short squeeze and lift. Practice on parchment paper, not on the cookies.
- Zigzags: pipe light lines first, then add the connecting diagonals. Wait a few minutes between passes so each set has time to settle.
- Flowers: flood a small round area of a contrasting colour, dry it, then pipe five or six petal loops in the centre before that dries.
- Scallops: pipe a series of connected half circles along the edge of the flood in a deeper colour.
- Contrasting outline: after the base colour dries, trace the outer edge again in a deeper shade. This sharpens the whole design and hides a wavy line underneath.
Keep a damp cloth beside you and wipe each tip between colours. Sugar and colour residue on a tip is the fastest way to dull a colour or break a fine line, and there is a lot of forum advice agreeing on that one point.
Wet-on-wet is the forgiving version of all this: flood all your colours, then pipe the detail while the flood is still slightly damp so the lines sink in and stay smooth. Beginners often find this easier than dry-to-dry because there is no dry layer to judge. Wait for full dryness if you want crisp detail and stacked cookies.
Dry, Store, and Serve the Cookies
Royal icing dries rather than sets. Moisture evaporates, the sugar and meringue proteins bond, and the result is a brittle shell that is firm to the touch after about two hours and fully hardened after 12 to 24 hours.
Leave the cookies on a single layer at room temperature while they finish. A boxy fan pointed at them speeds things up noticeably in a humid kitchen, and a dehumidifier helps more than leaving a window open.
Test before you pack: press the thickest flood area lightly with a fingertip. No dent and no colour transfer means the icing is dry enough for a tissue box or cellophane bag. If it leaves a mark, give it more time. Stacking tacky cookies is the fastest way to ruin a finished batch.
For storage, keep the finished cookies at room temperature in an airtight container with a sheet of parchment or wax paper between each layer, for up to five days. Do not refrigerate them, because condensation from the fridge softens the icing and makes it sticky again.
Freezing works well: lay the cookies in a single layer until firm, move them to a freezer bag, and push out the air so the icing does not frost over. Thaw them on the counter, uncovered, in about two hours. Do not touch or stack them while they defrost.
Do not refrigerate and do not pack a biscuit that still feels soft. If you are using an alternate royal icing formula from a manufacturer rather than the meringue powder recipe above, check that brand’s storage guidance, because timings follow the recipe’s thickener.
Common Mistakes
Almost every failed batch traces back to temperature or consistency. Here is what goes wrong, why, and the fix.
| Symptom | Cause | Fix |
|---|---|---|
| Cracks in the icing | Cookies decorated while still warm, or icing dried out in the bowl | Cool cookies completely and re-cover the bowl in cling film |
| Outline sinks into the cookie | Outline icing thinned past 20 seconds | Sift in confectioners’ sugar a spoonful at a time |
| Flood icing runs past the border | Flood icing thinner than 10 seconds | Add a teaspoon of powder and retest before reflooding |
| Small bubbles in the flood | Over-whipping or knocking air into the icing | Tap the bag on the wrist, then pop the rest with a toothpick |
| Broken or wobbly lines | Grease on the tip or coupler | Wash tips in hot soapy water and dry fully before reuse |
| Colours bleeding together | Flood not dry, or colours mixed in one section | Dry each section fully and change or wash the bag between colours |
| Dull, greyish colours | Too much water, or liquid colouring instead of gel | Start over with gel colour and thin less |
| Icing will not harden at all | Oil-based flavouring or an oil added in error | Remake the batch with pure vanilla or almond extract |
| Sugary crust in the bowl | Bowl left uncovered while you piped | Touch cling film directly onto the icing surface |
| Stacked cookies smudge | Piled before the icing fully hardened | Wait 12 to 24 hours and use parchment between layers |
Two batch habits make this much easier. Mix each colour separately in small jars or cups instead of tinting one big bowl, so you never have to dilute a batch back to a usable colour. And pipe from the 15 second consistency rather than thinner, because you can always add more water to a small cup later.
Frequently Asked Questions
Can I use a sugar cookie recipe for Easter egg cookies with royal icing?
Yes, and most recipes work. The dough needs enough fat and sugar to hold a shape without spreading, so a standard cut-out sugar cookie dough is a good match. Shortbread-style bases also decorate well, though they break more easily when handled, so cool them fully and decorate on parchment. Avoid thin, crispy cookie recipes, which snap when you pipe or lift the finished eggs.
How do I keep royal icing from cracking on egg-shaped cookies?
Cracking almost always means the cookies were still warm when you piped, or the icing sat exposed and dried out in the bowl. Cool the eggs completely on a wire rack first, and cover any icing you are not using with cling film pressed directly onto the surface. Keep the outline icing at about 20 seconds so it stays flexible instead of setting brittle while you work.
What consistency should royal icing be for outlining cookies?
Drag a line with your tip and count the seconds until the ridge flattens. Around 20 seconds is right for outlines, because stiff enough icing holds a raised border that contains the flood. 15 seconds suits dots, stripes and filling, and 10 seconds is for flooding only. Test every time you thin, since the icing thickens as it sits, and add water a half teaspoon at a time.
How long should Easter egg cookies dry before storing them?
The flood layer is dry to the touch after roughly two hours at room temperature, but the icing keeps hardening for 12 to 24 hours. Store only when a light fingertip press leaves no dent and no colour comes away. Pack finished cookies at room temperature in an airtight container with parchment between layers, and skip the fridge because condensation softens the icing again.
Can I freeze cookies decorated with royal icing?
Yes. Once the icing is fully dry, lay the cookies in a single layer in the freezer until firm, then transfer them to a freezer bag and push out the air. Thaw on the counter, uncovered, for about two hours. Touching them while they defrost is what causes smudges, so leave them alone until the icing is back to room temperature.
Conclusion
Good Easter egg cookies come down to three habits: cool the cookies completely, pipe a thin outline at about 20 seconds, and flood each section with relaxed icing at about 10 seconds. Add stripes, dots or scallops only once the flood is dry to the touch, then give everything 12 to 24 hours before you stack or package it.
Start with the dough today and you will have cooled cookies ready to decorate whenever the weekend arrives. Once you get the consistency test in your hands, the rest is just patience and a steady squeeze.