To flood cookies with royal icing, pipe a thin border around a fully cooled cookie, then fill the inside with thinner flood-consistency icing and let it self-level. If a line you drag through the icing melts back to smooth in 10 to 15 seconds, the consistency is right for flooding. Give the flood 30 minutes to an hour to crust before you pipe any detail on top.
The flood is the base layer for almost every royal icing cookie, and it is the one place where beginners lose confidence. A bumpy, streaky, or sliding flood usually is not a technique problem, though. It comes down to how much water is in the bowl and how long the outline sat before you filled it.
Work one cookie at a time rather than outlining the whole tray. Outline a cookie, flood it immediately, then move to the next. That keeps the icing at the right consistency and stops a fresh outline from picking up dust or sticking to your bag.
Table of Contents
- What You Need
- Step-by-Step
- Step 1: Prepare the Cookies
- Step 2: Thin the Royal Icing to Flooding Consistency
- Step 3: Pipe a Neat Border
- Step 4: Flood the Cookie
- Step 5: Remove Bubbles and Let the Icing Dry
- Common Mistakes
- Frequently Asked Questions
- How long should royal icing dry before decorating a flooded cookie?
- What consistency should royal icing be when flooding cookies?
- Can I flood cookies with royal icing that has been colored?
- How do I keep the icing from running outside the cookie border?
- How long do flooded cookies stay fresh?
- What should I do if my royal icing flood has bubbles?
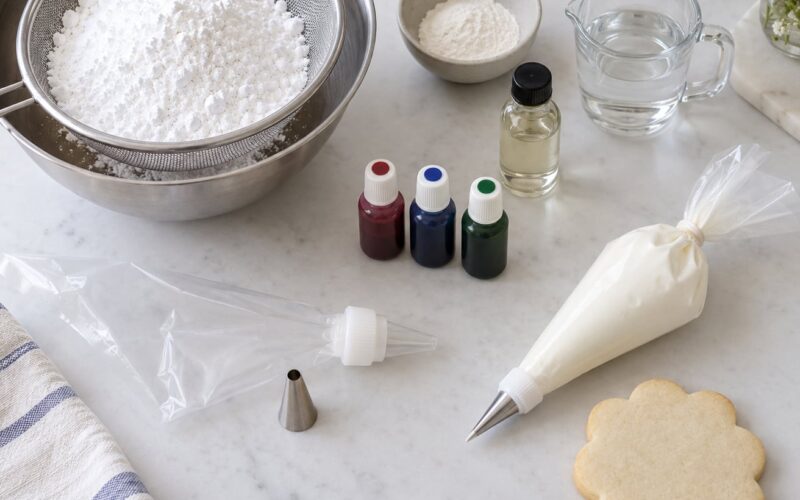
What You Need

The tool list is short and most of it you already own. What matters is having a scribe tool or a toothpick before you start, because chasing a moving flood with the bag is where most first attempts go wrong.
- Cooled sugar cookies with a flat top and a reasonably even surface. Thin or over-baked cookies have no structure for the icing to sit on.
- Royal icing made with powdered sugar and either meringue powder or pasteurized egg white. Raw egg white is not suitable for cookies that will be eaten uncooked.
- Gel food coloring for tinting. Liquid grocery-store drops add water and will thin your icing every time you use them.
- A piping bag with a coupler, plus a small round tip (#2 or #3). A tipless bag works too and gives a slightly thinner line on the border.
- A scribe tool, toothpick, or pin for pushing icing to the edges and popping air bubbles.
- A small cup of water and, if you like, a spray bottle for controlled thinning.
- A parchment-lined baking sheet that fits your fridge, plus a small bowl of extra icing for patching thin spots.
Set your tray somewhere flat with room around it. You will tap the tray on the counter to release bubbles, and you need that space before the icing starts moving.
Step-by-Step
Step 1: Prepare the Cookies
Let the cookies cool completely on the baking sheet, then move them to a rack. Warm cookies melt the icing and dry it from underneath, which is why a same-day flood often ends up wrinkled.
Pick cookies with a flat top and a shape you can outline in one continuous line. Rounds, squares, and hearts with clean edges all flood well. Avoid cookies with deep cracks or very rough surfaces, because the icing settles into them and reads as bumpy.
If you want the icing to stop exactly at the edge, mark a guide line with a pencil before you pipe. Erase it once the icing is dry.
Step 2: Thin the Royal Icing to Flooding Consistency
Scoop your icing into a bowl so you can work on a small amount, leaving the rest of the bowl stiff for borders and detail work. Add water a quarter teaspoon at a time and stir fully between additions.
Test it by dragging a spatula or knife through the icing and starting a stopwatch. The line should melt back into a smooth surface in 10 to 15 seconds. At 20 to 30 seconds you have outline consistency, and past 30 seconds it holds stiff peaks for piping.
| Consistency | How it behaves | Used for |
|---|---|---|
| 10 to 15 seconds | Line levels out almost immediately, soft peaks droop | Flooding |
| 20 to 30 seconds | Line stays visible for a few seconds before settling | Borders, outlines, writing |
| Over 30 seconds | Holds a stiff peak that does not move | Piped details, flowers, borders |
If you overdo the water, add a spoonful of stiff icing from the back of your main bowl rather than trying to fix it with more liquid. Thicker icing you can thin again; thin icing you can only thicken by adding powder, and that leaves lumps.
Step 3: Pipe a Neat Border
Load a separate bag with your stiffer icing and a #2 or #3 tip. Start at a low point on the cookie, squeeze without lifting, and keep the bag planted as you move around the shape. Lifting and restarting is what creates lumps and gaps in a border.
Keep the line thin and even. The border is a dam, not decoration, so if it is a thick rope the icing will puff noticeably when it dries. Corners are where beginners rush, so slow down there and let the line catch up with itself.
You do not need to let this border dry. A minute or two is enough for it to hold its shape when you flood.
Step 4: Flood the Cookie
This is where most of the how to flood cookies with royal icing tutorials get rushed, so take it slowly. With the thin icing in your tipless bag or a squeeze bottle, start at the edge and pipe a thin line of icing right up against the inside of the border all the way around.
Then add a small mound in the center. Do not add a pool large enough to reach the edges; the icing moves on its own. If you need more, add more icing. Chasing thin icing around with the bag is what causes the streaks and thin patches people complain about.
Once the center is filled, lift the tray a few centimetres and drop it once, then again. Two firm taps are enough to push air bubbles to the surface. Pick them off with a pin while the icing is still wet.
Set the tray flat and walk away for ten minutes. The icing settles into a level surface on its own. Use your scribe tool to nudge icing toward any bare spot near the border, then leave it again.
Step 5: Remove Bubbles and Let the Icing Dry
Do a final bubble check while the icing is wet. A pin works better than a toothpick here because it makes a tiny hole that closes as the icing levels again. Bubbles you miss now will pop through the surface while you are decorating and leave craters.
Wait 30 minutes to an hour until the flood is dry to the touch with no tackiness. After that you can pipe detail work on top. For stacking, transfers, or transport, give it overnight. A dry-to-the-touch flood can still dent underneath if you press it.
Keep the cookies in a cool, dry room. Humidity is the enemy of hard royal icing, and a fridge is not the answer, since condensation softens a finished cookie.
Common Mistakes

Icing that runs over the border. This is almost always too much water in the flood, not too little. Thicken it back toward 10 to 12 seconds and flood a thinner layer. If it keeps happening, let the border sit for five minutes so it firms up into a real dam.
A thick, grainy, or lumpy flood. You added too much water and then tried to correct it with more icing from the top of the bowl, where the sugar has settled. Thicken with icing you scoop from the middle of the bowl, and sift any powdered sugar you add to kill the graininess.
Air bubbles. They surface in the first ten minutes, so tap the tray right after flooding and pop anything you see with a pin. Details piped onto a flood that has already dried fully leave craters instead of sinking in cleanly.
A visible seam where the flood meets the border. The flood has dried against the outline before it could merge. Either outline and flood the same consistency on the wet border for a seamless look, or let the outline dry completely and accept the seam as a deliberate design line.
Wrinkled, thin-looking icing. Too much water while thinning, and a humid kitchen makes it worse. Aim for 12 to 15 seconds rather than runnier, and add a cup of ice to the oven while the cookies bake so they come out drier.
Icing that looks fine but never hardens. Meringue powder and excess water are the usual reasons. Pasteurized egg white gives a harder, less sticky result. If the icing stays shiny and tacky after 24 hours, it will not recover, so fix the recipe for the next batch rather than waiting.
Dull, matte icing with no shine. That is normal for pure royal icing, and it is the crunch people are tasting. A teaspoon of corn syrup per cup adds shine and keeps the icing edible, at the cost of some of that crunch.
Frequently Asked Questions
How long should royal icing dry before decorating a flooded cookie?
Wait 30 minutes to an hour before piping detail work on a flooded cookie. The surface should feel dry to a light touch with no tackiness. For stacking cookies, applying a royal icing transfer, or transporting them, give the flood overnight so it hardens all the way through. Pressing a finger into a flood that only looks dry will leave a dent that never comes out.
What consistency should royal icing be when flooding cookies?
Flood consistency melts back to smooth in 10 to 15 seconds when you drag a knife through it. That is looser than outline consistency, which holds its line for 20 to 30 seconds. If a beginner is nervous about the first batch, flood at 12 to 15 seconds rather than runnier. Thin enough to spread, thick enough that it stays where you put it.
Can I flood cookies with royal icing that has been colored?
Yes, and coloring before flooding is usually easier than coloring the flood after. Add gel food coloring to your flood batch first, then test the consistency, because gel color thickens slightly as it mixes in. Thin the color with a drop of water rather than squeezing more in, and keep a bowl of plain white icing nearby to patch any pale spots while the flood is still wet.
How do I keep the icing from running outside the cookie border?
Three things prevent run-off: pipe the border thin but continuous, flood only the inside edge of it, and use less icing than you think you need. Add a small mound in the center and let it spread on its own instead of flooding a full pool. If your icing is runnier than 10 seconds, thicken it before it goes anywhere near a cookie.
How long do flooded cookies stay fresh?
Fully dried royal icing cookies keep for one to two weeks in an airtight container at cool room temperature, with baking paper between layers so the icing does not stick to the cookie above. Decorating a week ahead often gives crisper results because the icing has had longer to fully harden. Skip the fridge, since condensation softens the icing and dulls the finish.
What should I do if my royal icing flood has bubbles?
Tap the tray on the counter right after flooding so bubbles rise, then pop them with a pin or a scribe tool while the icing is still wet. A hole that small closes as the icing levels again. Check once more ten minutes in. Bubbles you miss will break the surface while you pipe details and leave craters behind.
Start with one cookie. Thin your icing to about 12 seconds, pipe a thin border, fill the edges with a little icing and leave it alone for ten minutes, then tap the tray and pop what floats up. That single cookie will tell you more than a whole tray, and the next one will be better.
Updated for 2026.