Most blurry cookie outlines come down to two things: dough that is too warm to hold an edge, and a cutter that gets twisted on the way down. Chill your dough firm, roll it to an even 1/4 inch, dust the cutter with flour, and press straight down without rocking. Then lift each shape with a thin spatula rather than pulling it off the counter. That sequence takes about an hour of active time plus chilling, and it works whether you are cutting gingerbread men for a December plate or stars for a birthday batch.
Table of Contents
- What You Need
- How to Cut Clean Shapes With Cookie Cutters Step by Step
- Chill the Dough Until Firm
- Roll the Dough to an Even Thickness
- Cut the Shapes with a Sharp Cutter
- Release Each Shape Without Stretching It
- Transfer and Bake for Crisp Edges
- Common Mistakes
- Frequently Asked Questions
- How do I keep cookies from sticking to the cookie cutter?
- Should I chill cookie dough before using cookie cutters?
- Why do my cookie shapes lose their sharp edges?
- How do I cut intricate shapes without stretching the dough?
- How thick should cookie dough be for clean cuts?
- Can I use parchment paper when cutting cookie shapes?
- Conclusion
What You Need

The tool list is short, and most of it you probably own already. What matters more is the condition of the dough than the gear.
- Firm, cold dough. A sugar cookie or gingerbread dough wrapped and chilled for 30 to 60 minutes. Parchment paper and a bench scraper to lift and move the rolled sheet.
- A sharp cutter. Thin metal cuts a cleaner line than thick plastic. A plunger-style cutter with a sharp lower edge works well too.
- A rolling pin plus optional guide rings, so every part of the sheet comes out the same thickness.
- Flour for dusting, in a shallow dish the cutter can dip into between cuts.
- A baking sheet lined with parchment, a cooling rack, and a small offset spatula or thin fish-slice spatula for release.
Skip the rolling pin rings if you do not have them. Just check thickness in three places, corner to corner, because dough that is even in the middle and thin at the edges bakes unevenly.
How to Cut Clean Shapes With Cookie Cutters Step by Step

Here is the short version: chill the dough until it is firm but not rock-hard, roll it to an even 1/4 inch, flour the cutter, press straight down with no twisting, loosen the shape with a thin spatula, space cookies 1 inch apart, and chill the tray again for 10 to 15 minutes before it goes in the oven.
Chill the Dough Until Firm
Wrap the dough and refrigerate it 30 to 60 minutes. Overnight is fine if you are making ahead. You want dough that holds a shape when you touch it but still has some give.
Dough straight from the fridge cracks at the edge when you roll it, which is the most common complaint on baking forums. If it cracks, give it 10 minutes on the counter and roll again. Warm dough sticks to the cutter, cold-but-not-frozen dough cuts clean.
Roll the Dough to an Even Thickness
Dust the surface lightly, not heavily. Too much flour keeps the dough from releasing later, and a heavy dusting sits on the surface and dulls the outline.
Roll to about 1/4 inch for sturdy cookies. Thinner dough, around 1/8 inch, gives you a crisper cookie but it is fragile to lift and the corners snap off. Thicker dough holds a detail better but bakes like a biscuit.
Loosely drape plastic wrap over the rolled dough if you are nervous about sticking, and cut straight through it. Bakers on r/Baking report it gives a clean cut and keeps delicate shapes intact during transfer.
Cut the Shapes with a Sharp Cutter
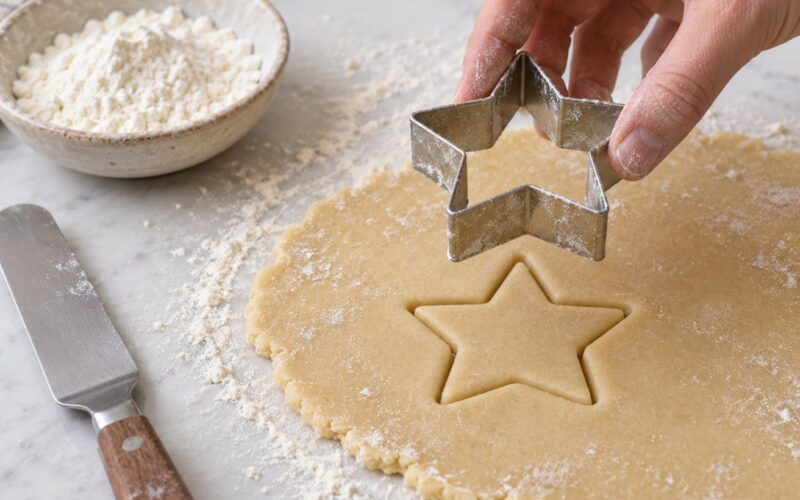
Dip the cutter in flour, tap off the excess, and press it straight down with your palm. No rocking, no twisting, no wiggling. A twisting motion is the number one reason edges come out ragged and frayed.
Leave a 1/2 inch border of dough between neighboring shapes so each cookie has room to spread slightly. Work from the center of the sheet outward so you are not pushing dough around with your forearm.
If the dough sticks to the rim, don’t fight it. Stop, dust again, and make the next cut. Scraping a stuck cutter sideways is what tears the edge.
Release Each Shape Without Stretching It
Slide a thin spatula under the cookie and lift it straight up. A warm round cookie twisted gently inside its cutter firms up frayed edges, a trick longtime bakers on CakeCentral use to rescue rough cuts.
For pointed shapes like stars and gingerbread, hold the cutter in place and use a small paring knife to slide the dough away from the sides. The points survive longer than your patience for re-rolling scraps.
Leave a 1 inch gap on the baking sheet. Cookies spread in the oven no matter how good the cut, and a crowded tray turns separate cookies into one sheet.
Transfer and Bake for Crisp Edges
Slide the tray into the fridge for 10 to 15 minutes before baking. That second chill matters as much as the first, especially if your hands warmed the dough while you were cutting.
Bake at 350 F until the edges are lightly colored. Pull them when the centers still look slightly underdone, because they keep baking on the pan.
If your shapes come out of the oven as unrecognizable blobs, the cut was probably fine and the spread was not. More butter, higher sugar, and a short chill before baking are the three levers that matter.
Common Mistakes
Nearly every bad cut-out is one of six problems. Find yours in this grid and fix the cause, not the symptom.
| Symptom | Cause | Fix |
|---|---|---|
| Dough sticks to the cutter | Dough too warm, or too much butter | Chill 20 more minutes, dip the cutter in flour, tap off the excess |
| Edges crack as you roll | Dough straight from the fridge | Rest 10 minutes at room temperature and roll again |
| Ragged or frayed outline | Cutter rocked or twisted on the way down | Press straight down with one firm push, palm centered |
| Corners snap off on lift | Dough rolled too thin, or lifted by hand | Roll to 1/4 inch, lift with a thin spatula |
| Shapes blur in the oven | Warm dough going into a hot oven | Re-chill the tray 10 to 15 minutes, bake one tray at a time |
| Some cookies bake darker | Uneven rolling thickness | Check thickness in three spots, use guide rings |
Two more habits that quietly improve outlines. Repack your scraps into a second ball and chill it before re-rolling, because warm scraps smear and drag the shapes you just cut. And keep cutters clean between batches, because a floury rim and a buttery rim both throw off the next cut.
One more thing worth knowing: you can skip cutting entirely for soft, thick cookies. Roll a single slab, bake it, and cut shapes out of the finished sheet once it cools. The edge is clean because the knife does the work. That trick fails for crisp or crunchy cookies, which shatter when you cut them cold.
Frequently Asked Questions
How do I keep cookies from sticking to the cookie cutter?
Keep the dough cold and the cutter floured. Chill the wrapped dough 30 to 60 minutes, then dip the cutter in a shallow dish of flour and tap off the excess before each cut. Too warm dough sticks because the butter softens against the metal edge. If it still clings, add 20 more minutes in the fridge rather than adding more flour, which leaves a dusty surface that dulls the outline.
Should I chill cookie dough before using cookie cutters?
Yes, and it is the single step that changes results most. Refrigerate the wrapped dough 30 to 60 minutes, or overnight if you are baking ahead. Cold dough holds a sharp edge and does not grab the cutter. Dough straight from the mixer sticks and smears, while rock-frozen dough cracks when you roll it, so aim for firm but slightly pliable.
Why do my cookie shapes lose their sharp edges?
Three usual reasons: you twisted the cutter on the way down, the dough was too soft to hold the edge, or the cookies spread before setting. Press the cutter straight down in one firm push, keep the dough properly chilled, and slide the tray back into the fridge for 10 to 15 minutes before baking. Space cookies 1 inch apart so neighbors do not merge in the oven.
How do I cut intricate shapes without stretching the dough?
Keep the dough cold, roll it to a full 1/4 inch, and use a sharp thin metal cutter. Press once, straight down, without rocking. Release with a thin spatula slid fully underneath rather than pulling the cookie up by a point. For tiny details like star tips or antlers, leave a 1/2 inch of dough between shapes so you are not cutting into a neighbor.
How thick should cookie dough be for clean cuts?
About 1/4 inch for most cut-out cookies. That thickness is sturdy enough to lift without cracking and still bakes tender in the center. Roll thinner, near 1/8 inch, for crisp cookies, but expect fragile corners. Anything much thicker than 1/2 inch holds detail well yet bakes more like a biscuit.
Can I use parchment paper when cutting cookie shapes?
Yes, and it makes transfer easier. Roll the dough on parchment, cut straight into it, and peel the parchment off the counter with the cookies still attached. You can slide that sheet onto the baking sheet instead of moving each cookie one at a time. Parchment works for transferring; it does not replace chilling the dough first.
Conclusion
Start with the dough. Put it in the fridge for 30 to 60 minutes before you roll anything, because cold dough is what lets a sharp cutter leave a sharp line.
From there, roll to an even 1/4 inch, dust the cutter, press straight down without twisting, and lift every shape with a thin spatula. Give the filled tray one more 10 to 15 minute chill and your cookies will keep the outline you cut.