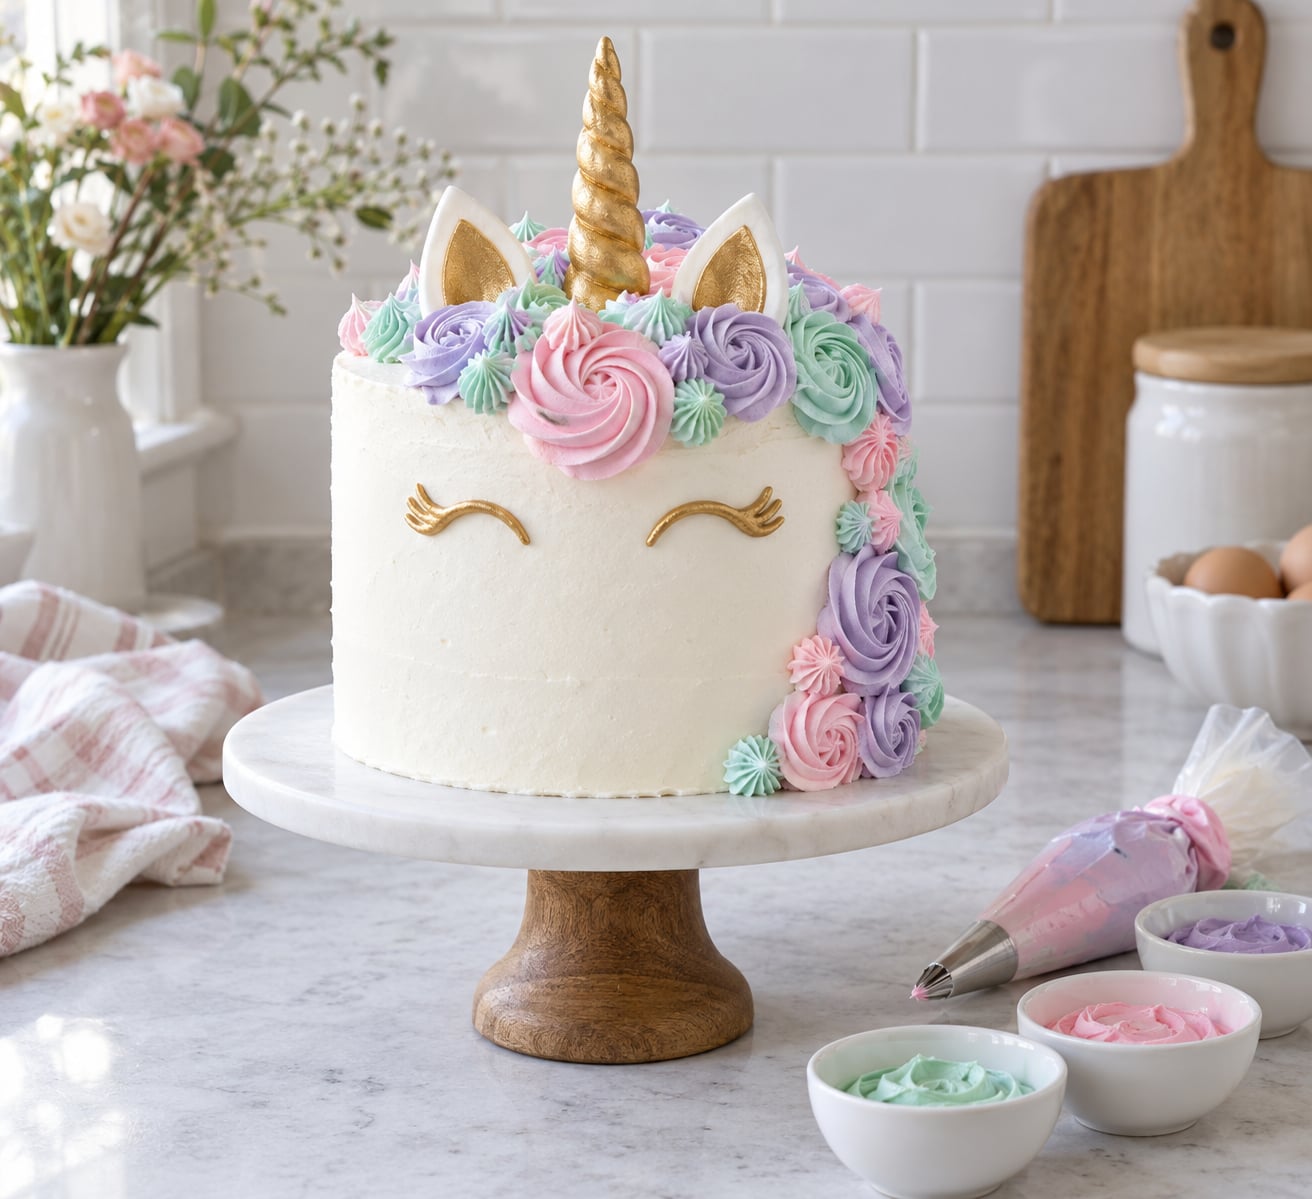
To make a unicorn cake at home, bake and fully cool a round cake, cut it into a head and body, crumb-coat and frost it smooth, then pipe a rainbow mane, add a gold horn, ears and a face. It takes about 2 hours 30 minutes and no sculpting skill.
No unicorn-shaped pan, no template, no fondant wrapping. This is the version I make when a kid asks for one on a Tuesday, and it is the beginner-friendly route: a single 10-inch round cake, American buttercream and a 1M star tip.
The short version, in five stages: bake and cool the layers, tint the frosting into pastels, fill and frost the cake, pipe the mane and the face, then attach the horn and ears. Each stage is a separate heading below, so you can stop after the bake and decorate the next day.
Table of Contents
- What You Need
- Step-by-Step: How to Make a Unicorn Cake at Home
- Bake and Cool the Cake Layers for Your Unicorn Cake
- Make and Tint the Frosting
- Fill and Frost the Cake
- Add the Unicorn Mane and Face
- Add the Horn and Finishing Details
- Common Mistakes
- Tips for a Stunning Unicorn Cake
- Frequently Asked Questions
- Can I make a unicorn cake without fondant?
- What cake flavor works best for a unicorn cake?
- How do I keep the frosting colors from mixing together?
- How long should I refrigerate a unicorn cake before serving?
- Can I make a unicorn cake for someone with nut allergies?
- Conclusion
What You Need
You do not need a unicorn cake pan. Everything here comes from a normal kitchen, and the only tools that matter are an offset spatula, a bench scraper and one star piping tip.
Equipment
- Two 10-inch round cake pans (or one 9×13-inch sheet pan if you want the retro cut-apart silhouette)
- 2 large mixing bowls plus a small one for the frosting
- Hand mixer or stand mixer
- Offset spatula, bench scraper, serrated knife, level
- Piping bag and couplers with a 1M open star tip and a small round tip
- Cake board or platter, cake pop stick or rolled parchment dowel
- Parchment paper liners for the pans, cooled completely in the pan
Cake (two 10-inch layers)
- 2 cups (240 g) all-purpose flour
- 2 teaspoons baking powder
- 1/2 teaspoon salt
- 3/4 cup (170 g) unsalted butter, room temperature
- 1 1/2 cups (300 g) granulated sugar
- 3 large eggs at room temperature, whites and yolks separated
- 2 teaspoons vanilla extract
- 3/4 cup (180 ml) buttermilk
Buttercream
- 1 cup (227 g) unsalted butter, room temperature
- 4 cups (480 g) confectioners’ sugar, sifted
- 2 tablespoons heavy cream or milk
- 1 teaspoon vanilla extract
- 1/4 teaspoon salt, plus gel food coloring in pink, lavender, mint, sky blue, pale yellow and a deeper accent pink
Decorations
- 4 ounces (113 g) modeling chocolate or candy clay, white and pink
- Edible gold luster dust and a clean dry brush
- Edible glitter or twinkle sprinkles, optional
- Dried spaghetti for attaching the horn and ears, in place of toothpicks
Before you start: 20 minutes prep, 26 to 30 minutes bake per layer, 1 hour cooling, about 40 minutes decorating. Serves 10 to 12. Total time is roughly 2 hours 30 minutes.
The frosting choice matters more than anything else on this page. American buttercream is the easiest for a first attempt and holds piped rosettes well. Swiss meringue buttercream tastes lighter and less sweet but needs a thermometer and a candy thermometer goes in hot water to stay under 160°F (71°C) so the eggs are safe. Fondant smooths to a flawless finish but tears and cracks when it meets a crumb coat that is too thick. Whipped cream is the softest option and cannot hold a horn or a mane at all, so skip it for this design.
Step-by-Step: How to Make a Unicorn Cake at Home
Bake and Cool the Cake Layers for Your Unicorn Cake
Heat the oven to 350°F (180°C) and line both pans with parchment, greasing the sides only. Whisk the flour, baking powder and salt together in one bowl.
In a second bowl, beat the butter and sugar for 3 minutes until pale, then add the egg yolks one at a time with the vanilla. Alternate the dry ingredients with the buttermilk, ending with the dry mix, and stop as soon as it comes together.
Whisk the three egg whites to stiff peaks and fold them in in three additions. That step is what keeps a plain white cake white; yolk-heavy batter shifts blue toward green when you tint it.
Tap the filled pan firmly on the counter three or four times before it goes in. That knocks out big air pockets and keeps the layer from sinking in the middle as it cools.
Bake 26 to 30 minutes. The layers are done when a skewer comes out clean and the tops spring back lightly when you press them, and the edges pull away from the pan. Cool in the pan for 10 minutes, then turn out onto a rack.
Chill the cooled layers for 20 minutes and trim the domed tops with a serrated knife while they are cold. Frosting a warm or domed layer is the single most common reason a home cake looks lopsided.
Make and Tint the Frosting
Cream the butter on medium-high for 5 minutes until it looks almost white with no lumps. Turn the mixer down to low and add the confectioners’ sugar a cup at a time, then the cream, vanilla and salt.
Beat on high for 2 full minutes to break up the air pockets, then drop to low for another minute. Air is the enemy here; a bubbly frosting bulges out of the piping bag the minute you squeeze it.
Divide the finished frosting into five or six small bowls before you tint anything. Use gel coloring rather than liquid drops, which can thin the frosting when you add more than a few drops.
Add a drop at a time and stir with a spatula rather than the mixer. Once the color is right, stop; over-mixing thins the butter and makes colors bleed into each other when you pipe.
Keep one bowl white or pure white for the mane highlights, and use a touch more of the darkest pink for the mane bases so the rosettes read as separate scoops rather than one blur.
Fill and Frost the Cake
Place one chilled layer on the board, pipe a thick ring of frosting about 1 inch from the edge, then set the second layer on top and press down gently with your palm. Use more frosting than feels reasonable here; thin layers make the cake lean.
Spread a thin crumb coat over the whole cake, about 1/8 inch thick. Chill for 15 minutes, then scrape away the crumbs that set above the surface.
Add the final coat of frosting and smooth it with the offset spatula, turning the cake as you go. Hold the bench scraper flat against the side with one hand while you turn the board with the other, and the sides come out straight.
For the round-cake version, pipe a border of rosettes around the bottom edge to cover any crumbs that worked loose. For the head shape, cut a wedge from one layer and angle the cut so it forms a muzzle, then round the top edge with the same knife.
Add the Unicorn Mane and Face
Load a piping bag with a 1M open star tip and pipe rosettes in bands along the top of the head and down the neck, switching color every three or four swirls. Start at the back edge and work toward the face so the swirls overlap the join and hide the seam.
Put the eyes low on the face. If you place them too high, there is no room left above them for the mane, and you end up squeezing rosettes into a narrow strip.
Draw closed cartoon eyes with black gel food coloring and a small round tip, about 2 inches apart, then add three short lashes fanned off the outer corner of each eye. A brush pen on an edible image sheet is an easier route if freehand feels shaky.
Add a small pink heart for the nose, a curved smile, and two soft circles of blush on the cheeks using a clean brush and a little diluted pink gel. Tap the blush on rather than painting it so the color stays light.
Finish the mane at the bottom edge with the tail: three or four larger rosettes piped low on the side, or a single swirl that curls toward the base of the cake.
Add the Horn and Finishing Details
Knead the modeling chocolate until soft, then shape about 20 pieces into small cones around a dried spaghetti stick. The spaghetti gives the horn a core so it does not snap when you set it.
Chill the cones for 15 minutes, then brush them with gold luster dust using a dry, clean brush. Dust in thin layers and let each one dry before adding the next.
Melt a little white modeling chocolate and use it as edible glue. Attach the horn to the top of the head at a slight forward angle, then push the other end of the spaghetti through the cake so the horn sits firm instead of sliding.
Shape two ears from the pink modeling chocolate using two small triangles, add a lighter pink center, and stick them on either side of the horn. A teardrop cookie cutter makes a matching pair in one squeeze.
Hold the horn in place with your fingertips for a minute while the chocolate sets, then add sprinkles or edible glitter over the mane and along the base of the horn. Refrigerate the finished cake for 20 minutes before moving it so the frosting firms up.
Common Mistakes
The cake sinks in the middle. Almost always trapped steam, and sometimes underbaking. Tap the pan on the counter before baking, and if the top still dips, finish it in a hot oven for three more minutes or cut the dome off once it cools.
Crumb coat pulls up tears of cake. The layer is too warm or too dry. Chill it properly first, and if it tears, patch the bare spot with a crumb and press a thin smear of frosting over it while the coat is still wet.
The cake looks uneven even though the layers are level. Not enough filling. Add a full inch of frosting between layers and let it bulge at the edge before you press the top layer down; community bakers repeat this tip more than any other in the decorating world.
Frosting melts, slides, or bulges out of the bag. Your butter or your kitchen is too warm, or you overbeat in too much air. Chill the cake for 20 minutes, chill the bowl in the fridge, and firm the buttercream back up with another scoop of sugar.
Pastel colors bleed into each other. Too-thin frosting and too-loose gel. Stir color in with a spatula instead of the mixer, add a second scoop of confectioners’ sugar if the frosting feels slack, and let each color sit for five minutes before you pipe.
The horn tips over or snaps. No core, or a cone that was too thin. Use dried spaghetti rather than toothpicks, since toothpicks left in a unicorn cake are a real hazard for children. Keep cones in the fridge while you frost so they stay firm.
Tips for a Stunning Unicorn Cake
Make-ahead timeline. Two days out, bake the layers and freeze them wrapped. One day out, bake or thaw the layers, make the frosting, and do the crumb coat. The day of, finish frosting, pipe the mane, add the face, then attach the horn, ears and sprinkles two to four hours before serving.
Chill between every stage. Chilled cake and chilled frosting are the reason decorating goes smoothly. Twenty minutes in the fridge before each step saves you from a cake that smudges the moment you touch it.
Use a 1M star tip for the mane. Rosettes are the most forgiving piping technique there is, forgiving enough that children can do them, which makes it a good one to delegate if you are baking together.
Transport it cold and level. Set the cake on a non-slip mat in the car, drive slowly, and take it out of any enclosed box before the drive so condensation does not land on the frosting.
Storage. American buttercream keeps fine covered on the counter for about two days. Refrigerating it extends that to roughly four days but softens the frosting and makes modeling chocolate decorations tacky and damp, so bring the cake back to room temperature for an hour before lighting the candles.
Nut allergies. Check every label, including the frosting, sprinkles, luster dust and cake mix, and keep the workspace free of nut flour crumbs if someone in the house has a severe allergy. Many nut-free bakers finish with a closed-eye face, which also has no chance of smearing.
Frequently Asked Questions
Can I make a unicorn cake without fondant?
Yes. American buttercream piped with a 1M star tip gives you the mane and tail, and the horn and ears can be modeled from candy clay or modeling chocolate instead of rolled fondant. Fondant is only needed if you want a glass-smooth, wrinkle-free surface, and it is the hardest material for a first-timer because it cracks when it meets a thick crumb coat.
What cake flavor works best for a unicorn cake?
A plain white or lemon cake is the best choice, because the frosting color carries the design. Chocolate works but eats into the pastel colors, and anything with dark crumb shows through thin icing. If you want rainbow layers on the inside, use a white cake made with egg whites rather than yolks, since the yolks tint a blue batter green.
How do I keep the frosting colors from mixing together?
Tint each color in its own bowl and keep the frosting stiff enough to hold a shape. Add gel coloring rather than liquid drops, stir with a spatula instead of the mixer, and stop adding color once the shade is right. Piping each color separately and touching swirls at the edge, rather than dragging one color into the next, keeps the bands clean.
How long should I refrigerate a unicorn cake before serving?
Chill it for about 20 minutes after you finish frosting, which firms the buttercream enough to move without smudging. For longer storage, an American buttercream cake keeps in the refrigerator for roughly four days, though the frosting softens and modeling chocolate decorations turn tacky, so let it sit at room temperature for an hour before serving.
Can I make a unicorn cake for someone with nut allergies?
Yes, with careful label reading. Check the cake mix, frosting, sprinkles, luster dust and any modeling chocolate, since nuts turn up in more products than people expect. Make the cake first on a cleaned surface, and if the allergy is severe, keep nut flour and nut-containing baking out of the kitchen entirely while you decorate.
Conclusion
A unicorn cake at home comes down to three things: chilled layers, more frosting than you think you need, and rosettes piped with a 1M star tip. Everything else, the horn, the ears, the tail, is a ten-minute job on top of a cake you already know how to bake.
Start with the bake. Cool the layers completely, wrap them, and get them in the fridge. Everything after that is decorating, and decorating is much easier on a cold cake than a warm one, so if you only do one part today, make it the first one.