To use gold leaf on a cake, chill the frosted cake for 30 to 60 minutes until the frosting is firm, place small pieces of edible gold leaf onto the surface with dry hands or tweezers, press them flat gently, and let them set before serving. The whole job takes about 20 minutes once the cake is cold.
Gold leaf is real gold beaten into paper-thin sheets, and a single sheet covers more cake than most people expect. The technique is not fussy, but it punishes three things: bare fingers, moving air, and a soft or wet frosting surface. Get those right and the rest is placement.
Table of Contents
- What You Need
- Step-by-Step: How to Use Gold Leaf on a Cake
- Step 1: Prepare a Clean, Smooth Cake Surface
- Step 2: Choose the Right Gold Leaf
- Step 3: Apply the Gold Leaf
- Step 4: Fill Gaps and Create an Even Finish
- Step 5: Finish and Store the Cake
- Common Mistakes
- Frequently Asked Questions
- Is gold leaf safe to eat on a cake?
- What type of gold leaf should I use on a cake?
- Can you put gold leaf on buttercream?
- Can I apply gold leaf to a cake ahead of time?
- How do I keep gold leaf from falling off?
- Conclusion
What You Need
You need very little, and most of it you probably already own. Edible gold leaf is the only non-kitchen item on the list.
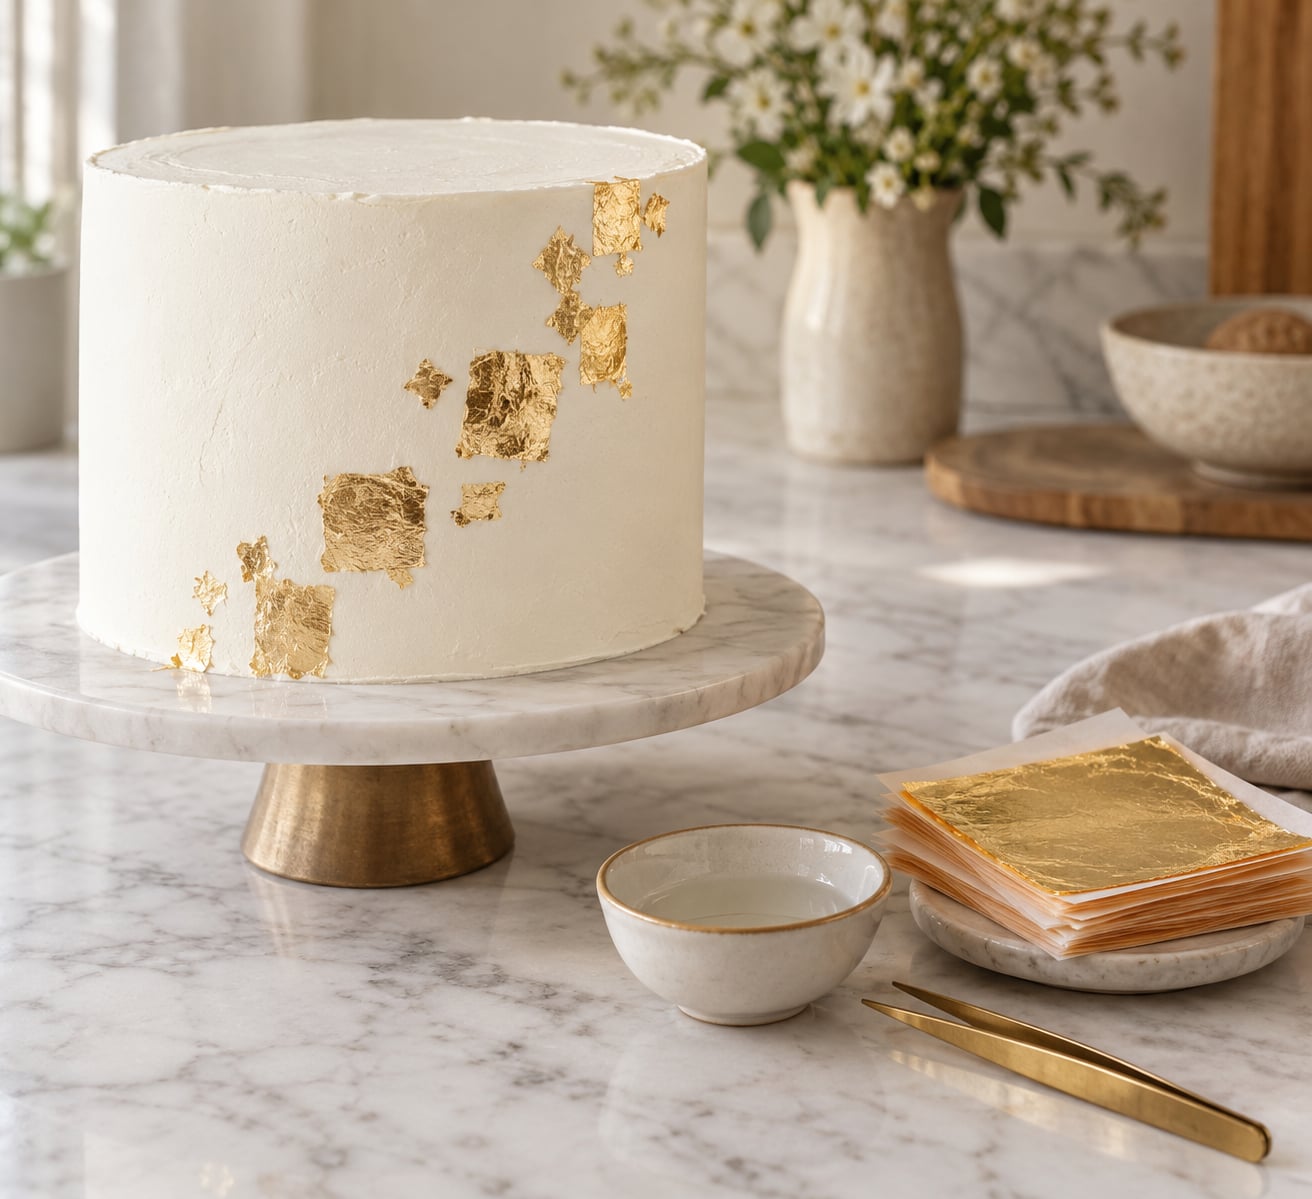
- Edible gold leaf sheets or flakes, in a booklet of loose pieces or in transfer sheets with a backing. Look for the word edible or food safe on the packet along with the karat number.
- A frosted cake with a smooth, chilled surface. Buttercream, fondant and set ganache all work.
- Tweezers, ideally pointed, for lifting single pieces and placing them precisely.
- A clean, soft, dry brush — a small paintbrush or a clean makeup-style brush you have never used on anything else.
- A small bowl of clear water or a little high-proof alcohol such as vodka, used sparingly as an adhesive.
- Clear edible gloss, optional, for a sealed shine that shrugs off handling.
Never use craft metallic leaf or imitation gilding from a craft shop. It is not food safe, and some sheets sold for cake craft say only “non toxic, for decoration”, which is not the same thing as edible. If the packet does not clearly say edible or food safe, do not put it on a cake.
Cotton gloves are a nice-to-have, but washing and drying your hands properly works about as well. The enemy is skin oil and moisture, not bare skin on its own.
Step-by-Step: How to Use Gold Leaf on a Cake
Step 1: Prepare a Clean, Smooth Cake Surface
Chill the frosted cake in the fridge for 30 to 60 minutes. A cold, firm surface is what holds the leaf without dragging or tearing it, and it is the single most important part of the method. Buttercream that is soft enough to dent with a fingertip will swallow the leaf.
Take the cake out, then brush away crumbs and loose sugar with your dry brush. If you are working on fondant, press the surface with a smoother first and dust off any starch. Check the whole cake in good light now, because anything you fix later is harder to fix under gold.
Step 2: Choose the Right Gold Leaf
Pick sheets or loose pieces labelled edible, and check the karat. 24-karat is pure gold and the most common for baking. 22-karat and 21-karat are slightly softer and warmer in tone and work just as well. Champagne gold gives a softer, more muted shine; silver leaf is the cool-toned alternative. There is no edible rose gold, because rose gold is an alloy containing copper.
Loose leaf gives you control over placement, piece by piece, and is what most beginners use. Transfer leaf is one continuous sheet on a backing paper, which is faster for a smooth panel or full coverage. Flakes are the loose fragments left over after working, good for scattering on cupcakes or dropping into drinks.
Step 3: Apply the Gold Leaf
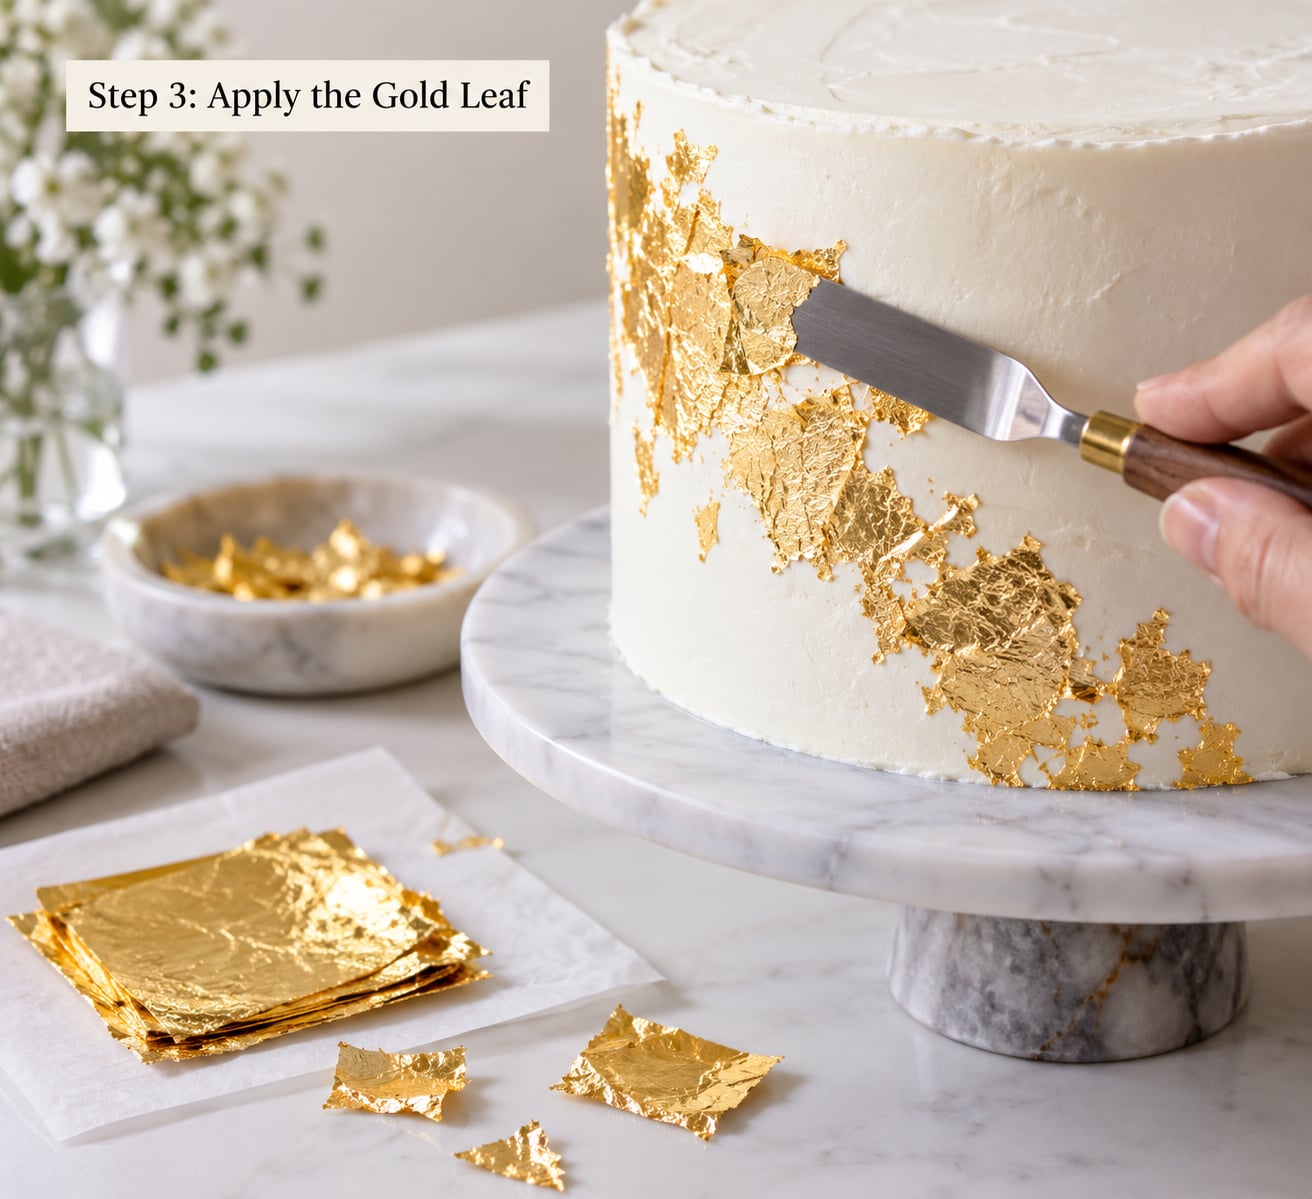
Lightly dampen a small area of frosting with a barely damp brush. You want tacky, not wet. If you prefer, a few drops of vodka or clear extract works and dries fast without leaving a mark. Only damp the section you are about to cover, not the whole cake.
Lift a piece of leaf with tweezers, or slide the sheet off its backing paper and cut a piece to fit. Lay it on the damp frosting, then press very lightly with the pad of a clean dry finger or the back of the tweezers. Pressing is what makes contact, and that is the only job of your finger.
Work from the bottom of the tier upward, or in small sections, so you can steady the cake and see the seams as they appear. Avoid fans, air conditioning and open windows. A sheet is thin enough that breathing over the work surface can move it.
Step 4: Fill Gaps and Create an Even Finish
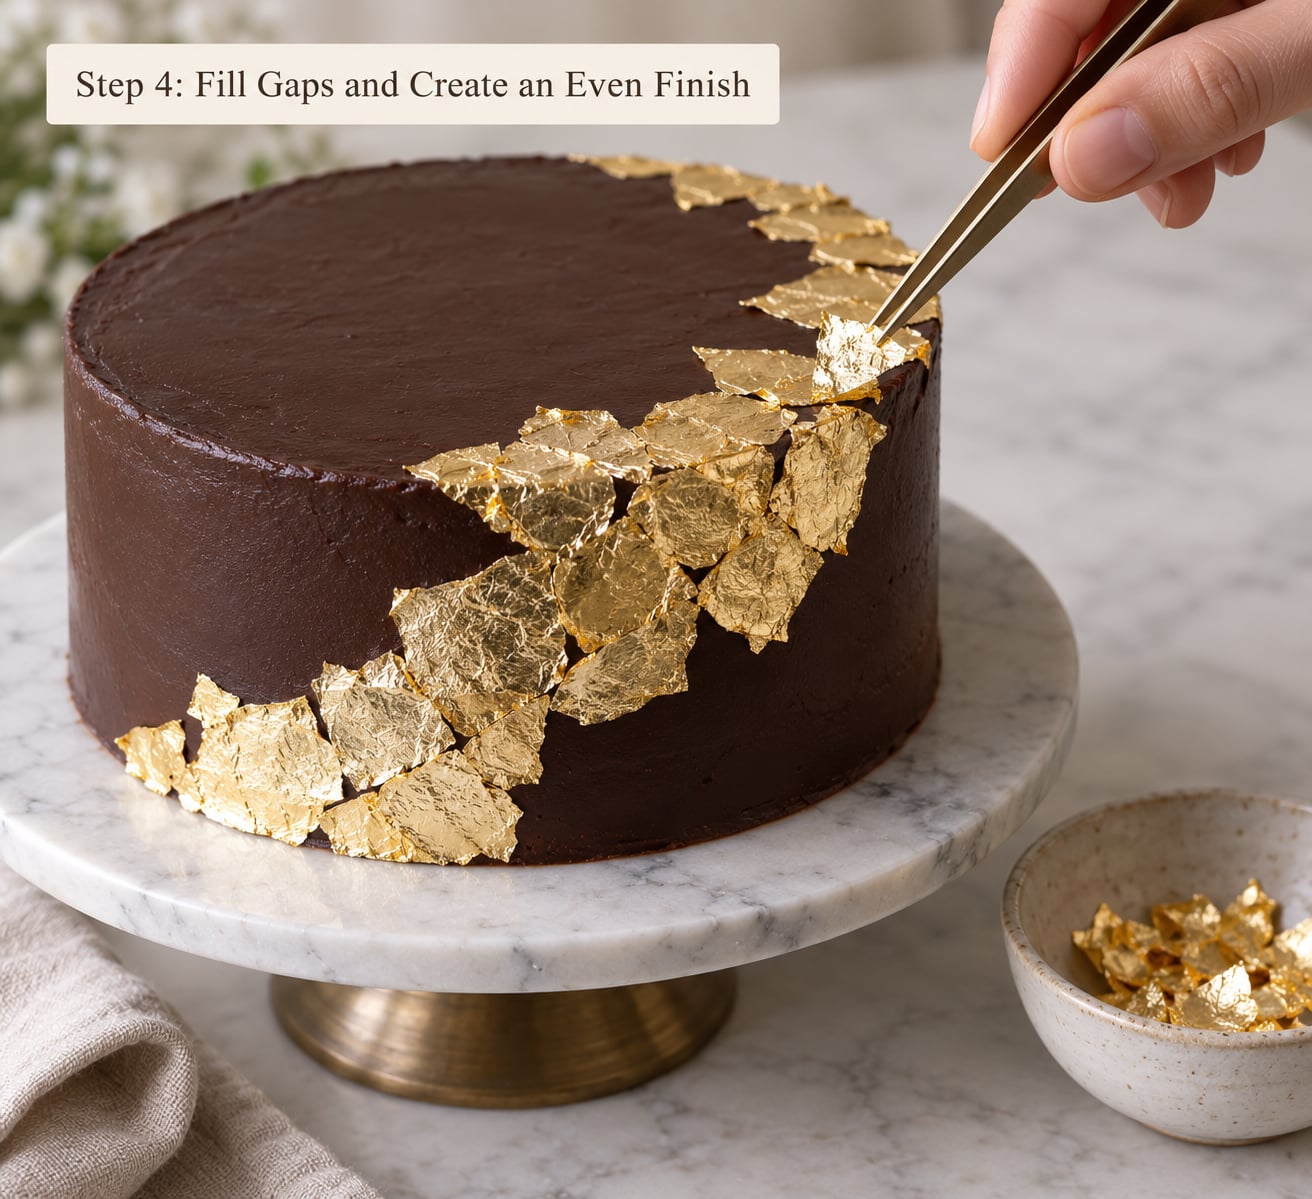
You will see small gaps and you will see a seam. That is normal on any covered cake. Cut a patch piece slightly larger than the gap, dampen that spot, and lay the patch down so its edges overlap the existing gold. Overlapping reads as one continuous layer; a patch that is too small reads as a patch.
Vary the pieces on purpose. A few larger squares with small fragments tucked between them look intentional, while evenly sized squares in a grid look machine-made. Leave some frosting bare. Gold on a white or dark cake reads as expensive partly because there is not much of it.
Use the lightest touch you can manage. Leaf is thinner than a human hair, and pressing hard wrinkles it. Press once, then move on.
Step 5: Finish and Store the Cake
Let the alcohol or water evaporate fully before you do anything else. A thin brush stroke of clear edible gloss over the finished gold seals it, and a light mist of clear edible spray works if you have no gloss. Both are optional; a matte crinkle is a legitimate finish too.
Store the cake cool and dry, and keep it away from the fridge if you can. Refrigeration is fine for a frosted cake without buttercream, but condensation forms when a cold cake meets warm air, and that condensation will lift or dull the leaf. If a chilled cake sweats, let it sit at room temperature until the moisture has gone rather than wiping it, because dabbing will drag the gold sideways.
Do not brush the surface to tidy up straight after placing. Wait until everything is completely dry, then use a dry soft brush to lift away loose fragments. The adhered gold will not brush off; the free flakes will.
Common Mistakes
The leaf sinks into the frosting. The frosting was too soft. Chill it properly and go again. Slightly tacky is right, soft is not.
The leaf will not stick at all. Either the surface is bone dry, or you skipped the dampening. Frosting that has been in the fridge for an hour can lose its tack, so wipe a very thin film of water or vodka over the spot and try again.
The piece tears or wrinkles as you lift it. You touched it with your fingers, or the brush was damp. Handle leaf with tweezers, keep the brush dry, and have a second piece ready before you lose the first.
It lifts off in patches after a few hours. Condensation, almost always. Either the cake went into the fridge after decorating, or it sat somewhere humid.
It blows off mid-application. Air. Close the window, kill the fan, turn off the air conditioning, and work away from an open door. Blowing gently across the cake to test whether a piece is stuck is how you will lose it.
The coverage looks patchy and you want it smooth. Overlap more, dampen a slightly larger area each time, and stop while you still have pieces. Full coverage takes far more leaf than people budget for, which is why most decorated cakes look best with a partial design.
You are not sure the leaf is edible. Skip it. There is no way to test a sheet, and “non toxic” on a craft packet does not mean food safe.
Frequently Asked Questions
Is gold leaf safe to eat on a cake?
Yes, genuine edible gold leaf is inert, tasteless and passes through the body without being absorbed. At 22 or 24 karat it is pure gold with no added pigments. Buy only products labelled edible or food safe, since craft metallic leaf sold for decoration is not safe to eat. If anyone at your celebration is pregnant or has a metal sensitivity, check the packet and ask their clinician.
What type of gold leaf should I use on a cake?
Use gold leaf in booklets of loose pieces or in transfer sheets, and check that the packet says edible or food safe with a karat of 21, 22 or 24. Loose leaf gives you control over placement and suits beginners. Transfer sheets cover a smooth panel faster. Silver leaf is the cool-toned option, and there is no edible rose gold because that colour comes from copper.
Can you put gold leaf on buttercream?
Buttercream is the easiest surface to work with, as long as it is chilled until firm. Frost the cake, put it in the fridge for 30 to 60 minutes, then lightly dampen the hardened surface with water or a high-proof alcohol and lay the leaf down. Soft buttercream will absorb the piece and it will disappear, which is the most common way this goes wrong.
Can I apply gold leaf to a cake ahead of time?
Yes, you can decorate a day or two ahead, and it often looks better the next morning once any alcohol carrier has fully evaporated. Store it cool and dry and away from the fridge, since condensation from chilling is what lifts or dulls the gold. If you must refrigerate a cake with a perishable filling, let it come to room temperature before you serve it rather than wiping the surface.
How do I keep gold leaf from falling off?
Chill the frosted cake, dampen the surface very lightly, and press each piece down once with a clean dry finger or tweezers. Then leave it undisturbed until it is fully dry before brushing off loose fragments. Air movement, condensation and a wet or soft frosting are what make gold fall off, so keep fans and air conditioning off while you work and store the finished cake in a cool, dry place.
Conclusion
Start with a chilled cake and confirmed edible gold leaf. Everything after that is placement: dampen a small patch, lay the leaf on, press once, and move to the next spot before the surface dries out.
If you only remember one thing, remember that firm frosting plus still air plus dry hands is the whole trick. Work in sections, patch gaps with slightly larger pieces, and leave a good amount of frosting showing. That restraint is what makes a cake decorated with gold look deliberate rather than covered.