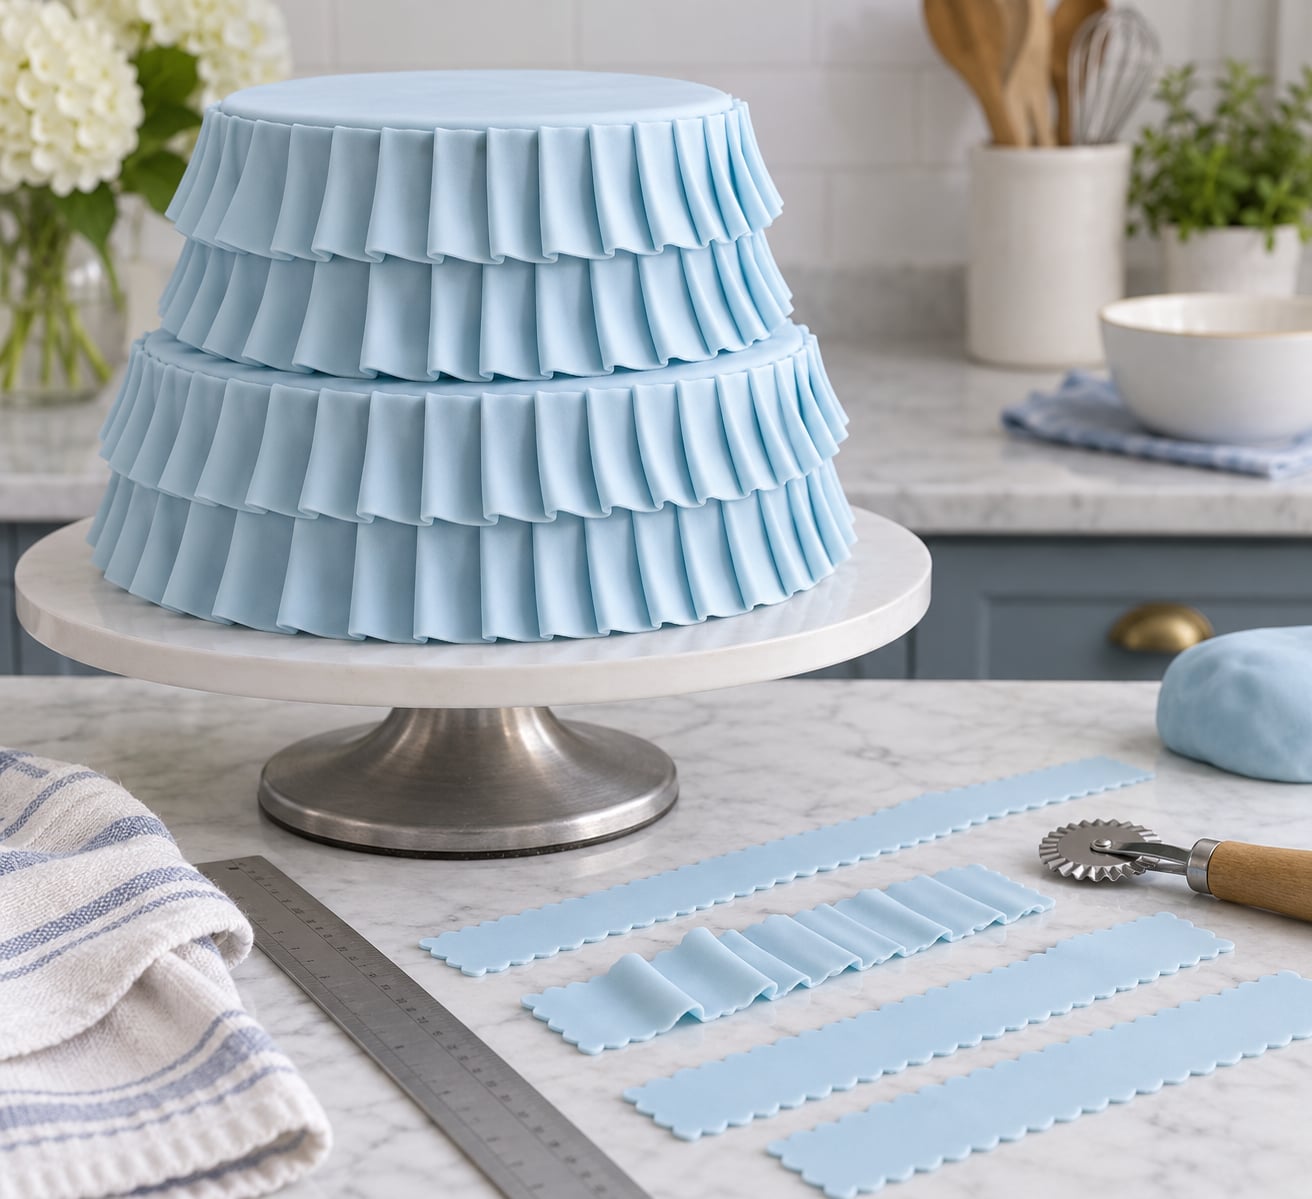
A fondant ruffle cake is a smooth buttercream cake covered in overlapping rows of thin, curled fondant strips that create a frilled, pleated finish down the sides. Learning how to make a fondant ruffle cake comes down to seven repeatable steps: chill the layers, crumb coat, frost smooth, roll and cut measured strips, curl them, glue them on in overlapping rows, then chill the finished cake. Budget two to four hours for a single small tier the first time you try it.
The ruffles look fussy but they are not clever work. What makes them succeed is cold cake, stiff frosting, strips that are all cut to the same width, and a final chill before the cake goes anywhere. Get those four things right and the pattern almost builds itself.
Table of Contents
- What You Need
- Step-by-Step: How to Make a Fondant Ruffle Cake
- 1. Level, Fill, and Chill the Cake Layers
- 2. Apply a Thin Crumb Coat
- 3. Frost the Cake Smoothly
- 4. Roll and Cut the Fondant Ruffles
- 5. Attach the First Row of Ruffles
- 6. Build and Finish the Ruffled Sides
- 7. Add the Top Finish and Final Chill
- Common Mistakes and How to Fix Them
- How to Store a Fondant Ruffle Cake
- Frequently Asked Questions
- Can a beginner make a fondant ruffle cake?
- Should the buttercream be soft or stiff for fondant ruffles?
- Why is my fondant sticking to the buttercream?
- Do I need fondant for every part of a ruffle cake?
- How do I transport a fondant ruffle cake without ruining it?
- Conclusion
What You Need
Everything below covers one 8 inch round tier. If you are stacking a wedding cake, decorate each tier separately and stack them on site, not before.
- Two 8 inch round cake layers (vanilla works well) plus filling and a thin buttercream layer to stop them sliding
- Stiff American buttercream, about 4 to 5 cups for the crumb coat and final coat combined
- Fondant for the ruffles, 1 to 2 lb (roughly 450 to 900 g) per 8 inch tier, in one color or three shades for an ombre
- Fondant smoother or acrylic disc, plus an offset spatula and a straightedge ruler
- Ribbon cutter or pastry wheel, a metal ruler, and a small sharp knife for trimming
- Ball tool (or a wooden skewer) for thinning and curling one edge of each strip
- Cornstarch shaker, a foam pad or silicone mat, and a small paintbrush
- Sugar glue (sifted powdered sugar mixed with a few drops of water to a thick paste)
- Turntable, a cake board, and wooden dowels or straws if the tier sits on anything
One thing worth saying plainly before you start: ruffles need a firm, well-chilled surface to hold their weight. American buttercream that is stiff enough to hold a peak works. Swiss or Italian meringue, cream cheese frosting, and any buttercream that slumps when you turn the cake will not, and the strips will slide down within the hour. If your frosting is soft, mix in more butter, or chill the frosted cake longer than you planned.
Step-by-Step: How to Make a Fondant Ruffle Cake
The method below leans on four things: a thin crumb coat, frosting chilled until it is firm enough to resist a fingerprint, fondant strips all cut to the same width, and a last chill so the pleats set sharp instead of settling.
1. Level, Fill, and Chill the Cake Layers
Trim the domes off both layers with a serrated knife, cutting downward in a slow spiral, then place them on a flat board and check with a level that the top edge is even all the way around.
Spread about a quarter inch of filling on the first layer, add the second layer, and press gently straight down so the stack sits flat rather than domed. To stop sliding, spread a thin smear of buttercream on the board first. If the tier sits on a base or a lower tier, push one dowel through the center now rather than after frosting.
Chill the stack for 30 minutes. It is ready when the layers feel cold and firm and the filling no longer bulges at the seam.
2. Apply a Thin Crumb Coat
Scoop a small amount of stiff buttercream onto the cake and spread it with the back of a palette knife or the side of the offset spatula, turning the turntable as you go. The coat should be thin enough that you can still see the cake’s shape and the color of the crumb through it.
Scrape the top flat with the straightedge and pull the sides straight with the smoother. Chill 20 to 30 minutes, then test by touching the surface with a clean fingertip. If it dents, chill longer. If it feels hard and leaves no mark, move on.
3. Frost the Cake Smoothly
Apply a second, thicker coat of buttercream over the cold crumb coat. Add enough to cover any crumbs that would otherwise push through, then knock off the excess with the offset spatula held at a slight angle.
Pull the sides straight with the smoother in one continuous vertical stroke per section, turning the turntable between strokes. Scrape the top with the straightedge held across two dowels or the rim of an upside-down bowl for a sharp edge where the top meets the side, and use the palette knife to draw a clean line at the base.
You are looking for an even surface with no visible horizontal marks and a bottom edge that meets the board cleanly. Chill 20 minutes again before any fondant touches the cake.
4. Roll and Cut the Fondant Ruffles
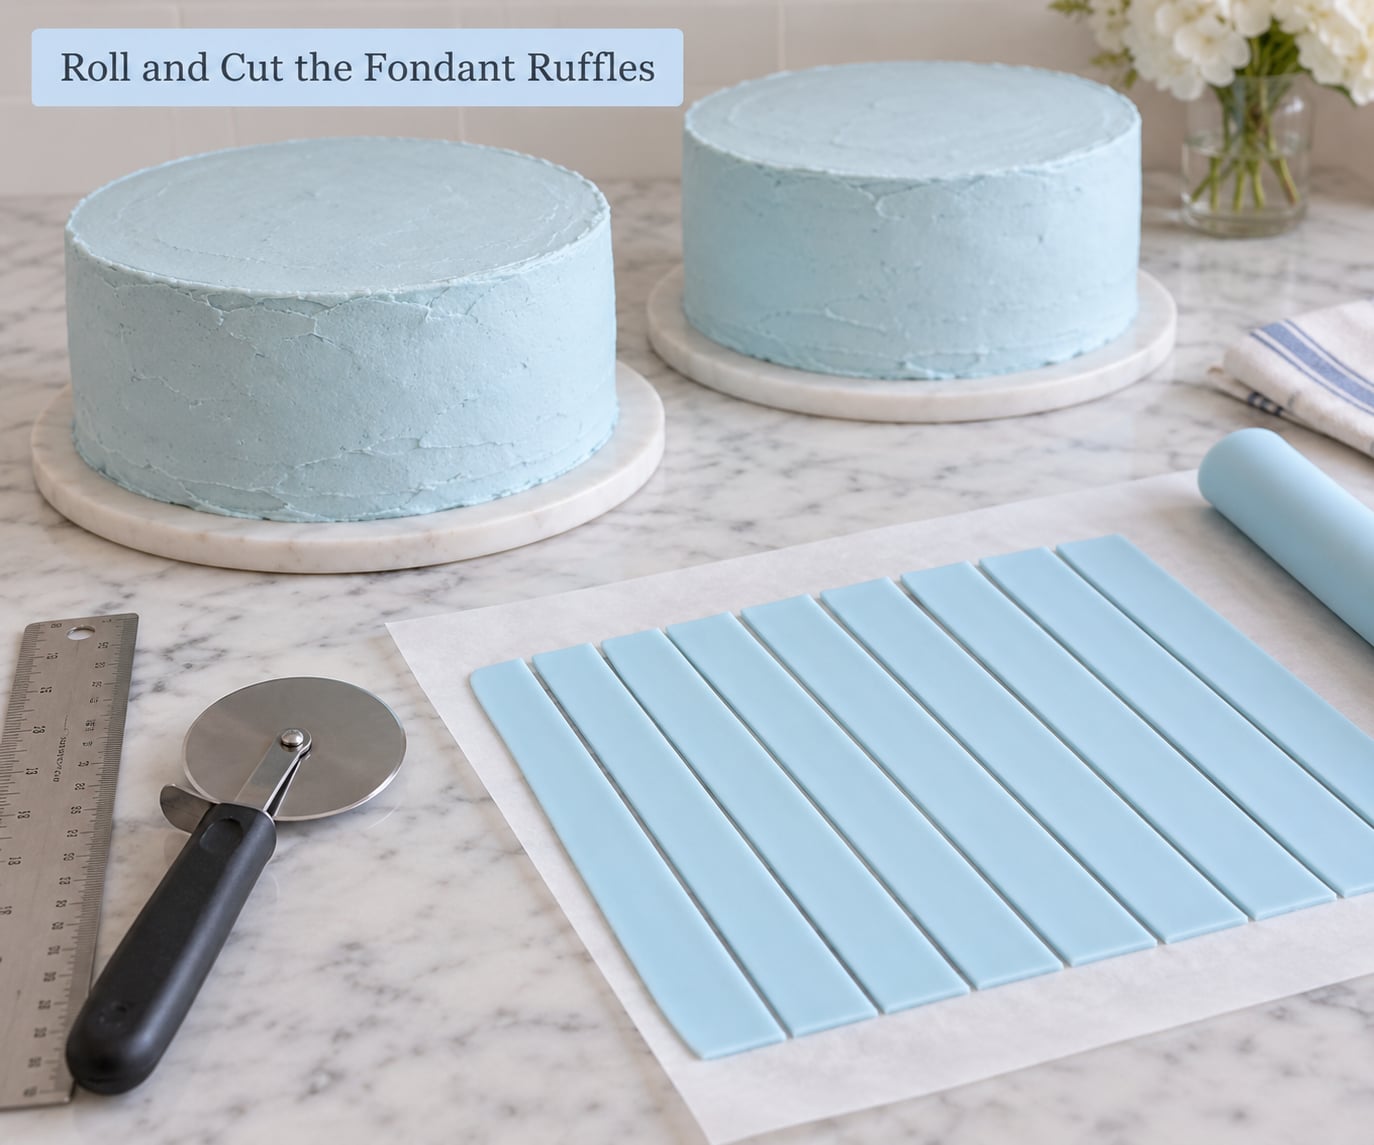
Knead the fondant until pliable, then roll it to about 1/8 inch (3 mm) thick. Roll with a light hand from the center outward and lift the fondant rather than dragging it, so it never stretches. Stretched fondant thins unevenly and cracks at the folded edge later.
Measure the strip width with a ruler: 1.5 inch wide is the sweet spot for a full-size tier, while a 1 inch strip suits a small 6 inch tier and gives you more overlap per row. Cut straight down with a pastry wheel or ribbon cutter, then separate the strips and dust both sides lightly with cornstarch.
Keep the strips workable by laying them in a single layer on parchment or between two sheets of plastic. If you batch them, keep the stack dusted with cornstarch and work from the top of the pile so the lower strips do not pick up moisture.
5. Attach the First Row of Ruffles
Paint sugar glue onto the buttercream in sections about 1 inch wide, working in a narrow band around the top edge of the cake. Do not paint the whole cake at once, because the glue will skin over and go tacky before you reach it.
Lay the first strip so its straight edge sits level along the top of the cake and the free end curls outward. Press only the center of the strip to the frosting. Pressing the whole strip flattens the pleat and kills the ruffle.
Keep your upper edge lined up with the top of the cake as you go, and attach one strip at a time all the way around before you move down.
6. Build and Finish the Ruffled Sides
For the second row, place it so it overlaps roughly half of the row above, and shift the folds slightly left and right from the row underneath so vertical seams do not line up and read as a ladder.
At each join, pinch the two strip ends together in the middle and feather the edges so the seam disappears into the pleat. If a join looks crooked, peel the strip back before the glue sets, shift it a few millimeters, and press again.
Trim the final strip to length rather than letting it overlap heavily, then finish the top edge with a smooth fondant band, a piped buttercream border, or a folded strip laid flat over the last row.
If a small gap opens and you can see buttercream behind it, patch it with a short strip cut from a scrap rather than smearing buttercream into the gap. Bumps and bulges in the frosting mean the cake needs another 15 minutes in the fridge, not more pressing.
7. Add the Top Finish and Final Chill
The top is where most cakes go wrong, because people stop while the sides still need tidying. Options are a rolled fondant top with a matching border, a second row of smaller ruffles piped around the rim, or a simple piped shell border in a coordinating color.
Chill the finished cake 30 to 60 minutes before moving it. The pleats firm up in the fridge, the sugar glue sets, and the cake becomes firm enough to lift onto a board or a stand without the ruffles slumping.
Realistic timings: about 60 to 90 minutes to level, fill and frost, 30 to 45 minutes to roll and cut strips, 45 to 60 minutes to attach the rows, and 30 to 60 minutes of chilling. Allow two to four hours total for one tier. A three-tier cake is closer to eight or nine hours of work across two days.
Common Mistakes and How to Fix Them
Ruffles droop or slide off. The fondant is too soft. Let cut strips dry 20 to 30 minutes before using them, or knead in extra powdered sugar. For a humid venue, work one third gum paste into two parts fondant, which firms it noticeably.
The ball tool tears the strip. That is usually marshmallow fondant that is too wet. Knead in a little cornstarch or extra firm fondant until it stops sticking to your hands, and make the curl in two lighter passes instead of one firm drag.
Fondant cracks as you roll or fold. The room is dry or you rolled it too thin. Knead in a few drops of vegetable oil or a small amount of water to relax it, and stop at 1/8 inch rather than chasing a thinner sheet.
Strips will not stick. The frosting is soft or the cake is warm. Chill it again and retest with a fingertip. Sugar glue works better than water here because it grabs the fondant without melting the frosting underneath.
Seams are visible down the cake. Use shorter strips, offset each row’s folds, and pinch the join in the middle rather than at the edge. Hold the seam under a finger for a few seconds while the glue grabs.
The finished cake looks dusty. That is leftover cornstarch. Brush it off with a soft, dry pastry brush once the cake is cold, and dust more lightly than you think you need while you work.
Ruffles will not hold their shape. Stop and chill rather than pushing through it. Warm hands and a warm kitchen are usually the culprit, so work in short bursts and return the cake to the fridge between rows.
How to Store a Fondant Ruffle Cake
A fully decorated cake with a non-perishable filling such as buttercream or jam sits fine at cool room temperature for one to two days, covered in a cake carrier so nothing touches the pleats. Keep it out of direct sun and away from a hot oven.
If the room is warm or the event runs past two days, refrigerate the cake in an airtight cake box for up to three to four days. Condensation is the real risk here, so put the cake in the box before it goes into the fridge and leave it in the box, closed, until it reaches room temperature. Taking a chilled ruffle cake straight into a humid room beads water on every pleat.
Any cake filled with whipped cream, custard, cream cheese frosting, or fresh fruit needs refrigeration from the start. Serve the ruffle cake at room temperature for the best texture, sliced with a warm knife.
Frequently Asked Questions
Can a beginner make a fondant ruffle cake?
Yes, as long as you slow down at the two fiddly parts: cutting equal-width strips and keeping the first row level. Ruffle work is a stacking and measuring skill, not a shaping one. Practice on a single 6 inch layer first, with no filling and no stacking, so you are only learning the strips. Expect the first cake to take around three hours and look uneven in places. The second one is where it starts clicking.
Should the buttercream be soft or stiff for fondant ruffles?
Stiff, every time. The frosting has to hold the weight of overlapping rows of fondant without sagging between them, so use American buttercream that holds a stiff peak rather than a soft swirl. Soft meringue, cream cheese, or a buttercream mixed for spreading will let the strips slump and slide down the side within the hour. If your frosting feels soft, add more butter or chill the finished coat longer before you attach the first row.
Why is my fondant sticking to the buttercream?
Two different problems hide behind that question. If the fondant sticks to your hands, roll it on a surface dusted with cornstarch and knead in more cornstarch or a little extra sugar if it is marshmallow fondant. If the strips stick too well to the cake or smear into it, your buttercream is too soft or the cake is warm, so chill it for another 20 to 30 minutes and use thicker sugar glue rather than plain water.
Do I need fondant for every part of a ruffle cake?
No. Fondant is only the ruffle strips, the optional smooth band at the top edge, and any fondant top you choose. The cake body, filling, crumb coat, and final coat are all buttercream. Plenty of decorators stop at buttercream and pipe a shell border along the top instead of laying a fondant band, which saves roughly a pound of fondant on a large tier and takes about 15 minutes less.
How do I transport a fondant ruffle cake without ruining it?
Chill it first, then move it cold. A cake that has rested 30 to 60 minutes in the fridge is firm enough that the pleats will not collapse in a car. Set the board on a flat non-slip mat in the footwell or trunk, never on a seat, and drive slowly around turns and speed bumps. For a tiered cake, transport the tiers separately and stack them at the venue once the bottom tier is level.
Conclusion
The whole method rests on four habits: chill the cake between every stage, make the buttercream stiff enough to hold weight, cut every strip to the same measured width, and overlap each row by about half before pressing only the center down.
Measure everything the first time you do it, and take your time pressing rather than smoothing. If you want to learn the technique without the pressure of a full cake, make a single 6 inch layer first, get the strips consistent, and let the fridge do the rest.