The bottom tier of a cake cannot hold the weight of the tier above it, and that one misunderstanding causes most collapsing wedding cakes. To use dowels in a tiered cake, you push food-safe rods vertically into the lower tier, cut them all to the same height, set a cake board on top, then lower the next tier onto that board. Cake and frosting carry almost no structural weight, so the dowels do the carrying and your decorated surface stays put. For a two-tier cake, allow about 45 minutes; the tricky part is cutting every dowel to an identical length, not the assembly itself.
Updated for 2026 by the Cakes n Shapes team.
The short version, if you want the sequence in one place:
- Chill, level and crumb coat every tier while each one still sits on its own board.
- Set the next cake board on top of the tier and trace it lightly, leaving an imprint.
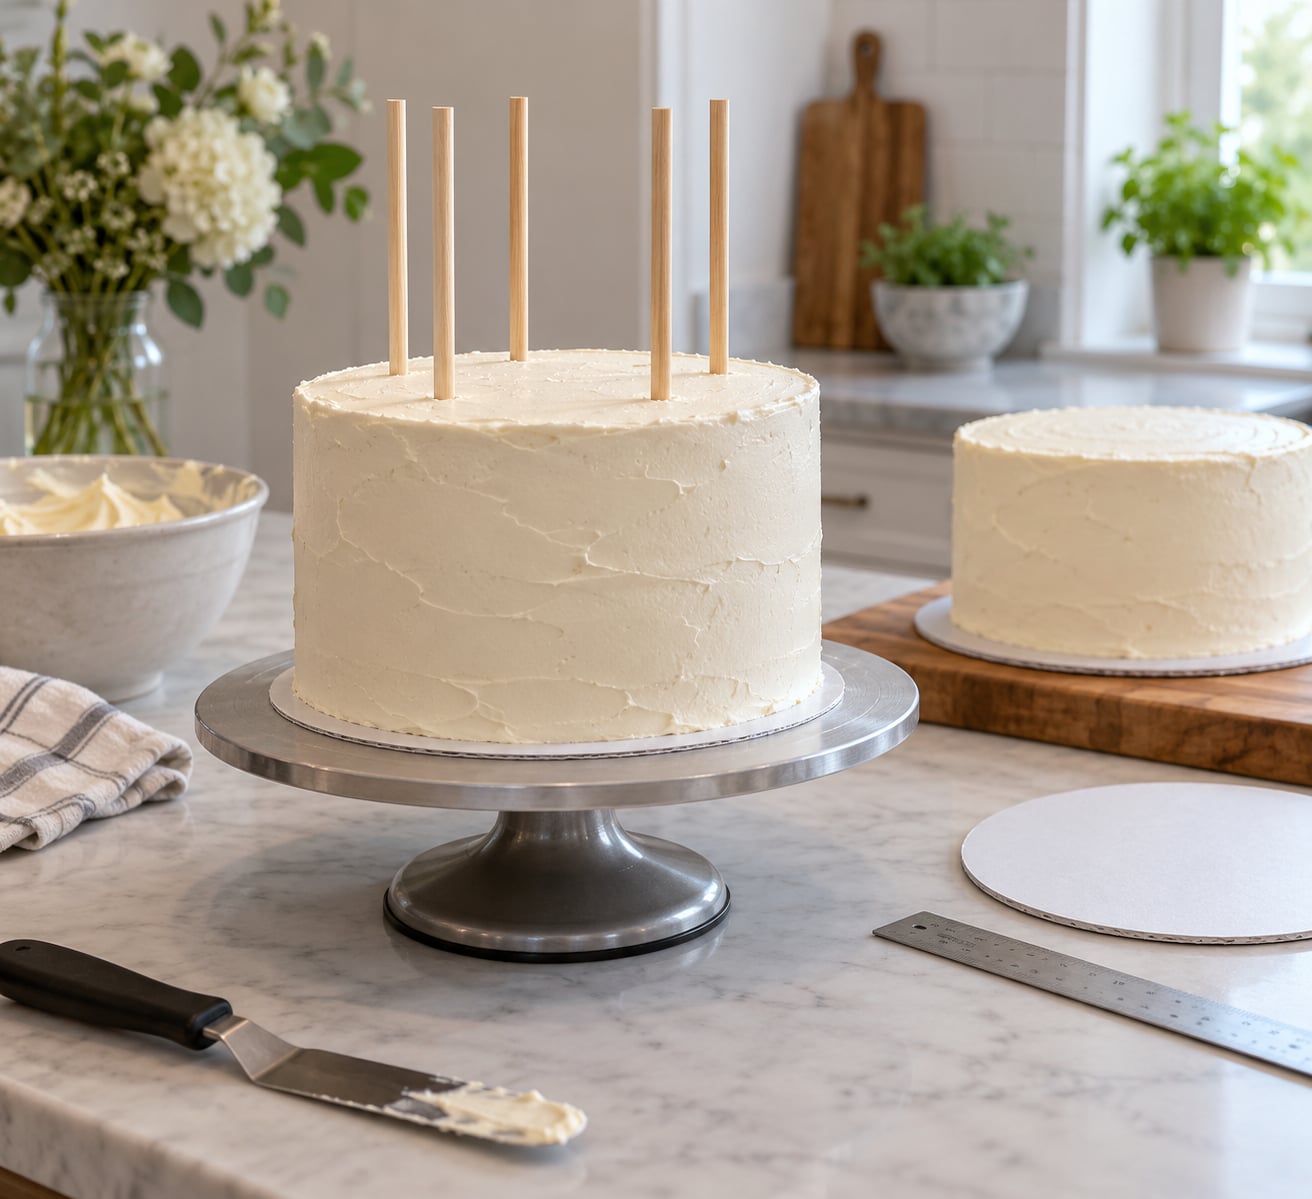
- Place one dowel inside the imprint, mark where it meets the cake, pull it out and cut it at the mark.
- Use that first dowel as a template so every other dowel is exactly the same length.
- Press the dowels into the tier just inside the imprint, spaced evenly in a circle.
- Lay a cake board on the dowel ends, check it is level, then lower the next tier on.
Table of Contents
- What You Need
- Step-by-Step: How to Use Dowels in a Tiered Cake
- 1. Chill and level the cake layers
- 2. Place and secure the bottom cake board
- 3. Add the first cake layer and a thin frosting fill
- 4. Mark the dowel height
- 5. Cut the dowels and seat them at one height
- 6. Add a support system when the tier above is heavy or the cake is tall
- 7. Place the next cake layer
- 8. Repeat the process and finish the cake
- Common Mistakes
- Frequently Asked Questions
- Do you have to use dowels when stacking cakes?
- How many dowels do I need for a 2 tier cake?
- Where should I place the dowels in a cake?
- Can I use straws instead of dowels?
- Do I need dowels for a 3 layer cake?
- How do I stop a tiered cake from leaning?
- Conclusion
What You Need
Dowels are thin food-safe rods, traditionally birch dowel rods and now more often plastic or poly dowels. For a home baker, a bundle of 1/4 inch (6 mm) rods around 12 inches (30 cm) long covers almost every tier size, and a small dowel cutter or sharp kitchen shears will trim them cleanly.
- One cake board per tier — a thin cardboard or foam core circle in the exact diameter of the tier that sits on it. This is the surface the upper tier actually rests on.
- A sturdy cake base for the bottom tier, thick enough not to flex when you set the whole cake down.
- Dowels — more than you think you need. Buy the bundle; cutting extras costs nothing.
- A ruler and the marked dowel for measuring and as a cutting template.
- A small spirit level or a level phone app for the level check most people skip.
- An offset spatula and a turntable for lifting each tier without dragging the frosting.
- Thick buttercream, ganache or royal icing to fill and glue, plus a thin layer for the top of each tier.
Choosing dowel type. Wooden dowel rods are sturdy and cheap, but they are harder to cut and can shift once placed. Poly dowels slice with scissors and stay put, which is why a lot of decorators switched to them. Wide bubble tea straws work in a pinch because they are hollow and food-safe. Flexible drink straws, flimsy hobby-store plastic columns and thin flimsy cake drums do not work — they bend or sink under load, and replacing them after the cake is decorated is a miserable job.
How many dowels. Most guides quote a different number, which is why beginners second-guess themselves. The conventions are: one dowel per 2 inches (5 cm) of tier diameter, or a flat count by tier size, or spacing roughly 1.5 inches (4 cm) from the imprint with extra dowels on larger tiers. In practice these land close together.
- 6 inch tier: 4 dowels
- 8 inch tier: 5 to 6 dowels
- 10 inch tier: 6 to 8 dowels
- 12 inch tier or larger: 8 or more
Wilton’s stacked tier construction guidance spaces dowels about 1.5 inches (4 cm) from the edge of the cake board imprint and calls for at least three additional dowels on tiers of 12 inches (30 cm) or more. If you hit the numbers above and space them inside the imprint, you will be inside every one of those guidelines at once.
One clarification that trips people up: a cake layer is a horizontal slice inside one tier, and a cake tier is a finished unit with its own board. You do not dowel the layers within a tier. You dowel the tiers when you stack them.
Step-by-Step: How to Use Dowels in a Tiered Cake
Dowels move the load from the tier above into a cake board, so the cake you decorated only carries its own weight. Do this method for every tier except the top one, and the finished cake stays level through assembly and transport.
1. Chill and level the cake layers
Fill and frost each tier, then refrigerate it until the buttercream firms up. A chilled tier barely moves when you set something on it, and firm frosting resists the pressure of the board above.
Before chilling, check levelness on a truly flat surface — a sheet of glass on the counter or a level board. Put the small spirit level on top and nudge the cake a fraction at a time until the bubble sits centred. A tower built on a tilted base will lean no matter how good your dowels are.
2. Place and secure the bottom cake board
Set the cake base on a flat counter, with the bottom tier’s own cake board on top of it. Dab a small amount of royal icing or thick ganache under the board and press the tier down so it cannot slide.
That dab matters more than it sounds like. A tier that creeps a few millimetres sideways while you work is what turns a straight stack into a leaning one.
3. Add the first cake layer and a thin frosting fill
Trim any dome off the top with a serrated knife, then set the layer in the centre of the board. Add filling and buttercream between layers, keeping the stack’s total height at or under the height of the sides so nothing bulges out past the outline.
Crumb coat the whole tier, smooth it, and confirm it is level again. The next step depends on that surface being flat.
4. Mark the dowel height
Set the cake board for the tier above on top of the frosted tier and press down gently to leave an imprint ring in the buttercream. Lift it back off — you want the ring, not the frosting disturbed.
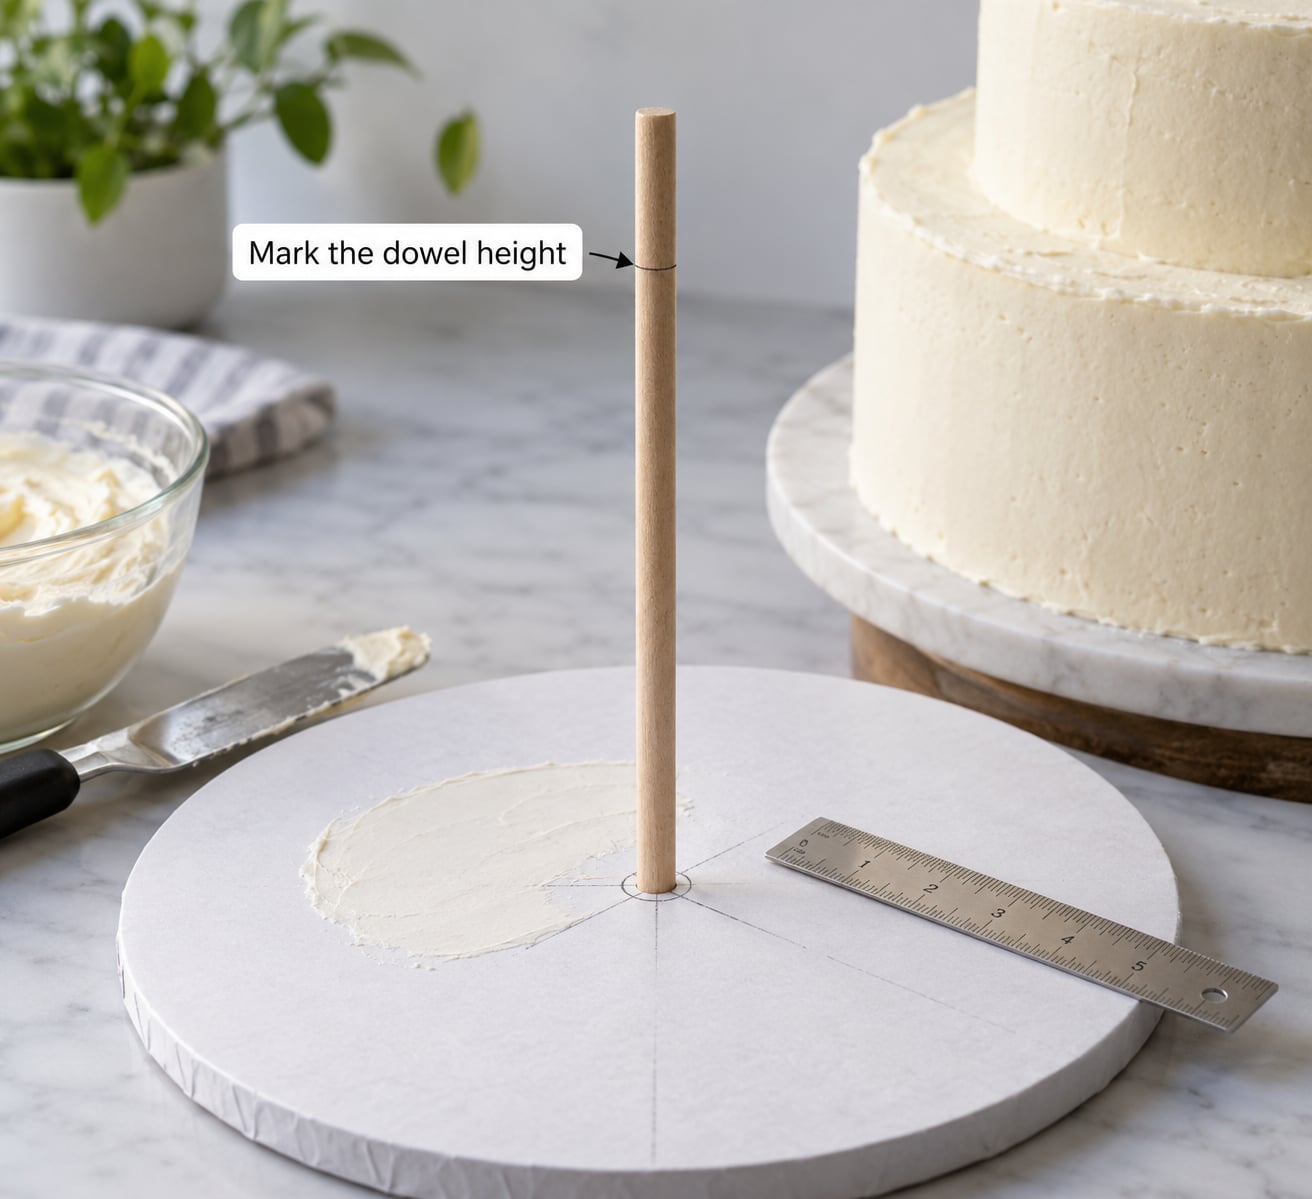
Push one dowel into the cake just inside that ring, stand it perfectly upright, and mark where the dowel meets the top surface of the tier. Pull it out and cut it at the mark. That single dowel is now your height template for everything that follows.
Cut slightly under the mark rather than over it. A dowel that stands a whisker proud will tilt the board above it and rock the whole stack.
5. Cut the dowels and seat them at one height
Line the cut template up against each remaining dowel and snip at the same point, or wrap a strip of paper around the bundle at the measured height and cut through it as one unit. Every dowel should be identical — even a 1/8 inch (3 mm) difference between two of them is enough to make a tier sit at an angle.
Now press each dowel into the frosted surface just inside the imprint, spaced evenly in a circle. Place them 1/2 to 1 inch (1 to 2.5 cm) inside the ring the board left, so the upper tier rests on the dowels rather than hanging half off them.
Push each one down gently with your palm rather than driving it hard. Stop when it meets the bottom board, and give it a tiny nudge to confirm it is straight and upright. Some decorators leave the last few millimetres loose so the weight of the tier above seats them properly; either way, none should wobble when you tap the dowel lightly.
6. Add a support system when the tier above is heavy or the cake is tall
Four or five dowels are plenty for a birthday cake. Once you reach three or more tiers, or a tier that is wide, tall and heavy, spread the load further with a center dowel or an extra board.
A center dowel is a single rod driven down through the middle of the whole stack from the top, after every tier is in place. Tap it in with a rubber mallet so it passes through the boards without splitting them, and keep the middle channel of each tier clear as you stack so the rod has somewhere to go. It stops a tall tower from flexing in the middle.
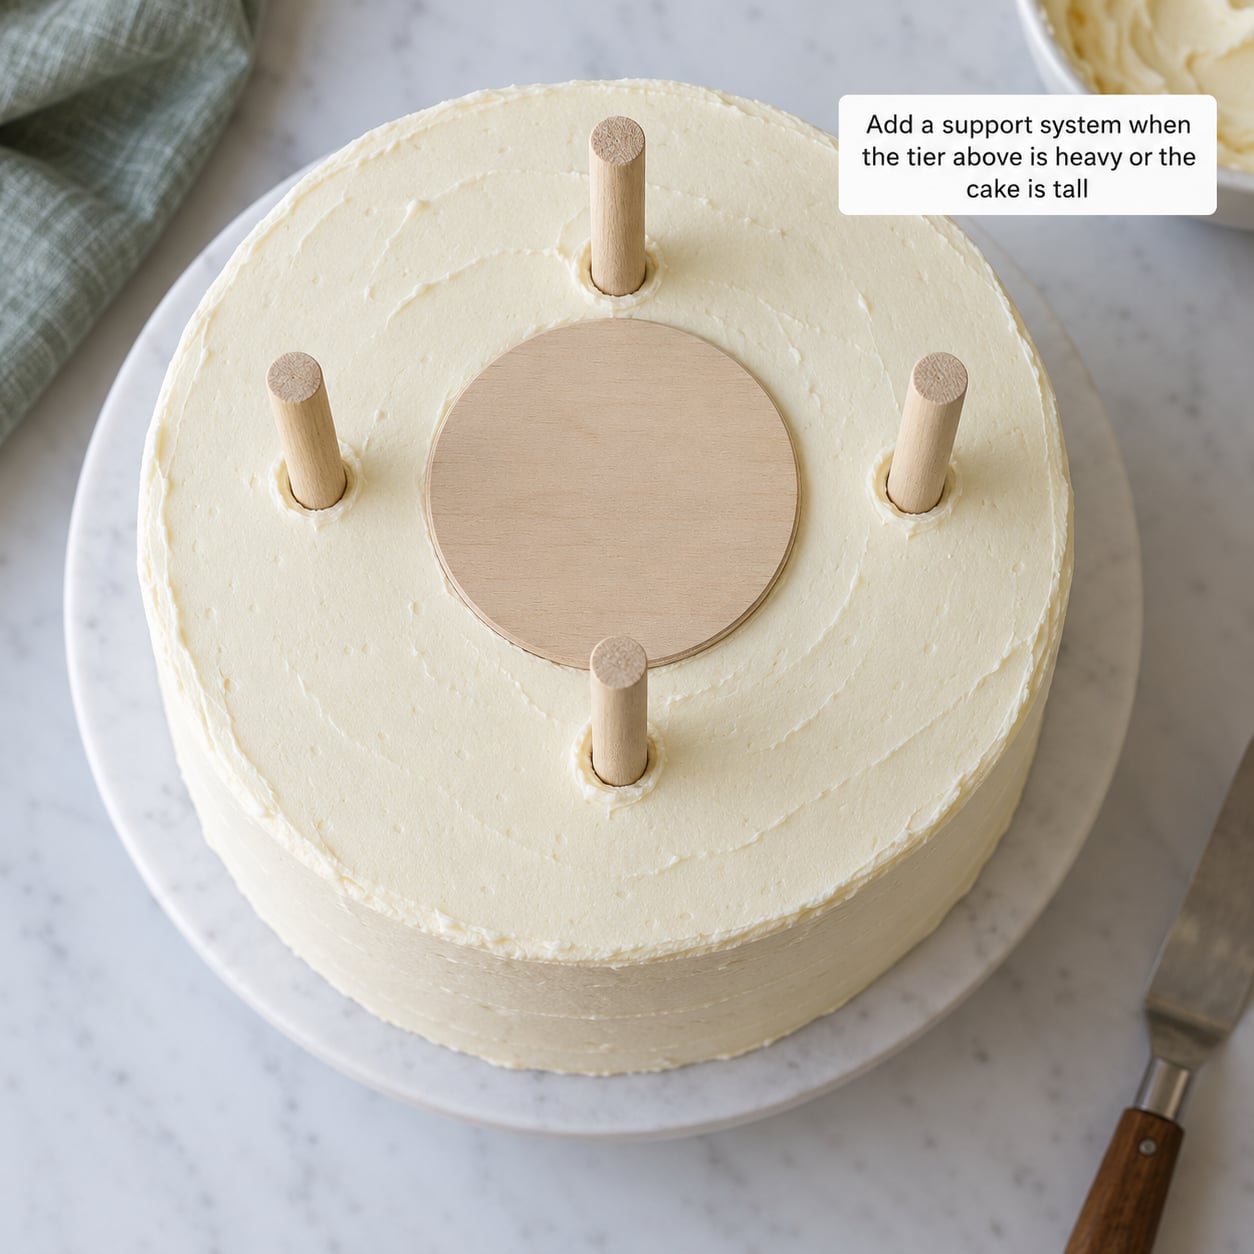
A small foam core board cut to the diameter of the top tier, laid flat on the dowel ends, spreads the load across the whole circle instead of onto five or eight small points. Some decorators add one to every tier on cakes of four or more.
7. Place the next cake layer
Lay the cake board for the next tier flat on top of the dowel ends. Press it down until it stops moving — it should sit on the dowels and touch nothing else.
Put the small level on the board and check it before the cake goes anywhere near it. If the bubble is off, one dowel is taller than the others; pull it, trim it, and reseat it.
Now lower the chilled tier on with both hands, using the spatula as a shelf under its base. Set it down rather than sliding it across, because dragging is what tears buttercream. Ease it into position with the turntable instead of pushing it from one side.
8. Repeat the process and finish the cake
Move up a tier and repeat the whole routine: mark, cut, place, seat, level. Every tier except the top one gets dowels, and each one is checked for level the moment the board lands.
For the finish, pipe a border of buttercream to close the seam between tiers, then do a light final smoothing pass with the spatula turned vertical. Chilling each tier again before the final stack keeps those seams tight and much easier to hide.
Transport matters as much as assembly. Carry one tier at a time on a rigid non-slip mat set on a flat car boot floor, and build the cake at the venue. If it has to travel stacked, the surface underneath must be flat and the cake must be sitting on a board, never on a serving platter.
Common Mistakes
The tower leans to one side. Almost always one of three things: a base that was never level, dowels of different lengths, or a tier that shifted while you worked it. Re-check the bottom tier on a flat surface before anything goes on it, and lay every dowel against the template rather than eyeballing each one.
The bottom tier sinks or the sides bulge. Too much filling between the layers, a filling that is too soft, or a tier that was assembled warm. Chill first, keep the filling inside the outline, and use a firm buttercream or ganache rather than whipped cream or a pudding filling.
A dowel pokes out through the side. It was placed outside the imprint, so it sits beyond the edge of the board above. Pull it, fill the hole with buttercream, and press a new one inside the ring where the upper tier will actually rest on it.
The buttercream cracks or tears as you set the tier down. The frosting was too soft and the tier was not cold enough. Chill both tiers properly, slide a rigid board under the top tier instead of gripping its sides, and lower it straight down without twisting.
The stack drifts after you move it. A car boot floor is not flat, and a non-slip mat is doing the work of a cake board. Transport tiers separately when you can and assemble on site on a level table.
The dowels are cut to the wrong height. Too short and the tier settles onto the frosting, crushing it. Too tall and it tilts. Cutting one dowel, marking it, and using it as a template for the rest is the whole fix.
A dull dome is showing through the top of a lower tier. Fill the dips, re-level, and do a second crumb coat. Once the board on the dowels is level, the tier above hides the rest.
Frequently Asked Questions
Do you have to use dowels when stacking cakes?
Yes, whenever one tier sits on another. Cake and frosting are not structural, so an unsupported upper tier compresses the lower crumb, cracks the buttercream and tips in transit. Dowels carry that load into a cake board instead. The only time you can skip them is a single tall tier with nothing resting on top of it.
How many dowels do I need for a 2 tier cake?
Count them by the diameter of the lower tier: 4 for 6 inches, 5 to 6 for 8 inches, 6 to 8 for 10 inches, and 8 or more for 12 inches or larger. A close enough rule of thumb is one dowel per 2 inches of tier diameter, spaced evenly inside the imprint left by the board above.
Where should I place the dowels in a cake?
Set them in a circle 1/2 to 1 inch (1 to 2.5 cm) inside the ring left by the cake board of the tier above. That keeps the whole upper tier resting on the dowels rather than half on them and half on frosting. Space them evenly so the load spreads across the tier, not to one side.
Can I use straws instead of dowels?
Wide bubble tea straws work because they are rigid, hollow and food-safe. Flexible drink straws do not: they bend under the weight of the tier above and the top of the cake tilts. Whatever you use, the rule is the same — every support cut to exactly the same height and placed inside the board imprint.
Do I need dowels for a 3 layer cake?
Not for the three layers themselves. Layers within a single tier only need filling and buttercream between them. Dowels come in when that finished tier has to carry another tier on top. If your three layers are very tall and heavy, a center dowel or a foam core board helps more than extra supports would.
How do I stop a tiered cake from leaning?
Start from a perfectly level base, cut every dowel to the same height using one as a template, and space them evenly inside the board imprint. Check the small spirit level on each board before the next tier goes on. Chill the tiers well and transport each one separately on a non-slip mat rather than moving the finished cake.
Conclusion
Start with evenly spaced dowels cut to one identical height, set inside the imprint the board above left behind. Lower each tier straight down with both hands, check the level before you add anything else, and repeat the mark, cut, seat and level routine for every tier below the top one. Get those four moves right and the finished cake carries its own weight without leaning, sinking or cracking.