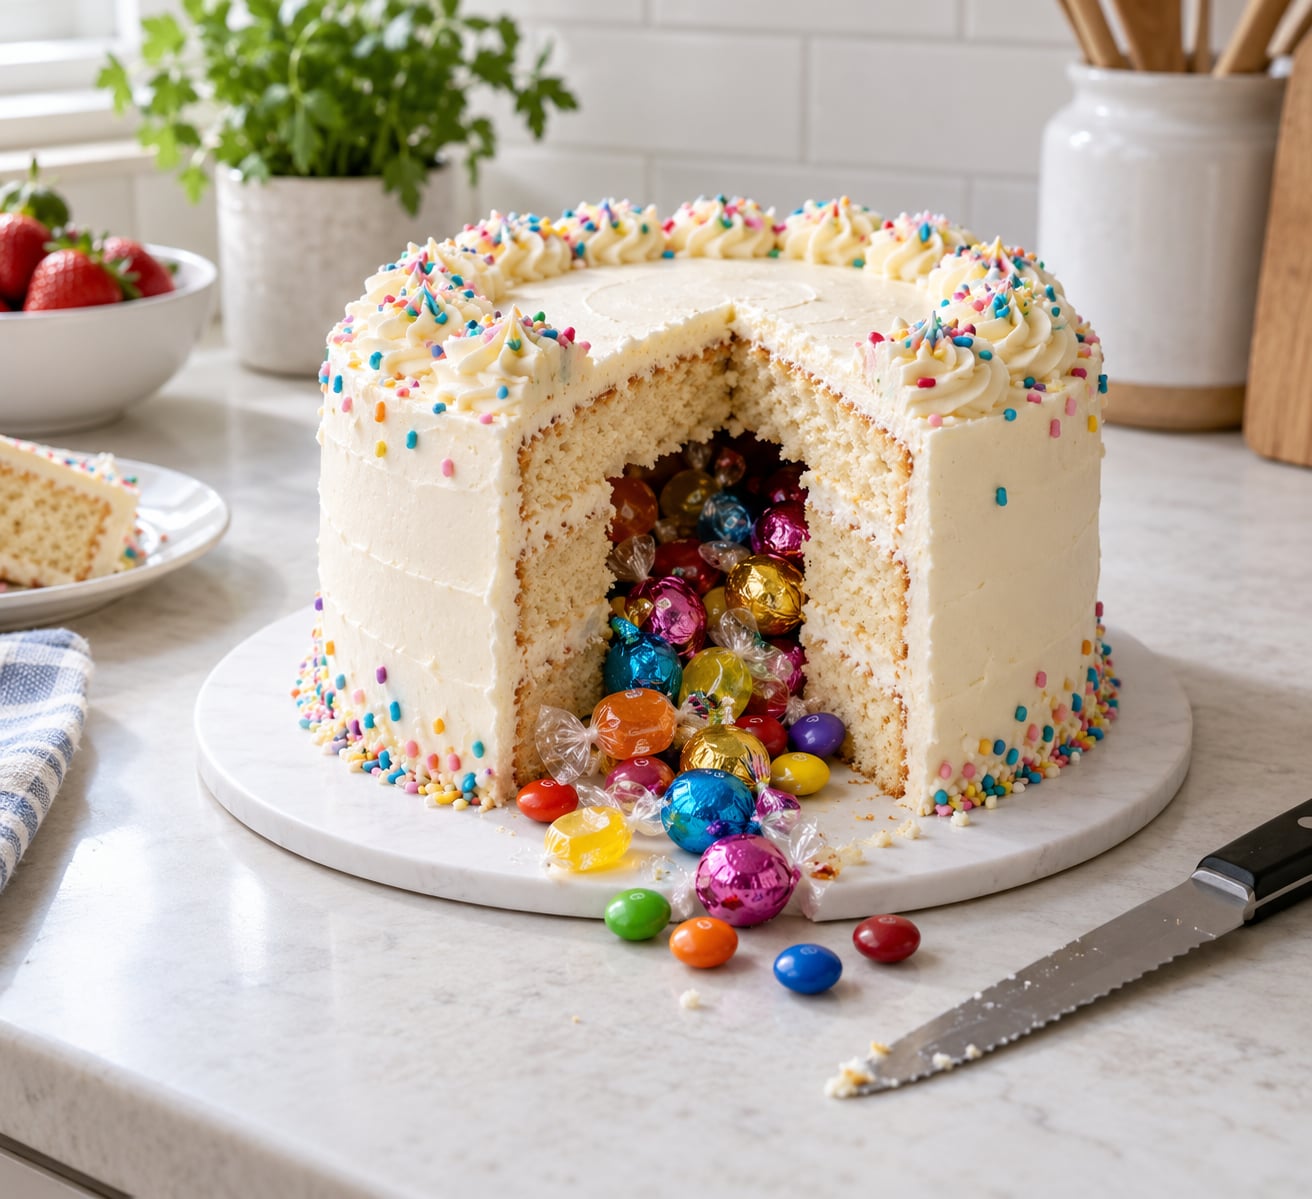
A surprise inside cake, also called a piñata cake, is a plain-looking layer cake with a hollow center packed with candy, small gifts, or a note, so the filling tumbles out the moment you cut into it. The technique is simple: bake four round layers, cut a core out of the middle two, fill the gap, and frost the outside like any other cake.
The whole job takes about two hours of active work plus baking and chilling time, and it uses the same tools you already have. Boxed cake mix and store-bought frosting work fine, so this is one of the higher-impact cakes a beginner can make. I would hand any beginner the method below in 2026 without changing a step.
Table of Contents
- What You Need
- The cake
- The tools
- The filling
- Support materials, only if you need them
- Step-by-Step: How to Make a Surprise Inside Cake
- 1. Choose a Sturdy Cake and a Stable Surprise
- 2. Level, Chill, and Mark the Hidden Center
- 3. Carve the Cavity Without Cutting Through
- 4. Add Filling and Reinforce Soft Layers
- 5. Close the Cake and Trap Moisture
- 6. Frost the Cake for a Clean Finish
- 7. Chill, Slice, and Reveal the Surprise
- Common Mistakes and How to Fix Them
- The cavity tears while you cut it
- The center collapses when you cut the first slice
- The filling bleeds into the frosting
- The candy is crushed or broken
- The stack slides or looks uneven
- Frosting melts or pulls up crumbs
- Too much filling, not enough
- Hiding a gift, key, or note inside
- Allergies, melting, and serving safely
- Frequently Asked Questions
- What is the best filling for a surprise inside cake?
- What kind of cake is easiest to carve?
- How far in advance should I make a surprise inside cake?
- Can I freeze a cake with a hidden filling?
- How do I keep the filling from leaking?
- Can I put a message inside a cake without frosting the inside?
- Conclusion
What You Need
The list is short, and every item is either a cake tool you likely own or something you can swap. The only purchase worth making is a cake board bigger than your cake, because a filled stack is heavier and more fragile than a plain one.
The cake
- Four 8-inch round cake layers, from scratch or from boxed mix
- Five to six cups buttercream frosting, roughly a crumb coat plus a full finish
- Two cups filling for the hidden center, plus a thin layer of buttercream for stacking
- One cake board, 10 to 12 inches
Oil the pans and line the bottoms with parchment. Two layers get hollowed out and two stay whole, and the two intact layers are what gives the cake its structural walls.
The tools
- A long serrated knife for trimming domed tops and cutting clean slices
- A 4-inch ring cutter, or a small bowl in the 4 to 5 inch range to use as a cutting guide
- An offset spatula for crumb coating
- A cake turntable, optional but it makes stacking far steadier
- A piping bag and tip, if you want a border or lettering
No ring cutter? Trace a circle on parchment with a small bowl, cut it out, and use that as your template. It takes an extra five minutes and gives you the same even border.
The filling
Good fillings share three traits: they hold their shape, they do not bleed color into the frosting, and they are safe to eat in a bite-sized portion. Candy works because it is wrapped. Loose sprinkles and crushed cookies do not, since the sugar dust migrates into everything it touches.
- Birthday: mini chocolate bars, Reese’s cups cut in half, peanut butter M&Ms, popcorn
- Halloween: candy corn, gummy worms, mini Halloween treats, black or orange M&Ms
- Valentine’s Day: conversation hearts, red hots, small chocolate boxes
- Easter: pastel M&Ms, mini jelly beans, foil-wrapped eggs, plastic eggs filled with small treats
- Graduation: chocolate coins, diploma scrolls rolled from parchment, candy bars
- Movie night: movie-theater boxes, small bags of gummies, two or three wrapped candies per person
- Treasure hunt or classroom: wrapped crackers, juice boxes, small sticker packs
Match the candy to the number of servings. A four-layer 8-inch cake serves roughly 16 generous slices, so two cups of filling is about right for a party. For a first attempt, chocolate coins are forgiving because they do not break and they survive a warm car ride better than gummies.
Support materials, only if you need them
Most four-layer cakes hold their own weight. If you are going taller than four layers, filling with something heavy like coins or loose candy, or frosting a cake that travels, add one or two food-safe wooden dowels or a single central support rod through the center of the cake. Never use a metal rod. Anything else you might reach for is unnecessary.
Step-by-Step: How to Make a Surprise Inside Cake
1. Choose a Sturdy Cake and a Stable Surprise
A sturdy cake is one that can stand on its own wall. Yellow butter cake, chocolate cake, and any dense boxed mix all work. Angel food, sponge cake, and anything with a very light crumb fail, because they compress under the weight of a wet filling and the cavity walls crack when you lift a slice.
Keep the cavity modest. In an 8-inch layer, a 4-inch circle leaves a 2-inch wall all the way around, and that is the minimum I trust. Go larger and the cake turns into four thin rings that slide out of alignment on the first cut.
For the surprise itself, wrapped candy is the safe default. A folded note, a key, or a small plastic capsule also works, as long as nothing is hard enough to be a choking risk for the youngest guests at the table.
2. Level, Chill, and Mark the Hidden Center
Cool the layers completely, then chill them for 30 minutes. A chilled layer cuts like a firm block instead of tearing into crumbs, which is the single difference between a clean cavity and a ragged one.
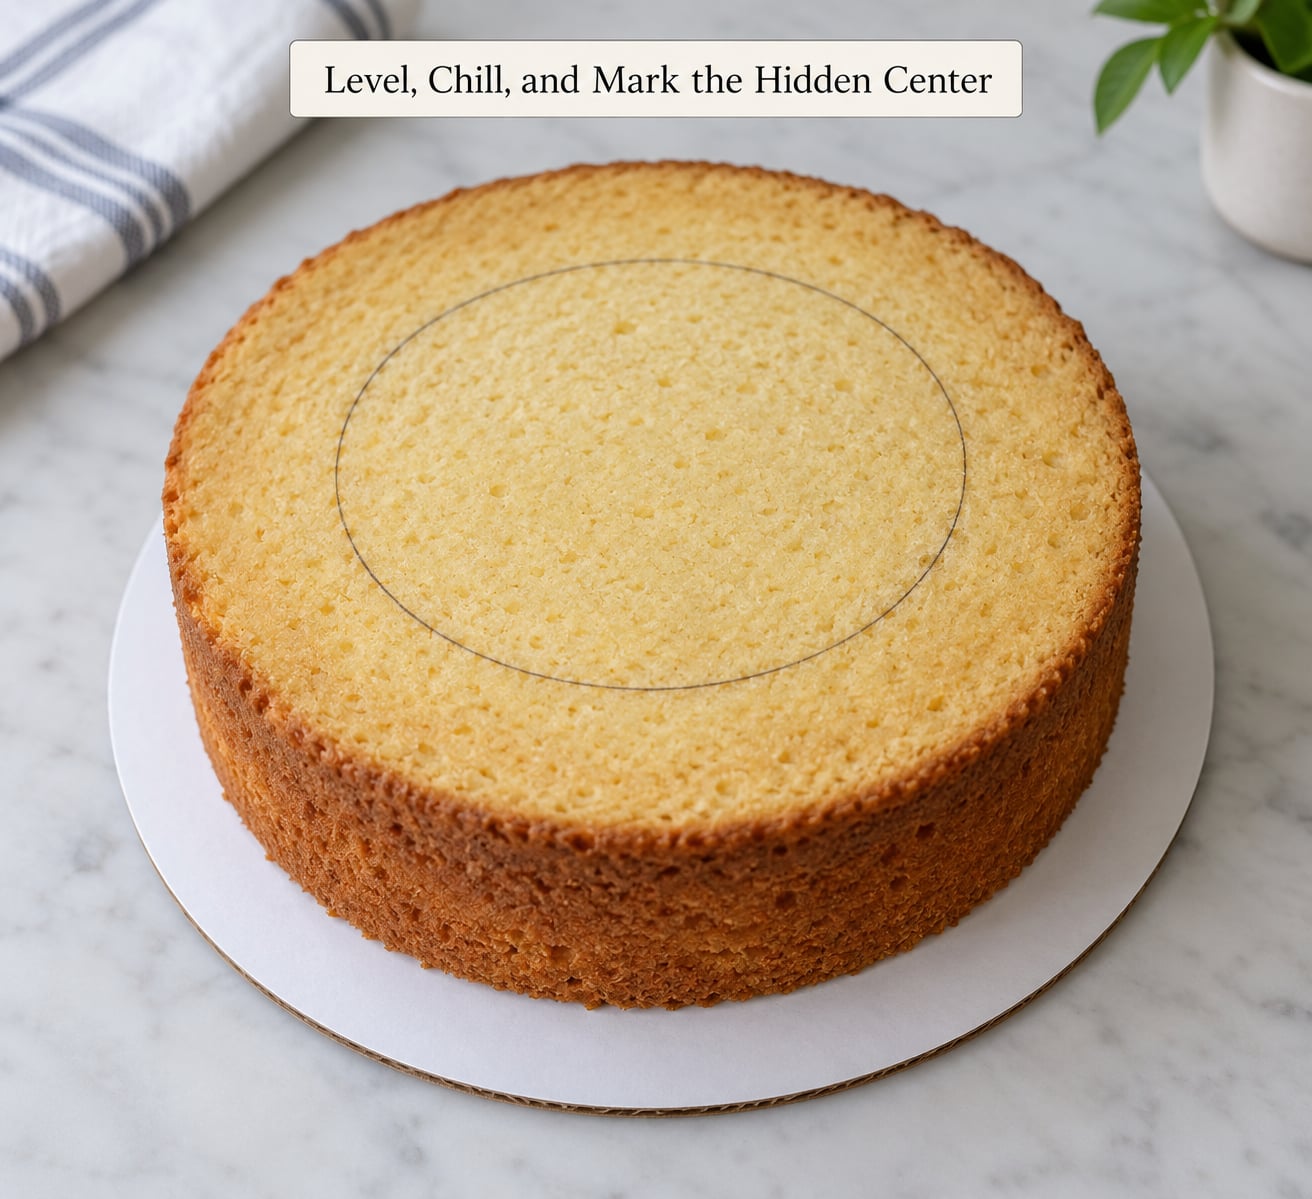
Trim the dome off the top of each layer with a serrated knife held level, sawing gently from the outside in. Then set the ring cutter or bowl in the center of layers two and three and trace around it with a sharp knife, cutting all the way to the bottom without pushing through it.
Check the border from the side before you go deeper. You want an even ring of cake on every side and a solid base about a quarter inch thick under the cavity. That base is what keeps the filling from soaking into the board.
3. Carve the Cavity Without Cutting Through
Work in shallow passes rather than one deep cut. Take off the outer ring first, then pare the circle down to size, rotating the layer as you go so the blade stays vertical and the wall finishes straight.
You will feel the moment you reach the base. Stop cutting and turn the layer over to check from underneath, which is far more reliable than judging by eye from the top. A slightly uneven base is fine, a hole is not.
Set the two carved cores aside. They make excellent small cakes for the people helping, or mini cupcakes with a little frosting on top.
4. Add Filling and Reinforce Soft Layers
Fill the lower carved layer about two-thirds full of your surprise, pressing the candy in gently so it packs rather than floats. Do not pack it above the top edge of the cavity, since anything proud of the rim gets pushed out when you set the next layer on top.
Spread a thin layer of buttercream on the cut face, which acts as a glue and a seal, then add the next layer. For tall cakes, push a food-safe dowel through the center before the final layer goes on so the middle of the stack cannot sag.
Weight matters here. Coins and loose candy are heavy for their volume, so a four-layer cake packed with them benefits from a dowel. Wrapped mini candy bars carry almost no weight and rarely need one.
5. Close the Cake and Trap Moisture
Add one of the intact layers on top, right side down, and press gently around the edges so the stack sits flat. Turn the whole cake on the board to check for a wobble before you frost anything. A gentle rock that stops is normal, a slide that does not is not.
To cut leaking, brush the exposed cake edges with a thin simple syrup made from equal parts sugar and water warmed until dissolved. It soaks into the crumb and creates a barrier that wet fillings stop at. It also keeps the cake from going dry, which is a real problem for a cake you build a day or two ahead.
6. Frost the Cake for a Clean Finish
Chill the assembled cake for 20 minutes, then apply a thin crumb coat: a scant layer of frosting that seals crumbs and traps any seepage from the filling. Crumb coat is not a finishing layer, so scrape off the excess with a straight spatula and let the ridges disappear.
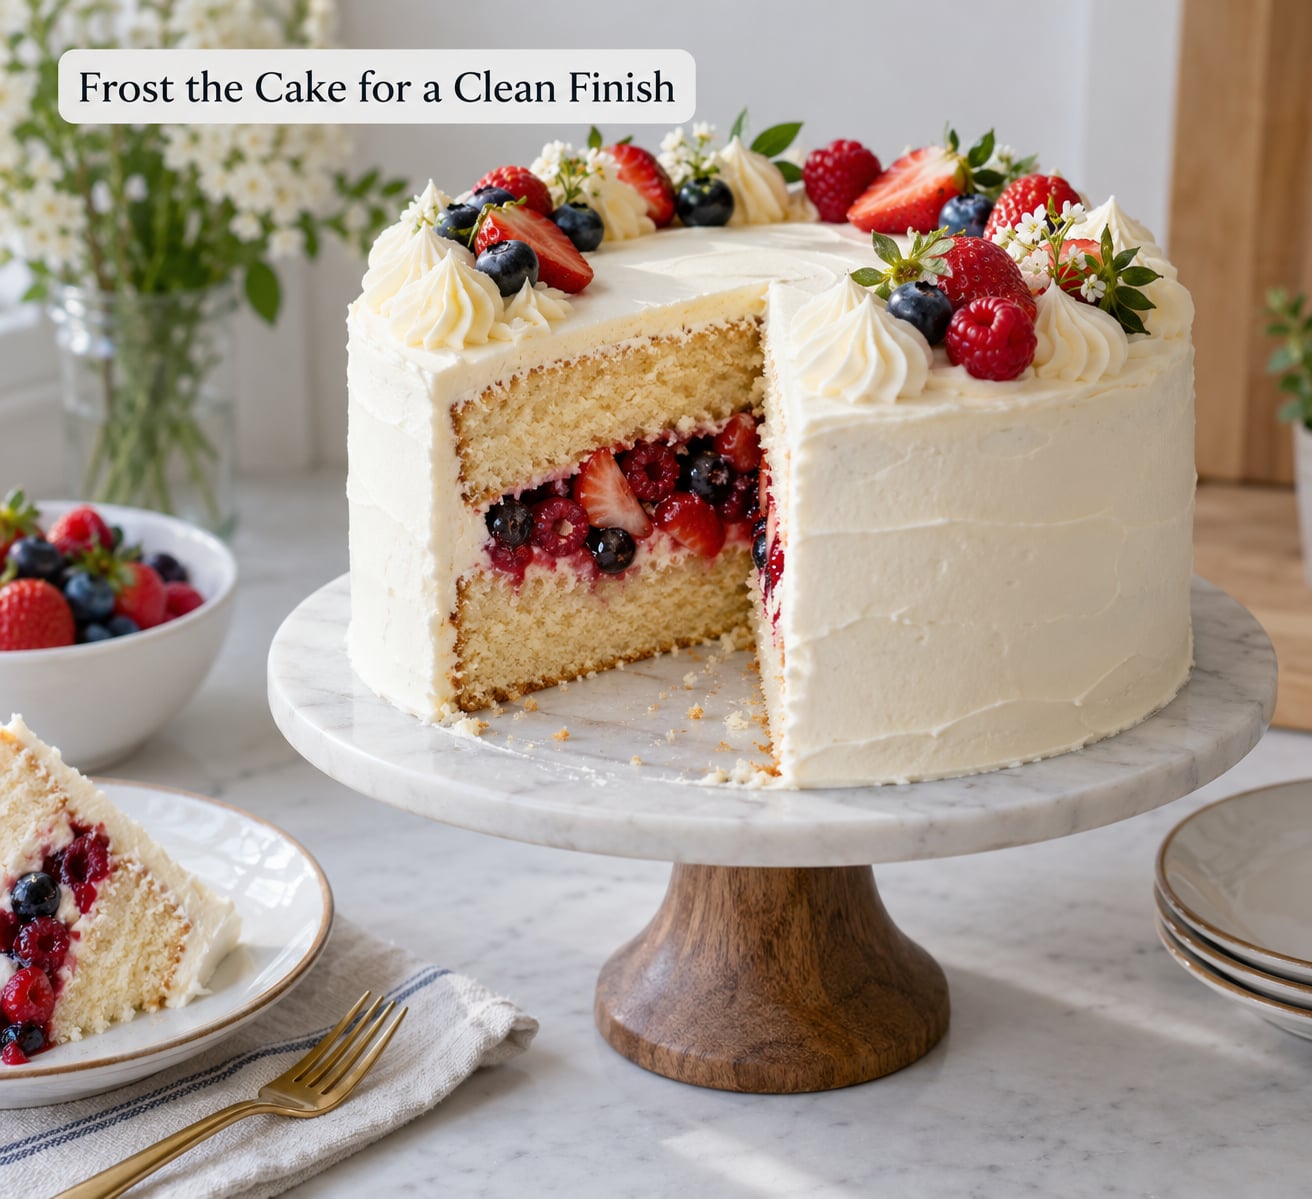
Chill again for 20 minutes, then frost the outside properly and add your finish: a ganache drip, a watercolor buttercream effect, sprinkles, or a topper. Keep the exterior design simple if frosting is not your strength, because a plain smooth finish in one color makes a reveal cake look intentional.
Hide the seam by frosting from the top down and pushing the frosting slightly past the bottom edge in a sharp, deliberate line. A scalloped or rustic base edge disguises an uneven one entirely.
7. Chill, Slice, and Reveal the Surprise
The cake cuts cleanest straight from the refrigerator, so chill the finished cake for at least an hour before serving. Run a long serrated knife under hot water and dry it between every slice, and each piece keeps its sharp edge.
Cut all the slices first, then carry them out together. The reveal is most of the fun when the whole table sees the pile of candy land on the plate at once, so resist the urge to hand slices out one at a time.
For a two-cup filling in a 16-serving cake, budget about a quarter cup of surprise per slice. If you filled more heavily, cut smaller slices so nobody ends up with a spoonful of candy and a bite of cake.
Common Mistakes and How to Fix Them
The cavity tears while you cut it
The cake was too warm or the blade was too dull. Chill the layers for 30 minutes, use a sharp knife, and cut in shallow passes instead of pressing straight down. Sawing motions tear far less than pushing motions.
The center collapses when you cut the first slice
The wall was too thin or the filling too wet. Keep at least a 2-inch border, fill no higher than the rim, and chill the finished cake for a full hour. If you are stacking more than four layers, add a dowel.
The filling bleeds into the frosting
Wet fillings migrate through crumb unless you seal them. Brush the cut edges with simple syrup, use a proper crumb coat, and refrigerate the finished cake. Thick preserves, curd, and ganache leak far less than loose candy dust or crushed cookies.
The candy is crushed or broken
You packed it too hard or dropped the cake. Add it in two loose layers rather than compressing it, and never refrigerate chocolate candy in a car. If you need something that survives transport, wrapped coins and boxed miniatures hold up better than anything brittle.
The stack slides or looks uneven
The layers were not leveled or not level with each other. Trim the domes while the layers are cold, measure each one after trimming, and build the tallest layer on the bottom. A thin spread of frosting on a board also stops the whole cake from sliding while you frost.
Frosting melts or pulls up crumbs
The cake was warm or the crumb coat was too thick. Frost only a cold cake and keep the crumb coat thin. If frosting drags crumbs upward, chill for another 15 minutes and use a hot, clean spatula to warm the blade slightly.
Too much filling, not enough
Extra candy pushes the top layer up and leaves a gap at the edges. Two cups fits a four-layer 8-inch cake comfortably. If you want a bigger reveal, add a fifth layer rather than packing the same cavity harder.
Hiding a gift, key, or note inside
Skip the cavity for a small flat object. Make a pocket by cutting a shallow horizontal slot in the underside of the bottom layer, spread a thin buttercream layer on the cake board first, and set the item in the pocket so it sits against the board rather than floating in the filling. A note rolled around a candy bar fits the same way.
Allergies, melting, and serving safely
Label anything with nuts, and keep the filling clear of peanuts and tree nuts if a nut allergy is in the room. Chocolate candy softens above about 70 degrees Fahrenheit, so for a summer party use gummies, marshmallows, and sealed candies instead. Fillings with cream, custard, or curd need refrigeration, and perishable filling should not sit out longer than two hours. Skip hard candy and small loose pieces for children under three, and hand wrapped items to whoever is cutting rather than letting kids reach into the cavity.
Built cakes keep three to four days refrigerated, covered. Wait to frost until the day before if you are making it ahead, and let the cake sit at room temperature for about 20 minutes before cutting so the filling is not rock cold.
Frequently Asked Questions
What is the best filling for a surprise inside cake?
Wrapped candy is the best filling for most occasions because it holds its shape, does not bleed color into the frosting, and survives transport. Good choices include mini chocolate bars, peanut butter M and Ms, gummy worms, conversation hearts, and foil-wrapped chocolate coins. Avoid loose sprinkles, crushed cookies, and anything loose enough to shift. Match the amount to the servings: about two cups fills a four-layer 8-inch cake that serves sixteen.
What kind of cake is easiest to carve?
Dense cakes are easiest to carve. Yellow butter cake, chocolate cake, and standard boxed mixes all cut cleanly and hold a cavity wall without cracking. Avoid angel food, sponge cake, and very light low-fat crumb, which compress and tear under a wet filling. Chill every layer for 30 minutes before cutting, and use a sharp serrated knife in shallow passes rather than pressing straight down through the pan.
How far in advance should I make a surprise inside cake?
Build the cake two to three days ahead and refrigerate it covered, then frost and decorate the day before the party. You can also freeze the baked layers for up to three months and thaw them wrapped at room temperature, which makes carving them much easier. Let a refrigerated finished cake sit out about 20 minutes before cutting so the filling is not too cold to slice cleanly.
Can I freeze a cake with a hidden filling?
Yes, and most bakers find it improves the cake. Freeze the assembled and crumb-coated cake without the final frosting, wrapped tightly in plastic and foil, for up to three months. Thaw it in the refrigerator overnight, never on the counter, then frost and refrigerate until serving. Freeze unwrapped candy rather than chocolate that might bloom. If the filling contains fresh fruit or cream, freezing softens it, so freeze the layers before filling instead.
How do I keep the filling from leaking?
Seal the crumb, then seal the cake. Brush every cut edge with a thin simple syrup before stacking, spread buttercream on the cut faces as glue, keep the filling below the rim of the cavity, and apply a thin crumb coat over the finished cake. Chill for at least an hour before slicing. Thick preserves, lemon curd, and ganache are naturally more stable than loose candy dust or crushed cookies.
Can I put a message inside a cake without frosting the inside?
Yes. A piped buttercream message can go straight into the cavity on a layer of plastic wrap or parchment, then be covered with a buttercream-filled layer. For a written note, roll the paper around a small candy bar so it stays stiff, and slip it into the cavity or into a shallow pocket cut in the underside of the bottom layer. Keep the message away from the cut sides so no ink transfers to the cake.
Conclusion
Start by picking a sturdy cake and a stable filling, because those two decisions decide whether the rest works. Dense butter cake or boxed mix with wrapped candy is the combination that fails least often.
From there the order never changes: cool and chill, level the tops, mark and carve the cavity, fill it no higher than the rim, close and seal with simple syrup, crumb coat, chill again, frost, then chill once more before slicing. Follow that sequence and the ordinary-looking cake on the table opens into the full payload you packed in, which is the normal outcome, not a lucky one.