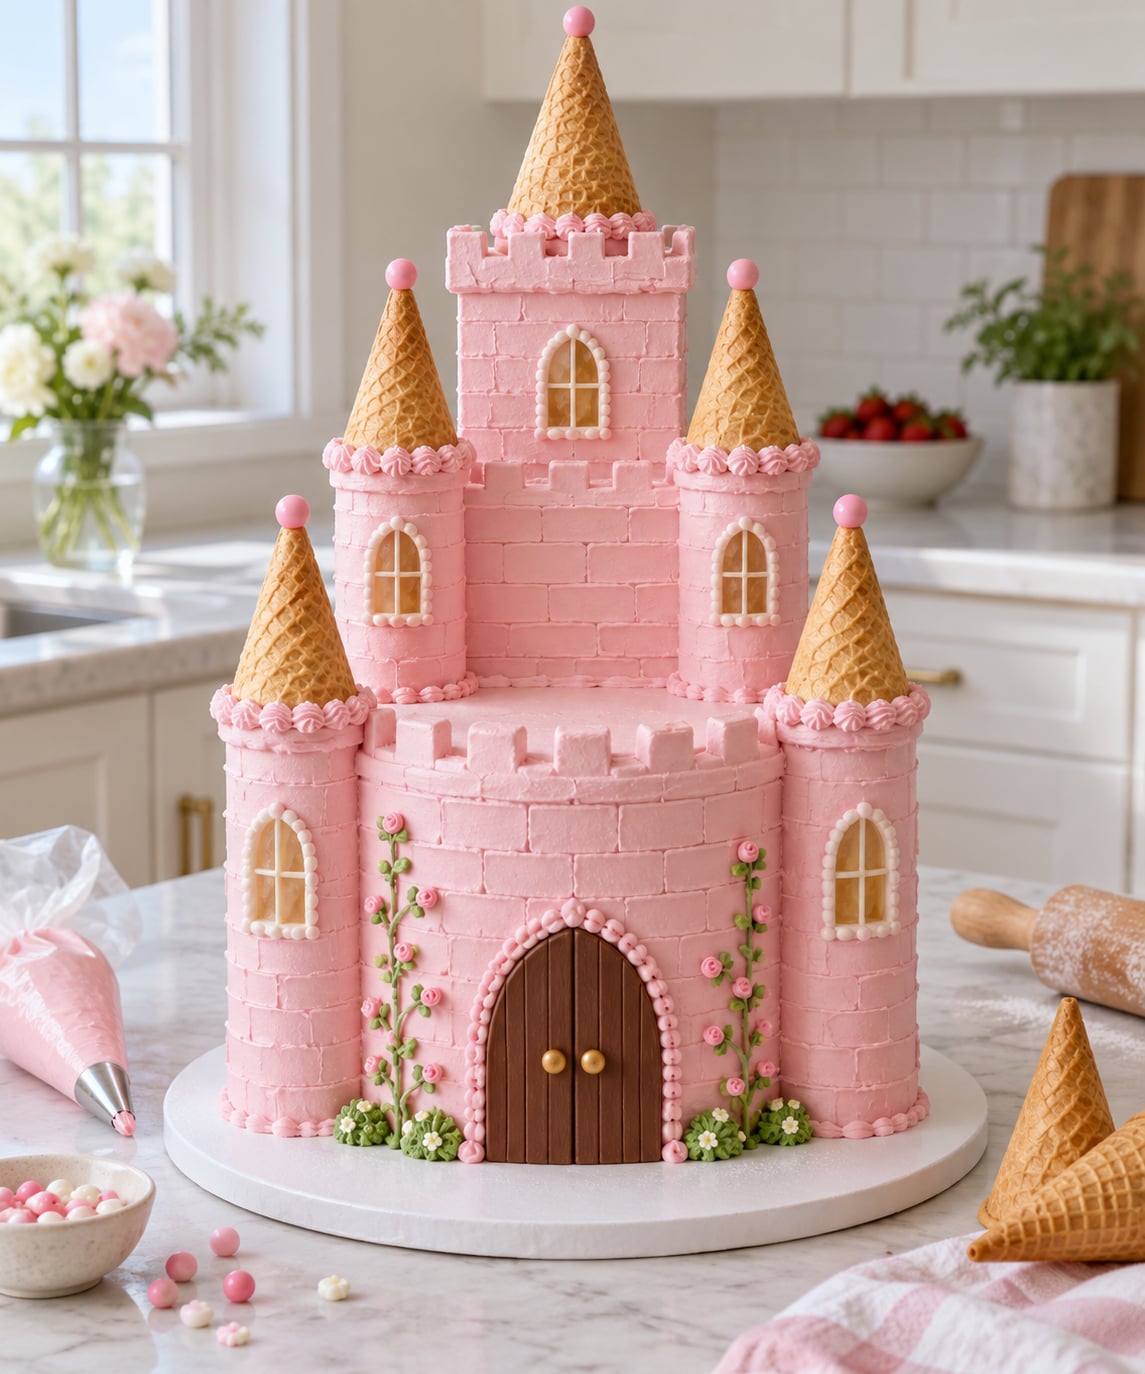
The easiest way to make a princess castle cake is to skip the sculpting. Bake a round cake and a square cake, frost them pink, and push sugar cones into the top as turrets. Add a candy door, piped windows and a crown on top. A build like this takes about four hours across two days, uses a boxed cake mix if you want it to, and works for a third birthday right up to a school bake sale.
I’ve built a few of these for kids’ parties, and the mistake I used to make was trying to carve the shape out of one tall cake. It tears, it sinks, and it takes twice as long. Stacking flat pieces that are already the right shape is faster, sturdier and much easier to fix when something goes wrong.
This guide covers both routes. There is a no-fondant buttercream method that is forgiving and quick, and a fondant version for when you want a smooth, mouldable finish. Pick one and follow it all the way through rather than switching halfway.
Table of Contents
- What You Need
- Equipment
- Ingredients
- Decorating
- How to Make a Princess Castle Cake
- 1. Choose and Prepare the Cake Shapes
- 2. Stack and Crumb-Coat the Cake
- 3. Add Buttercream Frosting
- 4. Make the Castle Walls and Roofs
- 5. Add the Princess Theme Details
- 6. Finish the Cake and Check the Structure
- Common Mistakes and How to Fix Them
- Frequently Asked Questions
- What is the easiest way to make a princess castle cake?
- Can I make a castle cake without sculpting the cake?
- How long should I bake and cool the cake pieces?
- What frosting is best for a castle cake that needs to hold its shape?
- How do I transport a princess castle cake without it breaking?
- Can I make a princess castle cake ahead of time?
- Conclusion
What You Need
This list is in the order the steps use it. Everything here comes from a grocery aisle, a hardware shop or your baking cupboard.
Equipment
- One 20 cm (8 inch) round cake tin, two 15 cm (6 inch) round tins, or one rectangle tin for the main tower block
- Four to six small ramekins, muffin tins or a loaf tin for the towers
- A flat-bottom sugar cone and four to six mini waffle cones for the turrets
- A cake board, roughly 30 cm (12 inch), plus a sharp knife or cake leveler
- A serrated knife for levelling, plus a small offset spatula and a piping bag with a round tip
- Wooden dowels or thick wooden skewers for internal support
- A rolling pin and a small rolling pin for fondant, if you are using fondant at all
- A brick or stone texture mat. A ribbed scraper or a smooth bench scraper held at an angle will do the same job.
Ingredients
For the cake, about 900 g (2 pounds) of firm cake serves 12 to 14. A firm sponge or a standard butter or oil cake works. Very light, moist cakes such as a delicate sponge or a fudgy brownie base are too soft to stack, so keep those for a flat single tier.
- 500 g (about 2 and a half 8 ounce boxes, or 4 to 5 cups of homemade batter) firm yellow or butter cake batter
- 4 to 6 small tower cakes from the same batter, baked in ramekins or a muffin tin
- 340 g (1 and a half cups, or 12 ounces) butter or shortening softened to room temperature
- 500 g (about 4 cups, or 17 ounces) powdered sugar, sifted
- 120 ml (half a cup, or 4 fluid ounces) milk or cream, plus 1 to 2 teaspoons vanilla
- A pinch of salt, and gel food colouring in pink, plus a second colour for roofs if you want two
That buttercream covers a full castle: two tiers, four or more towers and a board. If you are using a store-bought tub of frosting, you will need roughly 1.4 kg (3 pounds) for the same coverage.
Decorating
- A flat-bottom ice cream cone and mini waffle cones, which cost almost nothing next to a specialist castle kit
- A chocolate or cookie door shape, or a rectangle of chocolate you cut yourself
- Candy windows, or piped royal icing for windows if you want them nut-free
- Edible glitter or luster dust for the spires, plus pearl cachons or hundreds and thousands
- Edible glue, which is just a little water mixed into gum paste or a dab of cooled, thin buttercream
- Optional: a cake topper wand, a fondant crown, ribbon for a banner, and fresh or sugar flowers
How to Make a Princess Castle Cake
Build from the bottom up and outside in. The board goes down first, then the main tiers, then the towers, then every bit of decoration. Never the other way round.
1. Choose and Prepare the Cake Shapes
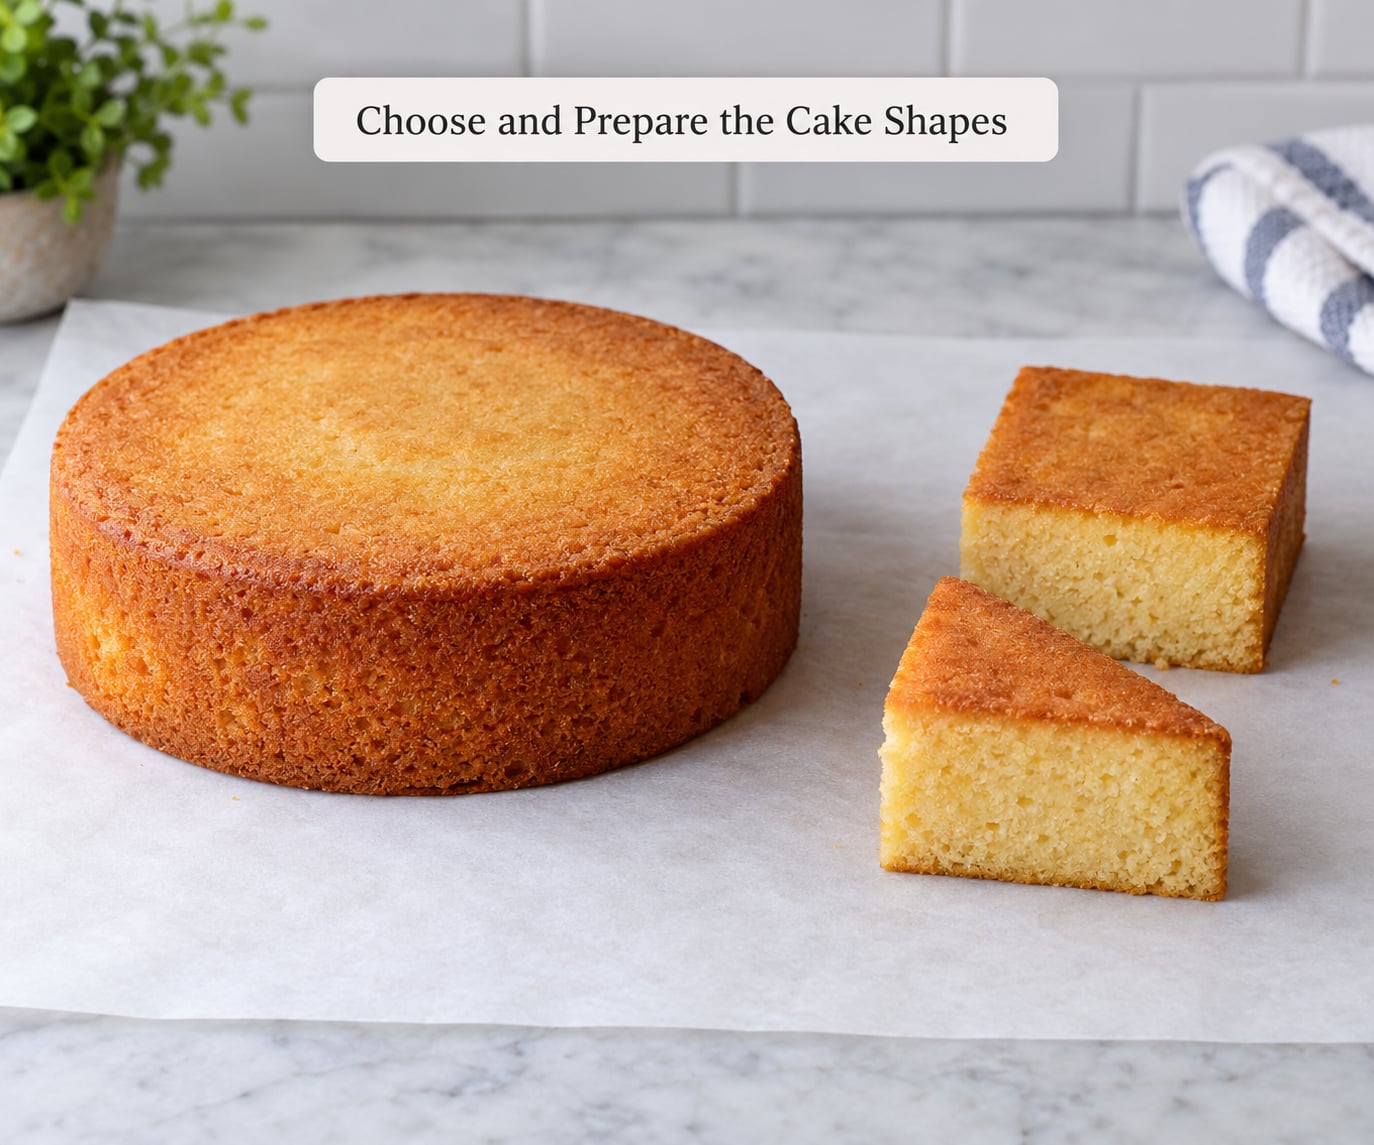
The main body of the castle is a large round cake for the front wall and a square or rectangle piece for the taller back tower. The turrets come from small cakes baked in ramekins, or you can skip baking them entirely and use cones alone.
Bake at 175°C (350°F) for 22 to 28 minutes for rounds, 18 to 22 minutes for the small tower cakes, and 30 to 35 minutes for a rectangle. Test with a skewer in the thickest part; it should come out with a few damp crumbs, never wet batter.
Cool the layers completely on their pans for 10 minutes, then turn out onto a rack. This takes 1 to 2 hours, and cutting into a warm cake is the number one cause of a lopsided castle. Bakers on baking forums describe exactly this: a domed top sliced badly, crumbs dragged across the icing, and a tower that leans all the way to the car.
Level the cakes with a serrated knife held flat against the rim of the tin, turning the cake as you cut. A bench scraper works too. Saw off the dome in thin slices from the back so the crumbs fall onto the board, not onto your work surface.
2. Stack and Crumb-Coat the Cake
Cover the cake board with frosting, fondant or a strip of ribbon and set the main round cake in the middle. Apply a thin crumb coat, a layer of frosting thinner than you think you need, then chill the cake for 20 to 30 minutes. That chill firms the surface so the next layer does not drag it around.
Wherever a second tier sits on top, push wooden dowels or thick skewers down through the lower cake until about 2.5 cm (1 inch) of the lower tier’s thickness remains below them. That leftover depth is your buffer. Skewers poking through the tier above are one of the most common complaints on cake forums, and they happen because people push all the way to the board.
Set the upper tier on top of the dowels rather than on the cake itself. The dowels carry the weight so the lower tier does not compress and squash. Keep the dowel footprint inside the edge of the tier above so you are not cutting into anything visible later.
3. Add Buttercream Frosting
Beat the butter and salt until pale, then add the powdered sugar a little at a time on low speed, alternating with the cream. Beat on medium for 3 to 5 minutes at the end until it turns pale and fluffy. That aeration is what makes it hold a shape rather than slide off.
Do not overbeat once the sugar is in. If the frosting looks dull and heavy at first, keep going. It lightens at around the five-minute mark and that is when the ice cream cone spires and rosettes stop slumping.
Ice the chilled cake with a crumb coat, chill again for 15 minutes, then lay on the final coat. Hold the spatula vertical, turn the cake slowly, and smooth in one direction rather than back and forth. For sharp edges, use a scraper held at the bottom of the rim and rotate the board while you pull it upward.
Reserve roughly a quarter of the frosting in a separate bowl for the brick lines, the banner lettering and the flowers. That reserved piece also gives you a second colour without mixing a new batch.
4. Make the Castle Walls and Roofs
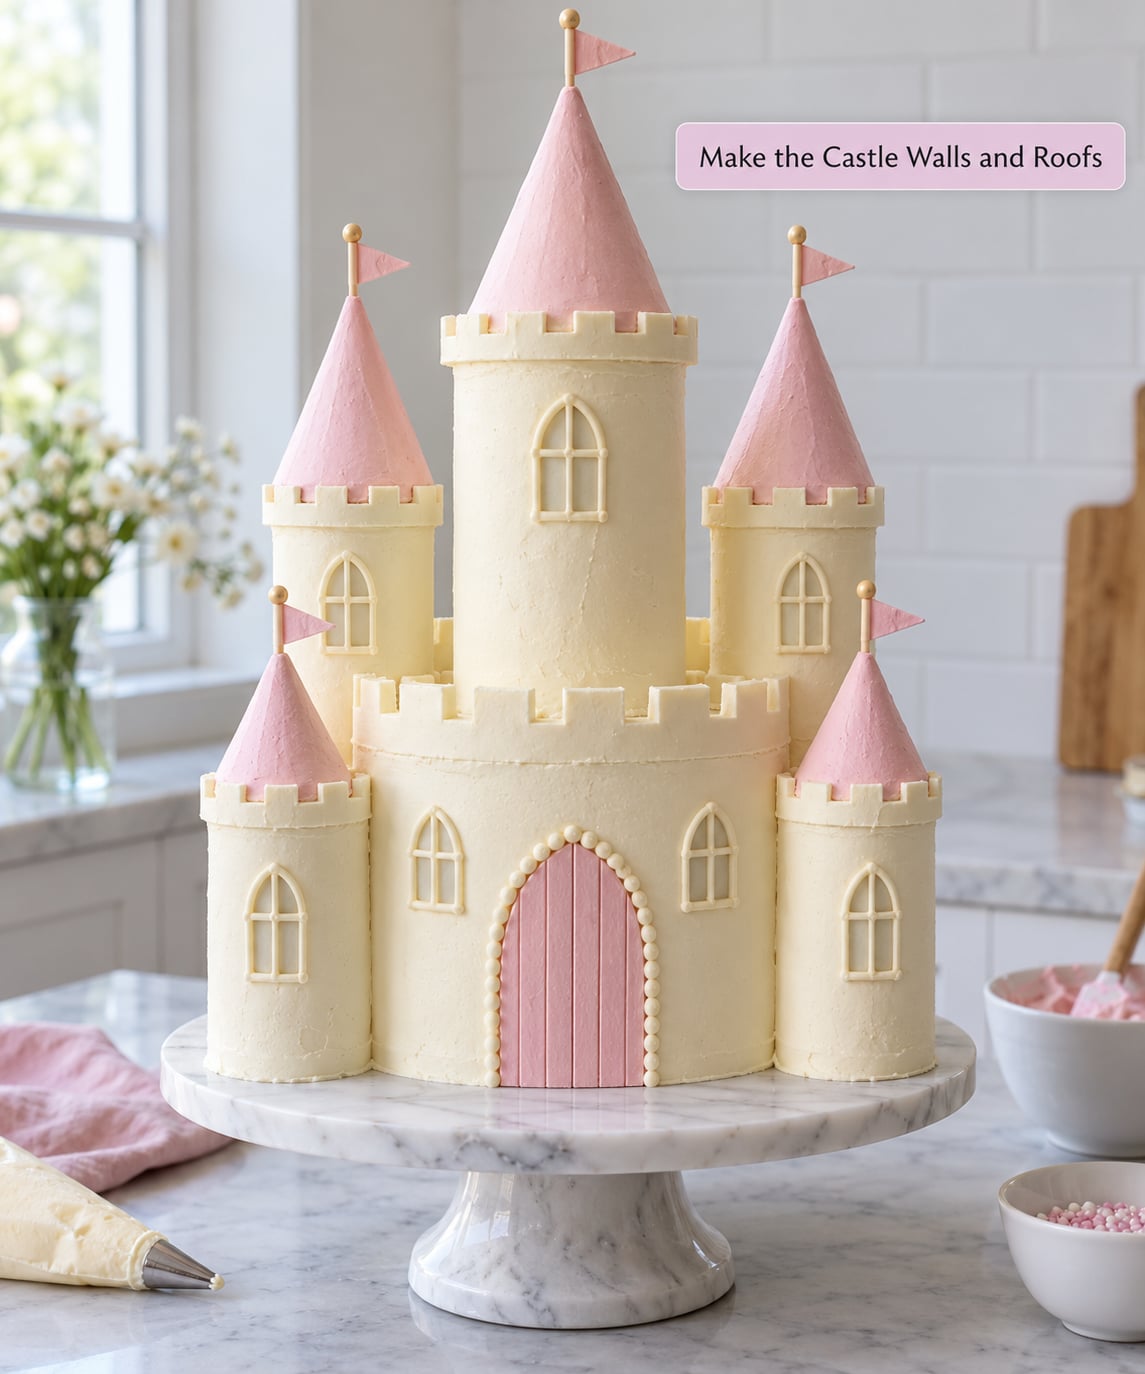
Stonework is the detail that makes it read as a castle rather than a stack of cakes. Roll the chilled cake gently over a brick texture mat with light pressure, or drag a ribbed scraper lightly down the sides. Two or three passes is enough. Overworking it drags the frosting off.
If your frosting is soft, skip the texture pass and do the stonework with piped lines instead. Load a piping bag with the reserved frosting, use a small round tip, and pipe horizontal mortar lines across the front wall, then a few vertical joints offset by half a brick each row. It takes longer than a texture mat but it holds up on a warm day.
For the turrets, press a flat-bottom ice cream cone into the top of each tower cake. The flat base is what keeps it upright. A cone with a pointed end is decoration, not structure, and those lean within about ten minutes.
Give the cones a roof by piping a spiral of the reserved frosting around the cone, or paint them with gel colour thinned with a drop of water and finished with edible glitter. Mini waffle cones work for the smaller towers. Trim the top off a waffle cone with scissors first so it sits flush instead of perched.
Add windows by piping small rectangles and dots of royal icing, or by pressing candy windows on while the icing is still tacky. A strip of candy along the bottom of each window makes a sill and reads well from across a room.
5. Add the Princess Theme Details
Do the door next. Cut a rectangle from a thin chocolate sheet, or use a cookie, and press it on with a dab of buttercream. A walkway of flattened marshmallows or a piped path in a darker shade leads from the base of the wall to the front edge of the board.
Twisted fondant braid, piped in a rope shape around the base of the towers and along the top edge of the wall, adds a tidy bit of trim. Fondant rolled into thin ropes and twisted together works well. So does a piped rope border in the reserved frosting.
Vines and roses are the highest-impact decoration for the least effort. Roll green fondant into thin ropes, curve them up the sides of the tower, and add a small ball of red or pink fondant at intervals for roses. Press a little edible glue at each joint so the vine holds its curve.
For the topper, a fondant crown on a skewer above the tallest tower reads clearly as a princess cake from a distance. A banner cut from fondant or a strip of ribbon tied between two skewers works too. Dust the spires with luster dust last, once every wet surface is dry, so it does not smear.
Nut-free parties are easy here. Swap candy windows and cookies for piped royal icing, replace fondant roses with sugar flowers or royal icing blobs, and check that your cake mix and buttercream are both made in a nut-free facility if it matters for your guest.
6. Finish the Cake and Check the Structure
Any decoration taller than about 10 cm (4 inches) needs its own support. Slide a skewer down into the cake beside the decoration, leaving a little length showing, and tie or pipe a small blob of frosting around it as a collar. Do not simply balance a wand on the roof and hope.
Press down gently on each corner of the board. Nothing should move or creak. If the front sags, add a dowel under that tier and rest it again for an hour in the fridge to firm up.
Chill the finished castle for at least an hour before serving. Buttercream sets firm and slices cleanly when cold, and a chilled cake holds its shape far better in a warm room. Bring it out about 20 minutes before you cut it so the flavour comes through.
Common Mistakes and How to Fix Them
Most castle cake problems are structural rather than decorative, which is good news, because they all have the same handful of causes.
- The cake leans to one side. Almost always a warm cake or an uneven base. Level it properly while cold, and keep a level cake board under the build. If it already leans, add a dowel on the low side to bring the tier back to flat.
- Skewers poke through the tier above. You pushed them too deep. They should stop 2.5 cm (1 inch) short of the top of the lower tier. Mark the depth with a bit of tape before you push, or use dowels rather than pointed skewers.
- Frosting slides off the sides. It was too soft or the cake was warm. Chill the crumb coat properly, beat the buttercream to stiff peaks, and hold the finished cake cool until the last few minutes before serving.
- Fondant tears or softens while you work. Warmth and humidity are the usual culprits, and no amount of kneading fully fixes it. Work in short sessions, keep spare pieces wrapped so they do not dry out, and roll fondant between two sheets of baking paper to stop it sticking to the bench.
- Details smear when you add more frosting. Decorate in order of height, back to front, and only add the fine touches once the bulk of the work is finished. Set delicate pieces in the fridge while you complete the rest.
- Turrets topple over. Pointed cones will not stand up. Use flat-bottom cones, glue them on with edible glue, and let the glue set for 15 minutes before moving the cake.
- The base goes soggy before the party. Frosted cake needs refrigeration and room for air. Store it on a board with a box over it, not wrapped tight, and keep it away from fresh fruit, whose moisture wicks into the crumb.
- Colours look dull or bleed together. Gel colour beats food dye here. Add colour in two stages, chill between them, and dust with luster dust only where the buttercream has fully set.
Frequently Asked Questions
What is the easiest way to make a princess castle cake?
Stack a large round cake on a square cake, frost both in pink buttercream, and push flat-bottom sugar cones into the tops as turrets. Pipe windows and mortar lines, add a chocolate door and a candy path, then finish with a crown topper. It needs no sculpting, no bought castle kit and no specialty pans.
Can I make a castle cake without sculpting the cake?
Yes, and it is the easier way. Choose pieces that are already the right shape instead of carving one cake into a castle silhouette. A round cake for the front wall, a square cake for the back tower and small cakes or cones for the turrets give you the same silhouette with a fraction of the risk and none of the torn crumbs.
How long should I bake and cool the cake pieces?
Bake round layers at 175C (350F) for 22 to 28 minutes and small tower cakes for 18 to 22 minutes. Cool 10 minutes in the tin, then 1 to 2 hours on a rack until completely at room temperature. Warm cake is the most common reason a castle leans or the icing melts during decorating.
What frosting is best for a castle cake that needs to hold its shape?
American buttercream made with shortening or butter and powdered sugar holds pipes, cone spires and sharp edges better than anything else on this list. Swiss meringue buttercream is lighter and less sweet but needs careful chilling. Cream cheese frosting is too soft for towers and will slump the whole way down the cake.
How do I transport a princess castle cake without it breaking?
Chill it thoroughly, place it on a non-slip board mat, and carry the board rather than the cake. Put it on a flat car floor or seat, never the passenger footwell, and drive slowly around corners. A tall cake is safer carried as two sections stacked at the venue than as one tall build in a car.
Can I make a princess castle cake ahead of time?
Yes, and you should. Bake the layers up to two days ahead and wrap them at room temperature, or freeze them unfrosted for up to two months. Crumb coat and stack one day ahead and refrigerate. Frost and decorate the same day you plan to serve, and keep it chilled until roughly an hour before the party.
Conclusion
Start at the beginning of the day before the party: bake the round and square layers plus the small tower cakes, let them cool fully, and wrap them. The next day, stack, crumb coat, chill, then cover. Finishing details like windows, mortar lines and the crown come last, right before the cake goes back in the fridge.
That order is what makes how to make a princess castle cake feel simple rather than stressful. Nothing is hard here so long as the cake is cold, the tiers are supported and the towers have flat bottoms.